Welcome to MovieSlate

HOW MOVIESLATE CAN HELP YOU
MovieSlate is a slate and clapper board— traditional movie-making tools for syncing picture with sound, and photographing shot/production info when starting and ending takes.
MovieSlate logs notes and shot info effortlessly as you shoot— saving you time when capturing and editing footage during post-production.
MovieSlate exports notes and logs to files of various formats— so you can:
- Generate Daily Shot Reports
- Maintain long-term History Archives
- Ingest shot and note data into Apple Final Cut Pro, Avid Media Composer, and Adobe Prelude/Premiere
MOVIESLATE 8 PRO FEATURES
Designed for professionals, a PRO Features subscription (optional in-app purchase) provides these additional features:
Learn More
Timecode Sync. Sync LTC timecode via iOS wired microphone input (On older devices: a headphone jack. On newer devices: a headphone to lightning adapter, or headphone to USB-C adapter). Sync wireless timecode via Tentacle Sync E, UltraSync Blue, AtomX SYNC Ninja V, Timecode Buddy, Pulse, and Wave hardware.
Learn More
Sound Dept Sync + Reports. Log up to 32 tracks on up to two recorders. Generate stunning Sound Reports. Sync data with the latest Zaxcom recorders.
Learn More
Camera Sync. WiFi sync data/timecode and remotely control supportedRED Scarlet/Epic cameras (via 'REDLink' hardware).
Learn More
Reality MultiCam. Documentary and Reality Series data + notes logging for up to 26 cameras. Generate easy-to-read MultiCam Reports.
Learn More
Wireless Timecode Slate (WTS) Sync. WiFi sync timecode, userbits, FPS, scene/take data, and leader/end credits with hardware slates: Denecke TS-TCB and Betso WTCS-1.
Learn More
MovieSlate Cloud PRO. Continuous up-sync, expanded backup/restore; enhanced data sharing with colleagues; archival data view/search/reports from the web; new KeyClips macOS app for Final Cut Pro X integration.
Learn More
App Sync + Remote. WiFi sync data + timecode between MovieSlate apps; and remotely control one app from another.
MovieSlate 8 PRO Feature subscriptions are billed monthly through the Apple App Store. You can manage your subscription settings from your computer with iTunes or from your iOS device:
http://support.apple.com/kb/HT4098.
You can get complete details about the PRO Features by visiting our “In-App Store” in MovieSlate’s Settings > Movie★Slate Store.
Script Department FEATURES
MovieSlate 8’s Script Department features are for Script Supervisors who need
a fast and easy way to line scripts and simultaneously log data.
The Script Dept subscription includes all Pro Features, and:
- Import scripts and revised script pages
- Breakdown scripts (iPad only)
- Line script pages
- Schedule, log, and time scenes both complete and partial
- Log scene descriptions, continuity notes, audio/video quality, and other issues
- Monitor video from Teradek Cube
- Generate Breakdown Report PDFs
- Generate industry-standard Progress Report PDFs
- Generate Editor’s Log PDFs
- Generate Facing Pages Report PDFs
- Export Lined Script page PDFs
MovieSlate Basics: Tabs & Screens
THE TAB BAR
 MovieSlate is an organized collection of screens, each designed around a particular task. Switch screens by tapping buttons in the “tab bar” at the bottom of the screen.
MOVIESLATE TABS & SCREENS
Here’s a brief summary of each of the tabs/screens (details appear later in this User Guide):

MovieSlate - use this screen to enter notes and basic information about the production, timecode, and current shot. After tapping the clapper sticks at the top of the screen to “start a shot”, the current timecode and all the slate’s info are saved to MovieSlate’s shot log History.

DataSlate - use this screen to display a single piece of meta data in large type, to be photographed by the camera. The data can be free-form text, or linked to MovieSlate data fields.

Camera - use this screen to enter additional, optional information about your camera such as Resolution, Exposure, ISO speed, shutter speed, and corresponding filename (for cameras that store video in digital files). This info is also saved to MovieSlate’s shot log History when the shot starts and ends. With a PRO Features subscription (optional in-app purchase), this screen has a Camera Control feature for connecting to, and remotely controlling a camera.

MultiCam - is part of a PRO Features subscription (optional in-app purchase). Use this screen to take continuous notes, simultaneously log, and start/stop shots for up to 26 cameras. When a MultiCam shot is in progress, the slate’s clappersticks are used to create a timecode-stamped "clappersticks" note, rather than starting/stopping a single camera shot. With the Camera Control feature this screen can be used to connect to, and remotely control multiple cameras.

Music Video - use this screen to choose a song from your iTunes music library. The chosen song is used for playback during a music video shoot. MovieSlate automatically syncs its timecode with your song. On the iPad, this screen is not actually a tab, but instead appears on the MovieSlate screen— tap the timecode display, then the keypad’s SYNC button and choose Sync to Song.

Sound Dept - this screen is used by Sound Mixers as an alternative/adjunct to the MovieSlate screen. Part of a PRO Features subscription (optional in-app purchase), this screen manages meta data such as sound roll, folder, media, filetype, sample rate, bit rate, ref tone, filename(s), and up to 32 tracks (each containing two notes).

History - use this screen to view, search, edit, duplicate, shot log data and notes— and to export/email various History Reports. MovieSlate’s shot log History is organized as a collection of Projects (one per production or television episode). Each Project is a collection of Shots. Each shot can contain a collection of Notes.

Settings - from this screen, configure MovieSlate to suit your particular workflow. You can configure both the app’s appearance and behavior. This is also where you’ll find the MovieSlate store, and MovieSlate Cloud registration, login, and settings.

Help - this screen contains much more than the User Guide you are reading now. The FAQs and how-to-videos are periodically updated over an internet connection. Please feel free to contact us with comments, suggestions, or bug reports.

Chat - part of a PRO Features subscription (optional in-app purchase). Use this screen to conduct on-set chats via WiFi with other MovieSlate users (no internet required).

KeyClips - part of a PRO Features subscription (optional in-app purchase). Keyword-based Logging.
MovieSlate’s KeyClips screen logs keywords, markers, and notes which become Final Cut Pro X keywords, sequences, and markers.

Video - Stream camera video from Teradek Cube, Clip, Slice, & Serv Pro
over WiFi to watch while logging, capture frame grabs to use as notes.

Script Dept - part of the Script Dept subscription (optional in-app purchase). Save hours every work week with MovieSlate’s Script Dept. Easily log data while lining a script, with no need to enter/transcribe data later. MovieSlate generates script reports and emails them to your distribution list. Loaded with time-saving features, Script Dept helps you work faster and smarter than pencil+paper or other digital solutions. After all, time is money.
Customizing the Tab Bar

Not all the tabs may fit on iPhone and iPod touch but MovieSlate allows you to slide the tab bar so you can see other tabs. To configure what tabs appear and to set their order: tap the Settings tab and then tap on Tabs.
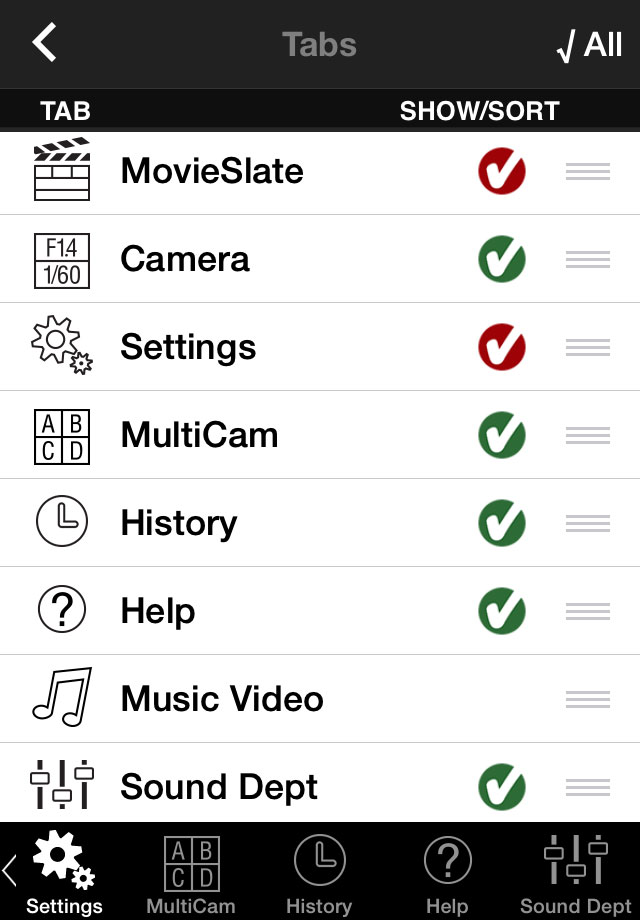
From the Settings > Tabs screen you can rearrange your tabs— so that your most frequently used screens are always visible:
- Tap to enable or disable specific tabs. The MovieSlate & Settings Tabs are required.
- Drag tab buttons to re-order them in whatever order functions best for your workflow.
- To quickly enable or disable all the optional tabs tap the All / None button in the upper-right corner.
Screen Orientation & Brightness
SCREEN ORIENTATION
Portrait and Landscape orientations are supported throughout the app. The app’s screens redraw themselves as you rotate your iOS device.
The tab bar is hidden on the MovieSlate tab/screen, when your iOS device (except iPad) is rotated to the landscape orientation. To view the tabs again, simply rotate the iOS device back to a portrait orientation.
You can lock and unlock screen auto-rotation by:
- Tapping the Slate’s Clapper Hinge - configure this behavior from MovieSlate’s Settings > Behavior > Clapper Hinge > Locks Things.
- Tapping the System Lock Button - swipe up from below the bottom of the screen to reveal the Control Center.
 After doing so, a panel of buttons appears at the bottom of the screen. Tap the right-most icon in this panel (with the circle-arrow on it) to prevent or permit screen rotation.
SCREEN BRIGHTNESS
Quickly change the screen’s brightness by swiping up from below the bottom of the screen to reveal the Control Center. Then use the brightness slider that appears there.
Screen brightness can also be changed from the Settings app > Display & Brightness. When the Auto Brightness button is ON, iOS will automatically dim/brighten the screen to adapt to surrounding lighting. This setting can really help conserve an iOS device’s battery power.
Entering Data into Fields
FIELDS AND LABELS
Many MovieSlate screens contain boxes called fields into which text data is entered. For instance, the MovieSlate screen contains fields labeled as: SLATE, ROLL, SCENE, TAKE, PROD, DIR, DP, CDL, FPS, DATE, CAM.
On the left side of many fields is some vertical text that we call a label. Edit a label by tapping on it. Text field labels can also be edited from MovieSlate’s Settings > Text Fields, and then tap on the round "i" button to the right of a field name.
DATA ENTRY TOOLS
To enter data into a field itself, tap on the center of the field. One of these entry tools will appear:
- Keyboard - standard iOS keyboards.
- Keypad - a small keyboard containing mostly numeric buttons. Other context-sensitive buttons may appear, depending upon the particular field being edited. Switch from the Keypad to the Keyboard by tapping the Keypad’s ABC button.
- Snippet Chooser - a scrolling list of frequently-used phrases called “Snippets”. To add a snippet to the text field, tap the snippet, then tap the Insert button. Tap the comma button to add a comma and space to the text field. Tap the Clear button to remove all text from the field. Switch to the Keyboard by tapping the ABC button. Tap the Snippets: button (at the top of the Snippet Chooser) to switch between various snippet groups. You can manage your snippets and groups from MovieSlate’s > Settings > Text Snippets > Snippet Groups and assign a particular Snippet Group to a field from MovieSlate’s > Settings > Text Fields
- Snippet Expansions - when using the Keyboard, snippet abbreviations can be auto-expanded into complete phrases. You can enable this feature from MovieSlate’s Settings > Snippets > Abbreviations.
- Menus - are full-screen (on iPhone/iPod touch) lists of snippets that require a single tap to simultaneously insert a single snippet and close the menu. A Menu is handy for fields that contain a single word or phrase; while the Snippet Chooser can be better for entering multiple snippets into fields containing many words, such as Notes (particularly on iPhone and iPod touch).
- Date Chooser - a scrolling list of months/days/years used for editing the DATE and/or other fields. To have the DATE field always use the current date, tap the Date Chooser’s Automatic button.
- Filename Editor - the Camera, MultiCam, and Sound Dept screens all contain filename fields. MovieSlate supports many automated filenaming schemes (called filename input styles). When a filename field is tapped, a Filename Editor may, or may not appear. Many filename input styles automatically build filenames using static text, auto-incrementing numbers, and data from other fields— and so often require little or no user input because they are automatically updated each time a shot ends. Select, edit, and create filename input styles from MovieSlate’s Settings > Text Fields.
FIELD INPUT STYLES
From MovieSlate’s Settings > Text Fields, choose which entry tool (keyboard, keypad, date, menus, snippets, filename) should appear for a particular field.
When choosing Keypad, some fields can also be configured (such as SCENE) to use a particular data format such as “123ABC”. This tells the app how to format the next/previous SCENE number in the keypad and elsewhere.
When choosing Snippets, a specific Snippet Group can also be configured. The plain “Snippets” input style defaults to the most recently used Snippet Group.
When editing a field with the Keypad or Snippet Chooser, tap the ABC button to summon the Keyboard.
 When editing a field with the Keyboard, long-tap the field to display the Edit Menu (used for Cut/Copy/Paste). Choose Snippets from the Edit menu to summon the Snippet Chooser. If the field’s existing text is not already in the Snippet Group, an Add ‘text’ button appears at the bottom of the Snippet Chooser.
When editing the DIR and DP fields with the keyboard, the Edit Menu contains a Contacts button, which summons the iOS Address Book from which a person’s name can be chosen.
INCREMENTING NUMERIC VALUES
Swiping. By swiping a finger upward on a field (iOS & iPadOS), you can advance to a numeric field’s next logical value. This is a convenient way to quickly increment the SLATE, ROLL, SCENE, TAKE and other fields which contain numeric data. Likewise, swipe downward on a field to decrement its numeric value. These swipes also work to increment/decrement the numeric elements (if any) of the SOUND FILE1 and SOUND FILE2 fields on the Sound Dept screen.
Filename Editing. Tap on a Filename field (FILENAME, SOUND FILE1, SOUND FILE2, or MULTICAM A-Z) to edit its elements. A Filename Editor appears. On either side of a filename’s numeric element are plus and minus buttons used to increment and decrement a numeric value.
 2
2Keypad up/down buttons. Alternatively, tap a numeric field, then tap one of the black buttons (with up/down arrows and numerals) in the Keypad’s upper right corner. When the value on the black button exceeds three characters, then only the right-most character is displayed on the button (along with a larger up/down triangle).
Auto Increment Slate/Take/Filenames. MovieSlate can optionally auto-increment the SLATE and TAKE numbers each time a shot ends as well as numeric portions (if any) of all FILENAME fields. Enable those behaviors from MovieSlate’s Settings > Slate Behavior > Clapper Behavior > When Shots End.
Auto Reset Timecode. MovieSlate can automatically reset the timecode (to the last manually input value) each time the shot starts. Enable that behavior from MovieSlate’s Settings > Behavior > Shot Behavior > When Shots Start > Reset Timecode on Clap.
Auto Reset Take. MovieSlate can automatically reset the TAKE to “1” each time the SCENE changes. Enable that behavior from MovieSlate’s Settings > Behavior > Reset TAKE to 1.
Auto Reset Slate. With the Sound Dept feature enabled, MovieSlate can automatically reset the SLATE to “1” each time the SROLL (Sound Roll) changes. Enable that behavior from MovieSlate’s Settings > Behavior > Reset SLATE to 1.
Entering Data into Notes
|
CREATING NOTES
|

|
MovieSlate’s shot log History is organized as a collection of Projects (one per production or television episode). Each Project is a collection of Shots. Each shot can contain a collection of Notes.
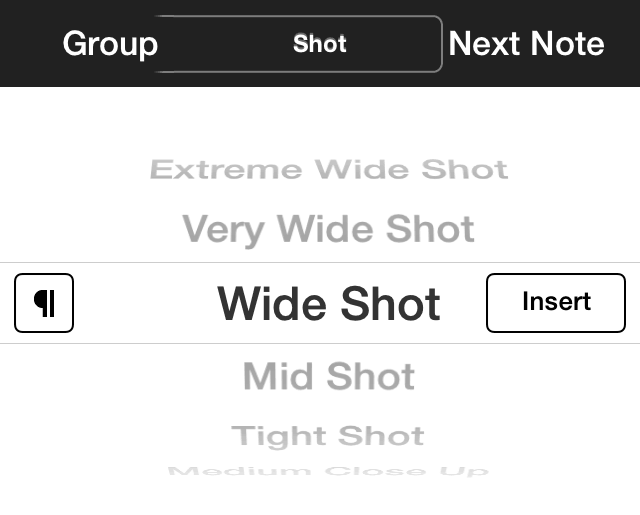
To create a Note, tap a button labeled Note (or a button with the icon shown at the top-right of this page) available on many MovieSlate screens including: Slate, MultiCam, Sound Dept, and History. The Note editor (shown here) will then appear.
Notes are entered into the yellow portion of this screen using either the keyboard, or the list of Snippets (as shown the first screen here).
Enter a Snippet into the note by tapping an item in the Snippets list at the bottom of the screen. Below this list is an Add Line Breaks ON/OFF switch to automatically insert line breaks along with a snippet.
Change Snippet Groups by tapping the Snippets button. Create and edit your own Snippet Groups from MovieSlate’s Settings > Text Snippets.
Create another Note without leaving this screen by tapping the Next Note button (which may look like the icon at the top-right of this page).

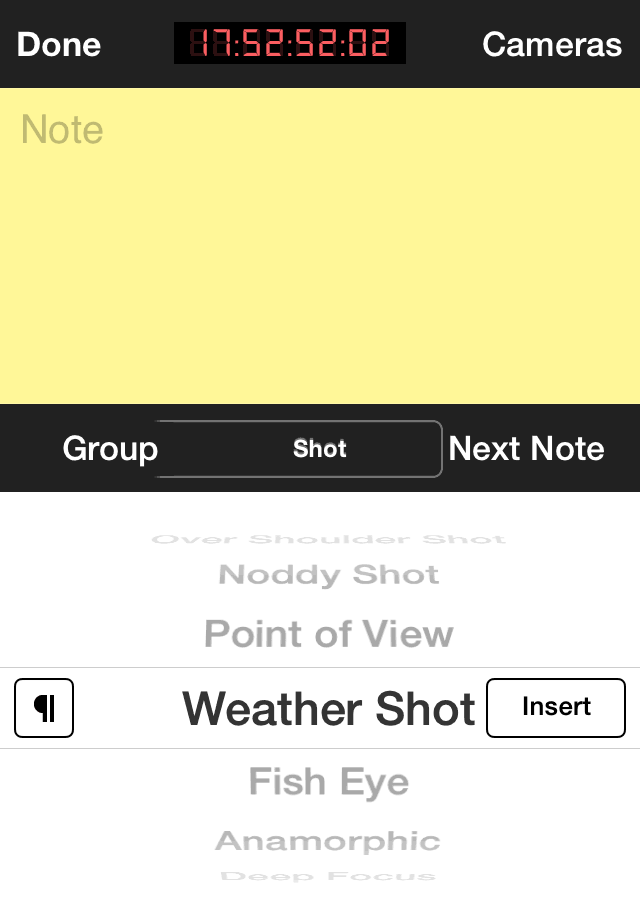
The Keyboard appears after tapping on the yellow note (as shown the second screen here). With the keyboard visible, tap the Snippets button to show the Snippets list again.
To change the Note’s background color tap the button with the square, rainbow icon. Choose a default note colors from MovieSlate’s Settings > Shot Log History > Default Note Color.
Timecode & Stopwatch displays appear when creating a new Note from the Slate, MultiCam, or Sound Dept screens while a shot is in progress.
To switch between timecode and stopwatch modes, tap the time display itself.
To control the stopwatch, tap the time display itself.
To paste time data into the Note, tap the time display itself. All notes are automatically timecode stamped when saved to MovieSlate’s Shot Log History— even when the stopwatch is displayed.
MovieSlate screen: Workflow
|
The usual MovieSlate workflow
|
|
- Choose a Project. Tap the slate’s PROD (Production) field to create a new Project, or choose/edit/clone an existing Project. You must enter a Production name for each Project. All other Project fields are completely optional, and can appear in some of MovieSlate’s History Reports. With the optional Timecode Sync plugin enabled, “Networked Projects” from other MovieSlates on the WiFi network will also appear after tapping PROD > Choose a Project.
- Enter data into fields (as described previously). Most slate field data is persistent; only changing when you manually edit the data. MovieSlate can automatically update some data for you (such as the DATE), and auto-increment some data (such as SLATE, SCENE, TAKE, and Camera/Sound Filenames). So even though MovieSlate saves a huge amount of data to its shot log History for each shot, you generally change a very small amount of data from shot to shot. Note that you can always correct a shot’s incorrect or missing data later from the History screen.
- Choose your camera’s frame rate by tapping the FPS field. Note that choosing Custom (text only) does not actually change the rate at which the timecode is displayed; it merely changes the text that appears in the slate's FPS field.
- Set the Timecode by tapping the timecode display, and set timecode values using the Keypad, or sync to an external timecode source.
- Photograph your MovieSlate by holding it up to the motion picture camera, thus allowing it to be photographed as part of the scene.
- Tap the clapper sticks to start a shot— simultaneously saving it’s data and the timecode to MovieSlate’s shot log History. MovieSlate then goes into a “shot in progress” mode, and presents tools for taking notes during the shot. For more details, please read the “Starting a Shot” section of this User Guide.
- When the scene ends (the Director calls “cut”), tap the slate’s End Shot button. This saves the ending timecode and your notes to the shot in MovieSlate’s shot log History. For more details, please read the “Starting a Shot” section of this User Guide.
- Export History Reports. At the end of the day, export your shot log reports from the History screen.
The Data-Only MovieSlate workflow
If you’re not interested in logging timecode start/end points, you can use MovieSlate’s Data-Only workflow. Follow steps 1 - 2 above, then follow these additional steps:
-
-

- Enter Data-Only mode by tapping the timecode display, the tapping the “NO Timecode” keypad button.
- Tap the Log Shot button. This saves all the shot info (excluding timecode start/end) to MovieSlate’s Shot Log History.
The Import History, then Slate workflow
Perhaps you prefer to prepare all shot data on a computer, import that data into MovieSlate, and use it to slate each shot— capturing/saving timecode, notes, and GPS location information in real time. Here’s how:
- Get MovieSlate CSV Templates into which you’ll enter data. MovieSlate emails Project and History CSV templates to your computer. To get the templates, go to: MovieSlate’s Settings > Shot Log History > CSV Templates.
- Open CSV Templates in a Spreadsheet program on your computer:
- MovieSlate Projects Template.csv - to create a list of projects to import
- MovieSlate History Template.csv - to create a list of shots to import
- Edit the Spreadsheets. Do not edit the top three rows, and add your data to the other rows. It is OK to delete any column except the first one (Production).
- Export the Spreadsheets as CSV Files. The files must be named exactly like the first row in each spreadsheet.
- Email the CSV Files to MovieSlate. Attach the new CSV files to an email, and send the email to your iOS device.

- Open the Email on your iOS device. Run the iOS Mail app, and view the email message you sent. Tap on a CSV attachment icon that appears near the bottom of the email (start with the MovieSlate Projects.csv file). A spreadsheet-like view of the attachment appears. Tap the action button (shown at right). A menu appears. Tap the Open with MovieSlate option. MovieSlate will open and import your data.
To Slate the Imported History

- Load a Shot’s Data. Go to History > Shot Details and tap the slate button (shown at right), then tap the Copy to Slate, then Delete button to load the shot’s data into the Slate, Camera, and Sound Dept screens. The existing shot is immediately deleted from History, but will be saved as a new shot once you tap the clapper sticks to start a new shot (the next step).
- Important! Start a New Shot by tapping the clapper sticks (or the Roll Sound button on the Sound Dept screen).
- Optional Set your Prefs. Choose what should happen every time the Copy to Slate, then Delete button is tapped. Do this from MovieSlate’s Settings > Shot Log History > History Data Import > Copy-to-Slate, and then.
MovieSlate screen: Fields
|
SLATE FIELDS
|
|
Here’s what each field on the MovieSlate screen is generally used for:
- SLATE - often a unique ID that’s assigned to each shot. Many production companies label this field as SEG.
- ROLL - the camera’s roll number, indicating the physical media (reel, roll, tape, disc, cart) on which a particular shot’s footage can be found.
- SCENE - which scene of the script is being shot. Trailing letters generally denote which setup is being shot for the scene. A new setup happens whenever anything major changes during the shot (such as a new camera angle). Tap the keypad’s “R/S” key to insert/remove a leading “R” to denote a scene that has been Reshot sometime after principal photography has wrapped.
- TAKE - how many times the current scene has been shot. Several keypad keys will insert/remove leading/trailing letters: a leading “FT” denotes a False Take; a trailing “P/U” denotes a Pick Up shot; and a trailing “SER” indicates to post production that a single shot actually includes a Series of takes.
- PROD - the Production (or Project) title. In MovieSlate, every shot must belong to a Project. Note that MovieSlate won’t let you “start a shot” until you’ve entered values for PROD, ROLL, SCENE, TAKE, UNIT, DEPT, LOGGER (although SCENE and TAKE are optional for MultiCam shots).
 CDL - a colorist’s “Look ID” as defined by Technicolor’s ASC CDL standard. Each Project can have its own unique set of color looks. To import ASC CDL data into MovieSlate, start by exporting a “.CCC” file from Technicolor’s Digital Printer Lights desktop application. Email the “.ccc” file to your iOS device. From the iOS Mail app, tap and hold your finger over the “.ccc” file icon in the email message, and choose “Open with MovieSlate”. MovieSlate will open, and prompt you to choose a Project into which the ASC CDL data should be imported. When a “MovieSlate XML” file is exported from the History screen, it contains all ASC CDL data.
- FPS (Frames Per Second) - the frame rate at which timecode is displayed. This would normally be set to match your camera’s frame rate. In MovieSlate, all FPS rates are NDF (Non Drop Frame) unless marked as DF (Drop Frame). 29.97 DF, 30 DF, and 59.94 DF rates are used to keep timecode in sync with wall clock time. Note that choosing Custom (text only) does not actually change the rate at which the timecode is displayed; it merely changes the text that appears in the slate's FPS field. When Custom is chosen, a menu of snippets from the FPS Snippets Group is displayed (if it exists). Otherwise, the keyboard will appear after choosing Custom.
- DIR & DP - the Director’s name, and Director of Photography’s name. When editing the DIR or DP fields with the keyboard, long-tap the field to summon the Edit menu, then choose Contacts to summon the Address Book from which a person’s name can be chosen.
- DATE - the date on which the shot was recorded.
- DAY - the number of the production shooting day on which the shot was recorded.
- CAM - which Camera(s) MovieSlate is recording shot log History data for. When a MultiCam shot is in progress, this field displays a MultiCam icon and cannot be edited.
- INT/EXT/NITE/MOS - general shot descriptors. INT/EXT indicate that the shot was photographed as an Interior or Exterior. MORN/NOON/DAY/EVE/NITE indicates the time of day. Choose AUTOMATIC to always display one of these values based upon the actual time of day. MOS appears on a slate when a scene is filmed without sound (we’ve heard many fascinating explanations of the term’s origins). You can choose to honor a tradition of leaving the clapper sticks in a vertical position for MOS shots from MovieSlate’s Settings > Behavior > Shot Behavior > Clapperstick Vertical for MOS. Or choose to display a hard-to-miss MOS label over the clappersticks from MovieSlate’s Settings > Behavior > Shot Behavior > Clapperstick Label for MOS.
- TITLE - an optional title for the shot. If present, the TITLE appears in the History screen’s scrolling list of shots.
- DATA1 through DATA6 - can be anything you like. Again, you can change a field’s label by tapping on it. These fields can be viewed by swiping the clapper sticks and/or timecode display left/right.
CHANGING SLATE FIELDS
The Slate tab can be customized by changing many of its fields. For example, tap the CDL field's label. A menu appears with these choices:
- Choose a Field - from a menu of data fields; even those from the Camera and Sound Dept tabs. For example, choosing UNIT would replace the CDL field with the UNIT field's label and data.
- Edit Field Label - changes the field's displayed label, but not the data field associated with it. For example, changing the CDL field's label to UNIT will not cause the current UNIT field data to display in the CDL field's box.
- Forget Field Choice - clears the associated data field, resulting in an empty FIELD box. Tap on the FIELD box again to choose an associated data field.
Some slate fields cannot be changed, such as: SLATE, ROLL, SCENE, TAKE, PROD, DIR, DP, DATE, DIR, FPS.
However...
SLIDING FIELD PANELS
Several sections of the MovieSlate tab can slide left/right to reveal additional fields which can be changed. Sliding field panels include: clappersticks, timecode, SLATE-ROLL-SCENE-TAKE, PROD-DIR-DP, and CDL-INT/EXT/NITE/MOS.
To slide a field panel: swipe your finger horizontally over these sections to reveal additional data fields and controls. For details, see the Sliding Field Panels section of this User Guide.
MovieSlate screen: Clapper & Hinge
|
CLAPPER STICKS
|
|
The clapper sticks appear at the top of the MovieSlate tab's screen. You can customize the appearance of the clapper and slate from MovieSlate’s Settings > Appearance.
By default, tapping the clapper sticks will “start a shot”— saving all slate data and the current timecode to MovieSlate’s shot log History (if the PROD, ROLL, SCENE, TAKE fields are not empty). Note that you can choose not to save shots to History from MovieSlate’s Settings > Shot Log History > Save History button. When using the optional MultiCam feature and a MultiCam shot is in progress, the clapper sticks do not start shots, but instead adds a timecode-stamped "clapperstick" note to the MultiCam master shot.
You can alter the clapper stick behavior from MovieSlate’s Settings > Behavior > Shot Triggers:
- Tap Clapper - starts a shot. When a MultiCam shot is in progress: instead of starting a shot, a time-stamped “clapperstick” note is added to the MultiCam master shot.
- Tap Clapper, then tap Anywhere - a tap on the clapper sticks “arms” the slate. Then tap the slate anywhere else to actually start the shot.
- Tap Clapper or Shake to Clap - tap the clapper (as in Tap Clapper above), or vigorously shake your iOS device to start the shot.
- Tap Clapper or Change Volume - tap the clapper (as in Tap Clapper above), or change the system audio volume (convenient when using a Bluetooth selfie remote control).
- Clap External Clappersticks - for use with an external clapper stick case such as ikan’s T-Slate. Shortly after the external sticks clap, MovieSlate’s clap detection software triggers the shot, saving it to History. In this mode, a Detect External Claps button appears over the onscreen clapper sticks. Tap the button to enable external clap detection prior to each shot. After enabling detection, two additional buttons appear: Detect Motion and Detect Sound. You can tap those buttons to enable/disable that form of clap detection. When motion and sound are both enabled, detection is quite good. However, you may experience false positives in some locations as the clap detection software is experimental and will be improved in later MovieSlate releases. To help prevent false-positives, clap detection is auto-disabled when the shot starts. During a shot, MovieSlate’s In-Progress screen contains a False Take button to quickly undo any false positives. Note that this feature is not compatible with Music Video mode and is not available on macOS.
When Using External Clappersticks, these additional settings come into play:
- Arm Before Each Shot - helps reduce false positives by showing a Detect External Claps button on MovieSlate’s clappersticks— which must be tapped to arm external clapperstick detection before each shot.
- Sound Sensitivity - can improve the reliability of external clapperstick sound detection.
CLAPPER HINGE

A “hinge” button appears on the left or right side of the clapper sticks. You can customize the location and appearance of the hinge from MovieSlate’s Settings > Appearance > Clapper Hinge. You can configure its behavior from MovieSlate’s Settings > Behavior > Clapper Hinge.
Here are the possible actions when the hinge button is tapped:
- Does Nothing - the button is just decoration, and performs no action.
- Starts Shot - immediately starts the shot. When a MultiCam shot is in progress: instead of starting a shot, a time-stamped “clapperstick” note is added to the MultiCam master shot.
- Tap Anywhere - a tap on the hinge “arms” the slate. Then tap the slate anywhere else to actually start the shot.
- Simulates Denecke Sticks - when the hinge is tapped, the sticks open, and the Before Clap credits animation is shown in a loop below the timecode— as if the physical sticks had opened on a synced Denecke TS-TCB slate. Tap the hinge to hide the TS-TCB display and close the sticks (without actually starting a shot).
- Locks Things - displays a list of items which can be simultaneously locked:
- Locks Nothing - clears all hinge lock options, and returns to the main Clapper Hinge Behavior menu.
- Locks Rotation - prevents the screen from automatically rotating when your iOS device is rotated. This MovieSlate feature is not available for iPad (in order to support iPadOS Split-Screen Multi-Tasking). You can also lock and unlock screen rotation by swiping down from the top-right corner of your screen to open Control Center, then tapping the orientation lock button (with the circle-arrow icon). The system-wide rotation lock supecedes MovieSlate’s rotation lock.
- Locks Timecode Scrolling - locks the Slate tab's timecode sliding panel.
- Locks Clapper Scrolling - locks the Slate tab's clappersticks sliding panel.
- Locks Clapper Clapping - locks the Slate tab's clappersticks so when accidentally tapped, a new shot is not triggered.
- Locks Data Scrolling - locks the Slate tab's other sliding data panels.
- Locks Data Editing - prevents data from being entered into slate fields. On busy sets, this can prevent accidental changes to your slate data by unauthorized personnel. Of course, setting an iOS password might do this better (from the Settings app > General > Passcode Lock).
MovieSlate screen: Timecode
|
TIMECODE DISPLAY
|
|
In the center of the slate is a digital display showing elapsed timecode (hours : minutes : seconds : frames). When FPS is set to a DF (Drop Frame) rate, the timecode display’s last colon becomes a semi-colon.
 To configure the timecode, tap the center of the timecode display, and the Keypad appears.
Here’s what the Keypad buttons do:

- Manually “jam” (set) the timecode to match your camera’s timecode using the Keypad’s 0 through 9 buttons. Timecode is entered left to right as hours : minutes : seconds : frames. Start by entering your camera’s current timecode plus about 10 seconds. Begin shooting/recording from your camera, and when your camera’s timecode matches the display, tap the Keypad’s blue Done button.
- Tap the wide “01:00:00:00” button to quickly set the timecode to the last manually jammed value (which actually appears on the button in place of 01:00:00:00). Note that this is the same timecode value used to automatically reset timecode when starting a shot (when MovieSlate Settings > Behavior > Shot Behavior > When Shots Start > Reset Timecode on Clap is checked).

- Tap the red button to clear the timecode display to all zeroes.
- Tap the “Clock” button to use Wall Clock Time— which is not always the same as timecode. This button is inappropriate for use with 23.976, 29.97, and 59.98 FPS
 because timecode at those NDF (Non Drop Frame) rates run 0.1% (0.001) slower than wall clock time; drifting away from clock time by 3.59 seconds every hour. When you attempt to use those incompatible rates with clock time, MovieSlate will warn you (but not prevent you from doing so). You can, however, avoid drift by using DF (Drop Frame) rates which are designed to keep timecode and wall clock time in sync.

- Tap the pause/play button (lower left corner) to stop/start the timecode. In clock mode, this simply pauses the timecode animation.
- Tap the blue “Done” button to accept your changes and close the Keypad.
- Tap the NO Timecode button to enter Data-Only mode and save shots to MovieSlate’s Shot Log History sans start/end timecode.

- Tap the SYNC button, then choose “Sync to Song” to sync timecode to a song, and then see the Music Video screen-- where song start/end points can be set.

- Tap the SYNC button (when PRO Features are enabled) to send or receive timecode and/or data to other MovieSlates via WiFi. Choose exactly which sync data the receiving MovieSlate accepts from MovieSlate’s Settings > Timecode Sync > Receive Data. Via WiFi, you can also sync timecode with Wireless Timecode Slate (WTS) hardware from Denecke and Betso, or wireless timecode generators such as the Tentacle Sync E or Timecode Systems’ UltraSync Blue, AtomX SYNC Ninja, and (TCS) Hubs such as the :pulse, :wave, and :buddy master. Via wired microphone input (On older devices: a headphone jack. On newer devices: a headphone to lightning adapter, or headphone to USB-C adapter), you can also send LTC timecode to, and receive LTC timecode from compatible cameras, sound recorders, timecode generators, and even other MovieSlate apps.
MovieSlate screen: Sliding Field Panels
|
Several sections of the MovieSlate tab's screen can be scrolled left/right. Swipe your finger horizontally over these sections to reveal additional data fields and controls.
You can prevent these panels from sliding from MovieSlate’s Settings > Behavior > Clapper Hinge > Locks Things, then tapping on the clapperstick’s hinge.
|
|
PAGE SCROLL DOTS
At the bottom of most sliding field panels are a row of small, outlined dots (see example below). Each dot represents a “page”. A solid dot represents the current page.
CDL / INT-EXT-NITE-MOS / FILE
Swipe the CDL & INT-EXT-NITE-MOS section to the left to reveal the camera file field. Swipe back to the right to reveal the the other set of fields.
SLATE / ROLL / SCENE / TAKE
Swipe the SLATE / ROLL / SCENE / TAKE section to the left to reveal three customizable fields; and left again to reveal two more customizable fields. By default, the customizable are set to ROLL / SCENE / TAKE and SCENE / TAKE. Tap on a customizable field’s label to choose a different associated field.
PROD / DIR / DP
- Swipe left once to reveal a blank space for a Production Graphic which is displayed on the slate (and appears at the top of HTML reports: Formatted HTML, and Sound Report). Tap the blank space to choose a graphic from your iOS Photo library. The graphic will then appear momentarily. Tap the production graphic to choose one of these actions:
- Scale to Fit - uses the entire graphic without cropping it
- Scale to Fill - fills the blank space with the graphic, cropping if needed
- Choose - replace the current graphic with a different graphic
- Clear - remove the graphic from the blank space
- Swipe the graphic to the left to reveal three unassigned FIELD boxes. Tap on a FIELD box to choose its associated data field.
- Swipe to the right twice to return to the PROD, DIR, and DP fields
TIMECODE DISPLAY
- Swipe right to reveal additional, customizable data fields.
- Swipe left to reveal the UBITS (User Bits) display. User Bits are static data sent/received along with timecode via WiFi and the wired microphone input/output (when the optional Timecode Sync plugin is enabled). User Bits data traditionally consists of codes, dates, tape reel numbers, or other organizational information. Tap the User Bits display to edit each hexadecimal digit using the Keypad. Tap the Keypad’s MDY button to enter the current Date in Month-Day-Year format. Tap it again to enter Day-Month-Year. Tap it again to enter Year-Month-Day. Once User Bits have been set to Date, they will always reflect the current date.
- Swipe left again to reveal additional, customizable data fields.
CLAPPER STICKS
- Swipe right once or twice to reveal additional, customizable data fields: TITLE and DATA1.


- Swipe left (twice on iPhone and iPod touch) to reveal buttons for displaying color, grayscale, and focus charts— which can be useful to your camera operator when adjusting white balance or setting lens focus. You can configure the content for these charts from MovieSlate’s Settings > Appearance, then Color Chart, Gray Card, Focus Chart.
- Swipe left (once) to reveal buttons for creating new text/audio/photo notes for the previous or next shot. You can determine which from MovieSlate’s Settings > Shot Log History > Save Clapper Notes.
- Note - create a text note. Each note is date/time stamped. Each shot can contain multiple notes.

- Microphone - create a voice note (available on iOS devices with microphones).

- Camera - create a picture note by taking a new photo (from iOS devices with cameras), or choosing an existing picture from the iOS Camera Roll or Photo Library (useful for importing sketches created by iOS drawing apps).
When shooting interviews, notes are a useful way to document what remarkable thing was said, and when. You can enter text from the keyboard, and quickly build notes from Snippet phrases. Customize your snippets from MovieSlate’s Settings > Text Snippets.
MovieSlate screen: Starting a Shot
|
SHOT START ACTIONS
|
|
When you tap the slate’s clapper sticks, many things can happen:
- A set of “pre-roll” beeps can be heard as an audio on-set warning that the shot is about to start. You can set the number of beeps, the interval between beeps, and the pre-roll duration from MovieSlate’s Settings > Behavior. If you have chosen a Music Video song, beeps may not be heard when the music starts playing. Music playback begins at the song’s Start point minus the pre-roll duration you have set.
- If you’ve chosen a Music Video song, the song will start playing (at the song’s Start point minus pre-roll duration). You can add a extra seconds of silence before playback begins from MovieSlate’s Settings > Behavior > Song Delay.
- The clapper sticks close, making a “clap” sound. You can set this sound from MovieSlate’s Settings > Slate Behavior > Clapper Sound. You can enable/disable all sound effects from MovieSlate’s Settings > Behavior > Shot Behavior > Play Sound Effects.
- A full-screen “Flash Graphic” is displayed behind the timecode display, at the instant the clapper sticks come together. Choose the graphic from MovieSlate’s Settings > Appearance > Flash Graphic. Choose how long the flash graphic is displayed from MovieSlate’s Settings > Appearance > Flash Duration.
- The timecode can be reset to the most recent value you entered using the Keypad. You can enable/disable this feature from MovieSlate’s Settings > Behavior > Shot Behavior > When Shots Start > Reset Timecode on Clap.
- The timecode can be shown if it was not already visible. You can enable/disable this feature from MovieSlate’s Settings > Behavior > Shot Behavior > When Shots Start > Show Timecode on Clap.
- The shot’s starting timecode can appear for 4 seconds. You can enable/disable this feature from MovieSlate’s Settings > Behavior > Shot Behavior > When Shots Start > 4 Second Timecode Freeze.
- The User Bits can be shown briefly. You can enable/disable this feature from MovieSlate’s Settings > Behavior > Shot Behavior > When Shots Start > Flash User Bits on Clap.
- A Credits “Before Clap” or “After Clap” animation can appear— displaying individual slate and production field values full screen for an instant so they can be photographed by the motion picture camera. This visual data can be useful when viewed frame-by-frame in a post-production editing suite. MovieSlate’s Settings > Behavior > Show Credits: Sticks Open; Sticks Clap; Shot Ends determine:
- Duration of each credit (in seconds or frames) - tap each row’s number button
- When/If Credits Appear - tap each row’s ON/OFF switch
- Credit Fields to Display - tap each row itself to choose the fields
- Timecode, Slate, and Production data are saved as a new shot to MovieSlate’s shot log History. You can enable/disable this from MovieSlate’s Settings > Shot Log History > Save History button. If a MultiCam shot is in progress, a timecode-stamped “clappersticks” note is added to the MultiCam master shot, instead of starting a new shot.

- A red “REC” badge appears (when a MultiCam shot is not in progress) on the MovieSlate tab bar icon, indicating that a shot is in progress. A similar red badge appears on MovieSlate’s application icon.
- The Shot In Progress screen appears - when a MultiCam shot is not in progress, and MovieSlate’s Settings > Shot Log History > Save History button is ON.
- MovieSlate can speak selected credits or data fields. - You can select the voice, speed, pitch, and which fields are spoken when the MovieSlate’s Settings > Slate Behavior > Speak Credits > Speak Before Clap button is ON.
MovieSlate screen: Shot In Progress Screen
|
SHOT “IN PROGRESS” SCREEN
|
|
After the shot starts, this screen appears (when MovieSlate’s Settings > Shot Log History > Save History button is ON). The screen contains several items:

- Un/Lock button - locks or unlocks the screen’s auto-rotation. Note that this button does not override the iOS system’s orientation lock.

- Location button (has a compass arrow icon) - uses the iOS device’s GPS radio (and/or WiFi and cellular towers) to locate the device’s current geographical location, look up the nearest address, and save all that Location information in MovieSlate’s shot log History. It can take up to a minute to obtain new map coordinates (latitude/longitude). An internet connection is required to lookup street address nearest to the map coordinates. You can have MovieSlate automatically refresh map coordinates each time a shot is started by enabling the Find & Save Locations and Refresh on Each Shot buttons from MovieSlate’s Settings > Shot Log History, then running the Settings app and enabling “Location Services” for MovieSlate. Note that frequent map coordinate refreshing can quickly drain your iOS device’s battery.
- TITLE field - an optional title for the shot. If present, the TITLE appears in the History screen’s scrolling list of shots.
- Timecode display - used for reference only. Timecode values cannot be changed while a shot is in progress.
- Note, Microphone, Camera buttons - tap these buttons to create new text/audio/photo notes for the current shot:
- Note - create a text note. Each note is date/time stamped. Each shot can contain multiple notes.

- Microphone - create a voice note (available on iOS devices with microphones).

- Camera - create a picture note by taking a new photo (from iOS devices with cameras), or choosing an existing picture from the iOS Camera Roll or Photo Library (useful for importing sketches created by iOS drawing apps). When the Video tab is connected to a Teradek Cube, you can also grab a still from the streaming video.

- Keywords - create a note containing custom, shot-specific keywords for inclusion in Final Cut Pro X XML reports.
When shooting interviews, notes are a useful way to document what remarkable thing was said, and when. You can enter text from the keyboard, and quickly build notes from Snippet phrases. Customize your snippets from MovieSlate’s Settings > Text Snippets.
- Picture Quality and Sound Quality ★★★★★ Star Ratings - tap one of the five dots to set a star rating for the current shot’s picture and/or sound quality. Star ratings are saved with the shot’s other data in MovieSlate’s shot log History. To clear a star rating, tap on any star and drag your finger to the left until no stars appear.
Circle
- Circle Take button - mark the shot as a good take in the MovieSlate shot log History— to be “printed” (processed by the film laboratory). Circles appear in MovieSlate’s History Reports. When a take is completed, the director yells, "Cut" and if the director wants the take converted to dailies, the director will also yell, "Print". Once the director yells, "Cut! Print!", the script supervisor, the camera assistant, and the Sound Mixer circle the take number on their log sheets.
SS
- Second Sticks button - immediately ends and deletes the shot as though it never happened (so you can “do over”).
FT
- False Take button - immediately ends the shot. The shot that was in progress can be automatically deleted from MovieSlate’s shot log History, or its TAKE field can be prefixed with “FT”. The Shot In Progress screen is closed, and certain fields are automatically incremented. These behaviors are set in MovieSlate’s Settings > Behavior > Shot Behavior > On False Takes. You can also mark false takes from the History details screen by tapping on a shot’s TAKE field, then the keypad’s FT button.
End Shot
- End the Shot button - saves an ending timecode to the current shot in MovieSlate’s shot log History, then closes the Shot In Progress screen. If MovieSlate’s Settings > Behavior > Shot Behavior > When Shots End > Confirm End the Shot is ON, then you are prompted to confirm that you want to end the shot:
- No - do not end the shot.
- Yes - end the shot.
- Yes, and stop asking - end the shot, and stop displaying the confirmation.
MovieSlate screen: Ending a Shot
|
ENDING A SHOT
|
|
To end a shot, tap the End the Shot button on the slate’s Shot In Progress screen.
When a shot ends, many things can happen:
- You may be asked to confirm that you actually want to end the shot. This can be changed from MovieSlate’s Settings > Behavior > Shot Behavior > When Shots End > Confirm End the Shot.
- The shot’s ending timecode can be paused. This can be changed from MovieSlate’s Settings > Behavior > Shot Behavior > When Shots End > Pause Timecode when Shot Ends.
- The “Shot In Progress” screen can be closed immediately. This can be changed from MovieSlate’s Settings > Behavior > Shot Behavior > When Shots End > Show Slate when Shot Ends.
- A “Tail Sticks” Slate screen can be shown upside down, with the shot’s ending timecode. This can be changed from MovieSlate’s Settings > Behavior > Shot Behavior > When Shots End > Show Tail Sticks.
- The SLATE, TAKE, and Camera/Sound Filenames can be automatically incremented. This can be changed from MovieSlate’s Settings > Behavior > Shot Behavior > When Shots End.
- The timecode is reset to a song’s Start Point when MovieSlate is in Music Video mode. For details, refer to the Music Video screen section of this User Guide.
- A Credits “Shot Ends” animation can appear— displaying individual slate and production field values full screen for an instant so they can be photographed by the motion picture camera. This visual data can be useful when viewed frame-by-frame in a post-production editing suite. MovieSlate’s Settings > Behavior > Shot Behavior > Show Credits: Sticks Open; Sticks Clap; Shot Ends determine:
- Duration of each credit (in seconds or frames) - tap each row’s number button
- When/If Credits Appear - tap each row’s ON/OFF switch
- Credit Fields to Display - tap each row itself to choose the fields
- MovieSlate can speak selected credits or data fields - when you end your shot. You can select the voice, speed, pitch, and which fields are spoken when the MovieSlate’s Settings > Behavior > Speak Credits > Speak After Shot button is ON.
Video screen
|
TERADEK VIDEO SCREEN
|
|
Use the Video screen to connect with Teradek Cube and Teradek Clip encoders over WiFi, and monitor their streamed video— fullscreen, with an optional timecode/info overlay. Once connected to a Cube or Clip, video can also be viewed from MovieSlate’s Notes screen (on iPads), and screen capture stills can be saved with notes to MovieSlate’s shot log History.
CONNECTING TO A TERADEK ENCODER
- Configure the Network - from the Settings app, tap the WiFi icon, and choose the network that the Teradek Encoder is using.
- Search for Teradek Encoder - from MovieSlate, tap the Video tab, then the Connect button in the upper right corner of the Video screen. A list of Encoders will appear.
- Choose a Teradek Encoder - from the list. The video will appear full screen.
WATCHING VIDEO - FULL SCREEN
- Full Screen Video - can be seen from the Video tab after connecting to a Teradek Encoder video source (as described above).
- Show/Hide Encoder Info + Timecode - by tapping the round Info button at the top right corner of the video. On iPhone: tap once to display running timecode; tap again to display Encoder info; tap again to hide the displays. On iPad: tap to toggle the timecode and Encoder info displays.
- Capture a Still - of the video to an image note by tapping the Save Image Note button. Configure what should happen next from MovieSlate’s Settings > Shot Log History > After Saving Images:
- Do Nothing - saves the note, and briefly displays a confirmation message.
- Edit Image - displays the image editor for adding annotations. Note images can also be edited from the History tab.
- Add Text - displays the note editor for typing accompanying notes. Note text can also be edited from the History tab.
- Stop Video Streaming - by tapping the Done button. iPad users: streaming video can be seen in the Notes editor until this Done button is tapped.
WATCHING VIDEO + TAKING NOTES (IPAD ONLY)
- Connect to a Teradek Encoder source - as described above. Do not tap the Done button from the full screen video viewer on the Video tab— or else the video won’t be available in the Notes editor.
- Create a Text Note - from the MultiCam tab. Or from the MovieSlate tab:
- During a Shot - by tapping the Note button.
- Before/After a Shot - by sliding the clappersticks to the left, and tapping the Note button.
- Video Appears - in the upper right corner of the Note Editor screen. While taking MultiCam notes, the video can be temporarily hidden by scrolling it upward, to reveal more of the camera list.
- Zoom Video Display - by double-tapping the video, or by pinching the video with two fingers.
- Show/Hide Encoder Info + Source - by tapping the round Info button at the top right corner of the video. Choose a new Teradek Encoder source by tapping the Source button at the top of the video.
- Save a Still - of the video to the note by tapping the Camera button. Afterwards, the streaming video viewer is replaced by a thumbnail of the still image that is now attached to the note being edited. Tap the New Note button to start a new note and again view the streaming video.
- Stop Video Streaming - by tapping the Done button from the full screen video viewer on the Video tab.
Music Video screen
|
MUSIC VIDEO SCREEN
|
|
MovieSlate can help automate Music Video shoots by playing back a portion of a song during a take. Use the Music Video screen to choose a song from your iPod library for playback. MovieSlate automatically syncs its timecode with your song, and starts/stops the music playback when the shot starts/stops.
A MUSIC VIDEO WORKFLOW
- Prepare your song(s) - as an iPod-compatible audio file (with one of these filename extensions: .mp3, .aac, .aif, .wav). If you enabled the MovieSlate Timecode Sync PRO feature and plan to send timecode data from MovieSlate via wired audio output (On older devices: a headphone jack. On newer devices: a headphone to lightning adapter, or headphone to USB-C adapter), then we recommend mixing your songs to monaural, and silencing one of the stereo channels on each song. You can then choose to have the timecode audio sent on the other stereo channel. See MovieSlate’s Settings > Timecode Sync > Send Timecode Audio.
- Add your song(s) to the iTunes library - run iTunes on your computer, and drag your song from the desktop to iTunes.
- Sync your song(s) to your iOS device. Cable-connect your iOS device to your computer. Make sure that both your song(s) and the MovieSlate app are set to sync with your iOS device. Then click the Sync button.
- Open MovieSlate’s “Music Video” screen from the MovieSlate tab/screen by tapping the timecode display, tapping the keypad’s SYNC button, and choosing “Sync to Song”. On iPhone/iPod touch, you can alternately tap the Music Video tab at the bottom of the screen instead (you may have to tap the More tab first).
- Choose a Song - by tapping the Choose Song button in MovieSlate’s Music Video screen. Please note that iTunes Match tracks must already be downloaded to your device before MovieSlate allows you to select them for use in Music Video Mode. Use the built-in Music app and tap the cloud download icon to download the song into the device’s iTunes Library.
- Set Start/End points - by dragging the start/end sliders in MovieSlate’s Music Video screen. During a shot, MovieSlate plays the song back from the Start point, and automatically stops the shot and the song playback when the End point is reached. The Music Video screen’s timecode display updates as you drag the active slider (which is blue). For very precise control of Start/End points, tap the Music Video screen’s timecode display, and enter timecode digits using the keypad.
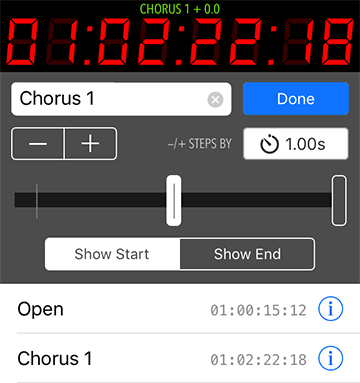 Setting Marker points - set multiple markers for your music track on the Music Video screen. Once you select a song you can set a Marker by moving the playhead along the slider or tap the Mark button as the song plays. Slim tickmarks will be created along the playback slider as you mark the track. Tap the Markers button to view all the markers you have set for the track. As you tap on each marker the playhead will move to the timecode index indicated by the marker. Double-tapping a marker in the list will set the playhead to the timecode index and then close the Markers list.
While the Markers list is visible, tap the blue (i) button to edit its title or adjust the timecode index by the step amount visible in the "-/+ STEPS BY" field. When you are done editing a marker tap the Done button or tap on another marker and your edits will be saved.
- Return to the slate view. On iPhone/iPod touch, tap the MovieSlate button in the tab bar. On iPad, tap the Music Video screen’s Done button.
- Using Marker points. When MovieSlate is synced to a song, tap the timecode display on the MovieSlate tab and tap Edit Music Sync. Tap the Markers button to view the markers set for the current track, and tap a marker to set the playhead to the given timecode index. Tap the Done button in the upper-left of the Music Video screen. At the top of the Slate’s timecode display you should see your marker title in green text along with a stopwatch that will begin to advance once you start your shot.
- Start the Shot. MovieSlate plays the chosen song back from the Start point, and automatically stops the shot and the song playback when the End point is reached. Please refer to the Starting a Shot section of this User Guide— which contains detailed information about pre-roll and song delay Settings that affect music playback.
When WiFi Syncing to iPads (using the optional Timecode Sync PRO feature), synced song information is sent to the receiving iPad. If the receiving iPad’s music library has the same song (with the identical song, artist, album name) as the sending iOS Device, then the music will play on both devices when the shot starts.
- End the Shot. The slate’s timecode is immediately reset to the song’s Start point.
- Start a new Take. MovieSlate continues to use the same song Start/End points.
- Start a new Scene by editing the song’s Start/End points. Handy trick: when you drag the Start point slider past the End point slider, the old End point becomes the new Start point.
- Exit Music Video mode by clearing the song. On iPhone and iPod touch, go to the Music Video screen, and tap the Choose Song button, then the red Clear Song button. On iPad, go to the MovieSlate screen, tap the timecode display, then tap the red Stop Music Sync button.
MUSIC VIDEO SETTINGS
From MovieSlate’s Settings > Appearance > Music Video you can choose:
- Show 'Start Playback' Button ON TOP CLAPPERSTICK - to make it obvious that tapping that button (or the clappersticks) will start music playback and a new shot.
- Show Current Marker Cue ON BOTTOM CLAPPERSTICK - to display the name of the last tapped Start-point Marker (which is easier to read at a distance than the marker show above the timecode display).
- Marker Cue Text Color - to set the color used to display the marker cue text on the bottom clapperstick.
Camera screen
|
CAMERA SCREEN
|
|
The Camera screen contains optional slate data fields that are saved with each shot to MovieSlate’s shot log History— and are often used in MovieSlate’s leader/end credit roll animations (which appear when photographing the slate at the start and end of a shot).
With the Camera Control PRO Feature enabled, tap the Connect to Camera button at the top of this screen to connect to, and remotely control a camera. Once connected, additional buttons will appear to control the synced camera’s recording, timecode, userbits, and other features. Many of this screen’s fields are synced to the camera (and appear with green text); changing field values in MovieSlate will also change corresponding settings on the synced camera.
On iPhone/iPod touch, you may have to tap the More tab to see the Camera tab.
Enter camera data by tapping on a field to edit it:
- Camera Filename - many cameras save footage to a computer data file instead of a video tape or film roll. MovieSlate can log each shot’s filename for post-production use. Final Cut Pro, Adobe Premiere, and Avid Media Composer use filenames to link logged meta data with media, so it is important to enter accurate data into the Filename field. To make this easy, MovieSlate supports many automated filenaming schemes (called filename input styles). When a filename field is tapped, a Filename Editor may, or may not appear. Many filename input styles automatically build filenames using static text, auto-incrementing numbers, and data from other fields— and so often require little or no user input because they are automatically updated each time a shot ends. Select, edit, and create filename input styles from MovieSlate’s Settings > Text Fields > Camera > File.
- Resolution - the size (in pixels) of a single movie frame. An “i” or “p” suffix indicates whether the movie is interlaced or progressive. The Resolution field is needed when exporting History Shot Log data to Final Cut Pro X XML format.
- Compression - used with some cameras (such as RED) which have a file compression setting.
- FPS & Sensor FPS - the FPS field on this screen has the same meaning as on the Slate screen, and can be thought of as "Project FPS". Some cameras that shoot raw digital format footage (such as RED and ARRI) also have a Sensor FPS setting.
- Shutter Speed/Angle - the number of seconds a camera’s shutter is open (exposure). When this field’s input style is set to Keypad (ABC) MovieSlate automatically inserts a leading “1/” for you because most exposures are measured in fractional seconds. When this field’s input style is set to Keypad (ABC°) MovieSlate automatically appends a degrees symbol after the shutter angle.
- Aperture (F-stops & T-numbers) - the size of a camera lens opening. MovieSlate automatically inserts a leading “F-” or “T-” for you. When editing this field, the Keypad has a plus and minus button which increment/decrement in third and half stop intervals.
- ISO Speed - the measure of a photographic media’s sensitivity to light.
- White Balance - color temperature, often measured in thousands of Kelvins. MovieSlate automatically inserts a trailing “K” for
you.
- HDR - used with some cameras (such as RED) which have a High Dynamic Range setting.
- Distance to Subject (Focus Distance) - is how far away the camera is to the subject being photographed. When editing this field with the Keypad, there are (') and (") buttons for separating feet from inches.
- Camera Name - the camera name and/or model.
- Camera Position - generally left or right (for 3D camera rigs), or center (for 2D camera rigs).
- Camera Height - can be entered as literal numerals (ie: inches), or free form text (ie: “eye level”). When editing this field with the Keypad, there are (') and (") buttons for separating feet from inches.
- CAM (Camera ID) - a letter from A to Z used to identify a camera on set. When logging with the MultiCam plugin, every camera has a unique Camera ID.
- Camera Color - some productions identify cameras on set by sticking a colored piece of tape the camera. Use this field to log a camera’s color.
- Camera Angle - can be entered as literal numerals (ie: 60°), or free form text (ie: “low angle”). When this field’s input style is set to Keypad (ABC°) MovieSlate automatically appends a degrees symbol after the camera angle.
- Camera Operator - the name of the person operating the camera.
- Unit - the unit this camera is part of. Many productions have various units shooting simultaneously, such as first unit, second unit, or effects unit.
- Lens - the lens used for this shot (free form text such as “wide angle”).
- Focal Length - of the camera lens, measured in millimeters. MovieSlate automatically inserts a trailing “mm” for you.
- Filters - a list of lens filters used for the shot (ie: “yellow”).
Camera Sync: PRO Feature
|
CAMERA CONTROL (PRO FEATURE)
|
|
The Camera Control (part of a PRO Feature subscription) can remotely control supported RED Epic/Scarlet cameras from MovieSlate via WiFi. Start/stop recording; move lens motors; monitor camera media; and sync timecode, userbits, FPS, white balance, and other settings. RED camera syncing requires a REDLink camera module.
CONNECT + CONTROL
- Connect a :pulse or REDLink to the appropriate camera.
- From the iOS Settings app > WiFi, join the camera’s WiFi network.
- Run MovieSlate, and ensure that the PRO Features subscription is enabled (from MovieSlate’s Settings > MovieSlate Store).
- From the Camera tab, tap the Connect to Camera button. The app displays a list of cameras found on the network; tap one of them. Once connected, the Camera tab’s screen refreshes to display timecode and many other camera settings and indicators.
- To change camera settings - tap one of the controls/fields, such as: Fan Mode, FPS, Sensor FPS, White Balance, CAM, Shutter Angle, Resolution, Camera Position.
- To Start/Stop Camera Recording - tap the "Record" button.
- To Adjust Camera Timecode - tap the timecode display.
- To Set Camera UserBits - slide the timecode display to the left, revealing the userbits display. Tap on the userbits display.
MULTICAM CAMERA CONTROL
MovieSlate’s MultiCam feature can be used to remotely control multiple synced cameras:
- To Connect to Cameras - tap the MultiCam tab’s Connect to Cameras button, select one or more cameras from the list, then tap the Done button.
- To Control Cameras - after the camera(s) connect, tap the Start Logging button to enter the notes/logging screen. On the iPad, the notes appear on the left side of the screen, and the cameras on the right. On the iPhone, tap the Cameras button to see the cameras list. A SYNCED badge appears to the right of the connected cameras.
- To Start/Stop Recording - for a single camera: tap the round button to the left of its roll/filename.
- To Start/Stop Recording - for all synced cameras: tap the round button in the top (ALL) row.
- To Edit Camera + Operator Names - tap the Edit button. While editing, additional "virtual" (unsynced) cameras can be shown/hidden. User Guide has more detailed information about the MultiCam Plugin and its tab/screens.
MultiCam: PRO Feature
|
ENABLING THE MULTICAM PRO FEATURE
|
|
If you shoot reality or documentary productions, then you might be interested in an optional PRO Features subscription which includes a MultiCam Feature— the painless way to keep track of: who said what; which units and cameras captured the action; and which rolls and clip files contain the footage. MultiCam simultaneously logs data and notes for up to 26 cameras, and includes a dedicated MultiCam report.
MultiCam provides a MultiCam Screen to start/stop/log multiple camera shots, star-rate shots, and create MultiCam notes.
MultiCam also generates a very nice MultiCam Report.
You can subscribe to PRO Features and learn more about MultiCam from MovieSlate’s Settings > Movie★Slate Store.
|
THE “MULTICAM” SCREEN
|
|
Once the MultiCam Plugin is enabled, a new MultiCam tab button appears in MovieSlate’s tab bar at the bottom of the screen. Tap this button to view the MultiCam Screen.
The MultiCam Screen is used by shot loggers as an alternative to the MovieSlate screen.
MultiCam: Workflow
|
MULTICAM WORKFLOW
At the start of the day, enter production data from the MultiCam Setup screen (visible when there’s no MultiCam shot in progress). Throughout the day, start/stop individual camera shots from the MultiCam Logging screen (visible when the Start Logging button is tapped). Both screens are accessed from the MultiCam tab.
|
|
MULTICAM SETUP SCREEN
- Choose a Project. Tap the slate’s PROD (Production) field to create a new Project, or choose/edit/clone an existing Project. You must enter a Production name for each Project. All other Project fields are completely optional, and can appear in some of MovieSlate’s History Reports— including the header at the top of the MultiCam Report. With the optional Timecode Sync feature enabled, “Networked Projects” from other MovieSlates on the WiFi network will also appear after tapping PROD > Choose a Project.
- Enter data into fields (as described previously). Most field data is persistent; only changing when you manually edit the data. MovieSlate can automatically update some data for you (such as the DATE), and auto-increment some data (such as SLATE, TAKE, and Camera Filenames). So even though MovieSlate saves a huge amount of data to the its shot log History for each shot, you generally change a very small amount of data from shot to shot. Note that you can always correct a shot’s incorrect or missing data later from the History screen. When MultiCam logging, the SLATE, SCENE, and TAKE fields are optional and can be left empty if your production does not use them.
- Choose your cameras’ frame rate by tapping the FPS field. When MultiCam logging, all cameras use the same frame rate.
- Set Timecode - tap the timecode display, and set timecode values using the Keypad, or sync to an external timecode source.
- Connect to Cameras - by tapping the Connect to Cameras button at the top of this screen (with the Camera Control feature installed). A list appears with the names of cameras discovered on the WiFi network. Check/Uncheck a camera name in the list, then tap the Done button to start/end syncing. Note that each camera should have a unique camera letter (from A to Z) as MovieSlate will only connect to a single camera for each assigned letter.
Start Logging
- Start Logging - tap the Start Logging button to start a MultiCam Master Shot and open the MultiCam Logging Screen. Master Shots contain all the notes associated with a MultiCam shoot— which can last many hours. Each individual camera shot (child shot) that you start/stop from the MultiCam Logging Screen will be grouped together within its master shot in MovieSlate’s History screen and MultiCam Reports.
End Logging - tap the End Logging button to end a MultiCam Master Shot and all the camera child shots in progress.
MULTICAM LOGGING SCREEN
- Title a scene by entering text into the Shot Title field. The title is saved with each new child shot.
- Enter a Camera Note by tapping the Note field. To enter a new note, tap the Next Note button. All notes are timecode-stamped and added to the MultiCam master shot.
- Add a ★-Rating Note by dragging your finger over the Content Rating dots. When you lift your finger, a timecode-stamped star rating note is added to the MultiCam master shot.
CAMERAS LIST SCREEN
- Enter Camera ROLL and Filename by tapping those fields on the Cameras List screen (seen by tapping the Cameras button on iPhone and iPod touch).
- Start/End Camera Shots by tapping a round aperture/lens button on the left side of each camera’s row (which also starts/stops recording on synced cameras). The round button is red when the shot is in progress. You can start/stop all cameras (or synced cameras) by tapping the round aperture/lens button on the ALL row.
- ★-Rate Camera Shots while a camera shot is in progress by dragging your finger over the five dots on a camera’s row. When you lift your finger, a timecode-stamped star rating note is added to that camera’s shot.
- Edit the number of Cameras by tapping the Edit button above the Cameras list. Drag the slider to use between 1 and 26 cameras.
- Edit Camera Colors by tapping the Edit button above the Cameras list. Tap the square color wheel icon to assign a color to a camera (many productions identify cameras by colors as well as letters A through Z). Tap the square color wheel icon on the ALL row to set or clear all camera colors.
- Edit a Camera Name & Operator by tapping the Edit button above the Cameras list, then tapping a particular camera’s name and camera operator fields. After editing these fields, their new values are sent back to the camera (if synced).
SLATE SCREEN
- Clappersticks do not start/stop shots while a MultiCam shot is in progress. Instead, when you tap the clappersticks, a timecode-stamped "clappersticks" note is added to the MultiCam master shot.
HISTORY SCREEN: REPORTS

- MultiCam Report, At the end of the day’s shoot, select a Project or MultiCam shot from the History screen, then export a MultiCam Report. The HTML-based MultiCam Report contains timecode for all camera starts/stops, notes for all master and child shots, and camera roll/filename columns indicating when each camera was started/stopped.
- Avid Report, At the end of the day’s shoot, select a Project or MultiCam shot from the History screen, then export an Avid Report consisting of a single ALE file and a collection of Locator files. The ALE file contains rows of shot meta data (rows prefixed with SEQ are MultiCam master shots, and rows prefixed with CLIP are camera child shots). Each Locator file contains notes for a single CLIP or SEQ. Since the MultiCam master shot contains most of the notes, you probably only need to import the SEQ Locator files, and not the CLIP Locator files. After receiving the exported files on your computer, run Media Composer, select a Bin window, select the menu: File > Import, and choose the exported MovieSlate Clips.ale file. Select the menu: Tools > Locators, then select the menu: File > Import Locators, and choose a MovieSlate Locators.txt file.
MultiCam: Cameras List Screen
|
CAMERAS LIST SCREEN
|
|
Each MultiCam mastershot can contain child shots for up to 26 cameras (labeled A through Z). While a MultiCam shot is in progress, any of the cameras may start/stop multiple times.
You enter camera data using the Cameras screen. On iPad, the Cameras appear on the right side of the MultiCam Logging screen. On iPhone and iPod touch, tap the Cameras button at the top of the MultiCam Logging screen to view the Cameras screen.
CAMERA ROW COMPONENTS
Each Camera row consists of these components:
- Record button - a large, round button on the left side of each camera row. Tap the button to start or stop an individual camera’s shot. Tap the record button in the ALL row to start/stop all visible cameras, and start/stop recording of synced cameras (with the Camera Control feature enabled).
- Camera Roll - the reel, roll, mag cart, disc, or tape on which the camera’s media resides.
- Camera Filename - many cameras save footage to a computer data file instead of a video tape or film roll. Final Cut Pro, Adobe Premiere, and Avid Media Composer use filenames to link logged meta data with media, so it is important to enter accurate data into the Filename field. To make this easy, MovieSlate supports many automated filenaming schemes (called filename input styles). When a filename field is tapped, a Filename Editor may, or may not appear. Many filename input styles automatically build filenames using static text, auto-incrementing numbers, and data from other fields— and so often require little or no user input because they are automatically updated each time a shot ends. Select, edit, and create filename input styles from MovieSlate’s Settings > Text Fields > MultiCam.
- ★-Rate Camera Shots while a camera shot is in progress by dragging your finger over the five dots on a camera’s row. When you lift your finger, a timecode-stamped star rating note is added to that camera’s shot.
SETTING THE VISIBLE CAMERAS

Tap the Edit button above the Cameras List, then tap the checkbox on the right of each camera to show/hide that camera. Tap the checkbox in the ALL row to show/hide all cameras.
CHANGING CAMERA COLORS
In addition to identifying cameras by letters A through Z, many productions stick pieces of colored tape or paper to their cameras.
Edit Camera Colors by tapping the Edit button above the Cameras list. Tap the square color wheel icon to assign a color to a camera.
Set All Camera Colors by tapping the square color wheel icon on the ALL row. Then choose to clear all camera colors, or set them to a default collection of rainbow colors.
EDITING CAMERA NAMES & OPERATORS
Edit a Camera Name & Operator by tapping the Edit button above the Cameras list, then tapping a particular camera’s name and camera operator fields. After editing these fields, their new values are sent back to the camera (if synced).
MultiCam: Reports
|
MULTICAM REPORTS
|
|
MovieSlate can generate an HTML-based MultiCam Report that contains timecode for all camera starts/stops, notes for all master and child shots, and camera roll/filename columns indicating when each camera was started/stopped.
MULTICAM REPORT HEADER DATA
On the first page of every MultiCam Report is a header block that contains information about you and the project. To populate this data:

- Enter your info. From MovieSlate’s Settings > History Reports, tap My Info. Tap the blue plus button in the upper right corner of the My Info screen. Choose your contact card from the iOS Address Book to paste its data into My Info. Edit the pasted text as needed. Make sure the Include in Reports button is ON. Typically, you only need to enter this data one time— not each time you run a MultiCam Report. You can also add your own logo to the report via MovieSlate’s Settings > History Reports > My Logo
- Enter project data. From the MultiCam Logging or MovieSlate screens, tap the PROD field, and choose Edit Project. Populate all the fields in the Edit Project screen. Typically, you only need to enter this data one time for each new project— not each time you run a MultiCam Report.
- Choose a Production Graphic. From the MovieSlate screen, swipe left once to reveal a blank space for a production graphic— which is displayed on the slate (and appears at the top of HTML reports: Formatted HTML, Sound Report, and MultiCam Report). Tap the blank space to choose a graphic from your iOS Photo library. The graphic will then appear momentarily.
SENDING MULTICAM REPORTS
To run a report, select a particular shot from the History screen. Tap the share button. From the menu, choose MultiCam Report and tap one of these menu choices:
- This Project - includes all MultiCam master and child shots for the selected shot’s project.
- Shots on Date - includes all MultiCam master and child shots for the selected shot’s date.
Your MultiCam Report is then created, and emailed to recipients (that you choose when the report is sent and/or from MovieSlate’s Settings > History Reports > Email To).
VIEWING & PRINTING MULTICAM REPORTS
MovieSlate saves MultiCam Reports as HTML files that can be viewed using web browsers. For best results, we recommend viewing and printing MultiCam Reports from the Safari or Firefox browsers on a computer.
To view the MultiCam Report, run the browser, then choose Open from the browser’s File menu, and choose the MultiCam Report html file.
To print the MultiCam Report from the browser, click the Print this Report button that appears at the top left of the report. Follow the browser-specific instructions that appear. It is important to print MultiCam Reports in landscape format, or they will not paginate properly.
From the print options sheet that appears in Mac OS X, users can click the PDF button to save the paginated report as a PDF, or click the Print button to send it on to the printer.
KeyClips: PRO Feature
|
KEYCLIPS LOGGING - FOR FINAL CUT PRO X
|
|
KeyClips Logging organizes Final Cut Pro X (FCPX) media into category folders, selects, and sequences— with notes, markers, and optional bottom-third titles. This helps Editors quickly find the exact footage they need.
KeyClips Logging is well-suited to unscripted productions like: sporting events, reality shows, and documentaries.
WHAT IS A KEYCLIP?
A KeyClip is a keyword with an associated starting+ending timecode, used to match keywords with media clips. KeyClips log data becomes FCPX keyword ranges, markers, notes, and sequences.
THE KEYCLIPS WORKFLOW
1. KeyClips Logging. Tap on MovieSlate keywords to log what’s being filmed, and when. Once logging is complete, tap the share button to send the logged data to a Mac running macOS Yosemite (v10.10) or newer.
2. Log+Clip Matching. Our free KeyClips app for macOS: imports logged data from MovieSlate; imports fcpxml files from FCPX; matches logs and clips; builds new fcpxml; and sends its new fcpxml to FCPX.
3. FCPX Organizing. FCPX imports the KeyClips app’s new fcpxml file— creating events with category folders, selects, markers, notes, sequences, and bottom-third titles.
THE KEYCLIPS APP (FOR MACOS)

Use our free KeyClips app to import and match MovieSlate log data and FCPX clip data. After merging log+clip data, new fcpxml is created and sent to FCPX. Using a Mac, download the free KeyClips app from movie-slate.com/keyclips
ENABLING KEYCLIPS LOGGING
KeyClips Logging is part of an optional PRO Features subscription. You can subscribe to PRO Features from MovieSlate’s Settings > Movie★Slate Store.
KeyClips: Setup screen
|
KEYCLIPS SETUP SCREEN
|
|
The KeyClips tab’s Setup screen is used to configure basic information about a production:
- Timecode - tap to set it with an onscreen keypad, or sync with external source.
- FPS field - tap to set the timecode’s framerate— which sticks to the production project.
- Logging Date field - tap to enter a specific date, or to update automatically.
- Production field - enter the name of the current project.
- Logger Info button - enter a person’s name, department, job title, unit.
- Log Keywords button - displays the KeyClips Logging screen.
- Share button - send a log data file (.mslog) to a Mac via Email, AirDrop, Dropbox, iCloud Drive, or MovieSlate Cloud.
GETTING STARTED
Create a new Project each time you start logging a new production. To do so, tap the PROD field and choose either Clone a Project or New Project.
Then, tap the Log Keywords button to start logging.
KeyClips: Logging screen
Entering Data
Enter Data into Fields from the Script PDF Screen which MovieSlate saves (logs) for each take, and uses to later generate Progress Reports, Facing Pages, and Editor’s Logs. Most field data is persistent; you only need to alter the data when something changes on set. MovieSlate can automatically update some fields for you (such as the DATE), and auto-increment some data (such as TAKE). So even though MovieSlate saves a huge amount of data to its shot log History for each shot, you generally change a very small amount of data from take to take.
Tap the Scene button in the toolbar (at screen top) to show/hide the data fields:
- Slated Scene - is comprised of three fields: PREFX, SSCEN, SETUP. Choose various input styles for these fields from MovieSlate Settings > Fields > Script.
- Scene Prefix (PREFX) - contains an optional scene prefix, such as: R for RESHOOT; or X for 2ND UNIT. Important: to ensure accurate Progress Reports, enter the scene’s prefix in the PREFX field rather than the SSCEN or SETUP fields.
- Script Scene (SSCEN) - tap to enter a script scene number (such as 1) using the keypad. Swipe up/down on the Script Scene to increment/decrement the scene without using the keypad or keyboard.
- Scene Setup (SETUP) - tap to enter a setup (such as A) using the keypad. Swipe up/down on the Scene Setup to increment/decrement the setup without using the keypad or keyboard.
- Time - displays the Scene’s duration and average take duration. Tap to enter a Scene duration using the keypad. Tap the keypad’s Takes button to set individual take durations.
- Pages - tap to enter a Scene’s page count (in eighths) using the keypad.
- Page# - tap to enter a Script page number (which does not always match a PDF page number). Script page numbers are used when creating Facing Pages Reports.
- Scene Notes - tap to enter notes for the current Scene/Setup.
- Circle Takes (Ⓣ ICON) - tap to circle takes (and cameras) from a list of previous takes. Cameras without checkmarks appear as NO-PRINT on the History screen, and in Editors Log and Facing Pages reports
- Sound Roll (SROLL) - tap to enter the current Sound Roll using the keypad.
- Take - tap to enter the current Take number using the keypad. Swipe up/down to increment/decrement the Take number. You can choose to auto-increment the Take number when each take ends from: MovieSlate Settings > Behavior > Shot Behavior.
- Cameras: Roll, Frame, Subject grouped fields for Cameras A-J. Swipe left/right to change cameras. Tap Cam to enable/disable cameras, or edit camera colors, letters, and names. Tap Roll to enter a Camera Roll using the keypad. Tap Frame to choose a framing abbreviation (such as XCU for Extreme Close Up). Tap Subj to choose an actor or character name.
- Camera-Specific Notes - create/edit camera notes by double-tapping a camera’s letter button.
Logging Data
Tap the Take button in the toolbar (at screen top) to start or stop a take and log all field data to MovieSlate’s Shot Log History.
While a take is in progress, these fields are visible:
- Scene, Time, Pages, Page# - as described above.
- Take Notes - tap to enter notes for the current take.
- Circle Takes (Ⓣ ICON) - tap to un/circle takes (and cameras). Cameras without checkmarks appear as NO-PRINT on the History screen, and in Editors Log and Facing Pages reports.
- False Take X - tap to mark a false take and start again.
- SRoll - tap/swipe to star-rate this take’s sound.
- Pix - tap/swipe to star-rate this take’s picture.
- Issue - tap to choose this take’s quality issue (if any). Edit the items in this list from MovieSlate Settings > Text Snippets.
Sound Dept: PRO Feature
|
ENABLING THE SCRIPT DEPARTMENT FEATURE
|
|
If you’re a Script Supervisor, then you might be interested in MovieSlate’s optional Script Dept feature— which provides an easy way to:
- Manage Script PDF pages: import, export, replace, delete
- Line/Mark Script PDFs using fingers or Apple Pencil
- Take Notes using text, audio, and pictures
- Log Data for scenes, takes, cameras, sound recorders
- Generate Reports quickly:
- Progress Report
- Facing Pages Report
- Editor’s Log Report
- Marked Script PDF pages
- MovieSlate XML, CSV, and HTML reports
Subscribe to Script Dept Features from MovieSlate’s Settings > MovieSlate Store.
Sound Dept: Workflow
|
A SOUND DEPT WORKFLOW
|
|
- Choose a Project. Tap the slate’s PROD (Production) field to create a new Project, or choose/edit/clone an existing Project. You must enter a Production name for each Project. All other Project fields are completely optional, and can appear in some of MovieSlate’s History Reports— including the header at the top of the Sound Report. With the optional Timecode Sync plugin enabled, “Networked Projects” from other MovieSlates on the WiFi network will also appear after tapping PROD > Choose a Project.
- Enter data into fields (as described previously). Most field data is persistent; only changing when you manually edit the data. MovieSlate can automatically update some data for you (such as the DATE), and auto-increment some data (such as SLATE, SCENE, TAKE, and Camera/Sound Filenames). So even though MovieSlate saves a huge amount of data to the its shot log History for each shot, you generally change a very small amount of data from shot to shot. Note that you can always correct a shot’s incorrect or missing data later from the History screen.
- Choose your camera’s frame rate by tapping the FPS field. Note that choosing Custom (text only) does not actually change the rate at which the timecode is displayed; it merely changes the text that appears in the slate's FPS field.
- Set Timecode - tap the timecode display, and set timecode values using the Keypad, or sync to an external timecode source.
Roll Sound
- Start the Shot - tap the blue Roll Sound (start shot) button start a shot— simultaneously saving it’s data and the timecode to the MovieSlate shot log History.
- Mark a shot’s sound quality with the star rating buttons.
Circle
- Tap the “Circle Take” button to mark the shot as a good take in the MovieSlate shot log History.
- Enter/update Sound Mixer Notes by tapping the NOTES field. Each shot can have a single mixer note. While a shot is “in progress”, you can add additional notes from the MovieSlate or History screens. Because notes change from shot to shot, you may prefer to enter persistent note data (such as “tailstix on B”) in the TITLE field— so you don’t have to enter that data for every new shot.
- When the scene ends (the Director calls “cut”), tap the red Cut! (end shot) button. This saves the ending timecode and your notes to the shot in MovieSlate’s shot log History.
FT
- Tap the “False Take” button to immediately end the shot. The shot that was in progress can be automatically deleted from MovieSlate’s shot log History, or its TAKE field can be prefixed with “FT”. The Shot In Progress screen is closed, and certain fields are automatically incremented. These behaviors are set in MovieSlate’s Settings > Behavior > Shot Behavior > On False Takes. You can also mark false takes from the History details screen by tapping on a shot’s TAKE field, then the keypad’s FT button.
- When the shot is “In Progress”, a location button (has a compass arrow icon) appears. The button uses the iOS device’s GPS radio (and/or WiFi and cellular towers) to locate the device’s current geographical location, look up the nearest address, and save all that Location information in MovieSlate’s shot log History. It can take up to a minute to obtain new map coordinates (latitude/longitude). An internet connection is required to lookup street address nearest to the map coordinates. You can have MovieSlate automatically refresh map coordinates each time a shot is started by enabling the Find & Save Locations and Refresh on Each Shot buttons from MovieSlate’s Settings > Shot Log History, then running the Settings app and enabling Location Services for MovieSlate. Note that frequent map coordinate refreshing can quickly drain your iOS device’s battery.
- At the end of the day’s shoot, export your Sound Report from the History screen.
Sound Dept Data-Only MovieSlate workflow
If you’re not interested in logging timecode start/end points, you can use MovieSlate’s Data-Only workflow. Follow steps 1 - 3 above, then follow these additional steps:
-
-
-
- Enter Data-Only mode by tapping the timecode display, the tapping the “NO” keypad button.
- Mark a shot’s sound quality with the star rating buttons.
Circle
- Tap the “Circle Take” button to mark the shot as a good take in the MovieSlate shot log History.
- Enter/update Sound Mixer Notes by tapping the NOTES field. Each shot can have a single mixer note. You can add additional notes from the MovieSlate screen (slide the clappersticks to the left). Because notes change from shot to shot, you may prefer to enter persistent note data (such as “tailstix on B”) in the TITLE field— so you don’t have to enter that data for every new shot.
- Tap the Log Shot button. This saves all the shot info (excluding timecode start/end) to MovieSlate’s Shot Log History.
Sound Dept: Fields
|
SOUND DEPT FIELDS
|
|
Swipe left/right on the block of Sound Dept fields to switch between a full layout and simplified layout.
Here’s what each field on the Sound Dept screen is generally used for:
- SLATE - often a unique ID that’s assigned to each shot. Many production companies label this field as SEG.
- SROLL - the sound roll number.
- SCENE - which scene of the script is being shot. Trailing letters generally denote which setup is being shot for the scene. A new setup happens whenever anything major changes during the shot (such as a new camera angle). A leading “R” denotes a SCENE that has been reshot sometime after principal photography has wrapped.
- TAKE - how many times the current SCENE has been shot.
- DATE - the date the shot was recorded.
- FOLDR - the folder in which the sound file is saved on the primary digital sound recorder.
- FILE1 and FILE2 - the name of the sound file(s) that are being saved on your digital sound recorder for this particular shot. Because many Sound Mixers use two sound recorders (a primary and backup), this screen provides two sound file fields. Sound filenames appear in the Sound Report (in each shot’s yellow NOTES / FILES column). MovieSlate supports many automated filenaming schemes (called filename input styles). When a filename field is tapped, a Filename Editor may, or may not appear. Many filename input styles automatically build filenames using static text, auto-incrementing numbers, and data from other fields— and so often require little or no user input because they are automatically updated each time a shot ends. Select, create, and edit filename input styles from MovieSlate’s Settings > Text Fields > Sound.
- PROD - the Production (or Project) title. In MovieSlate, every shot must belong to a Project. Note that MovieSlate won’t let you “start a shot” until you’ve entered values for PROD, ROLL, SCENE, TAKE. Tap the PROD field to create a new Project, or choose/edit/clone an existing Project. You must enter a Production name for each Project. All other Project fields are completely optional, and can appear in many of MovieSlate’s History Reports— including the header at the top of the Sound Report.
- FPS (Frames Per Second) - the frame rate at which timecode is displayed. This would normally be set to match your camera’s frame rate. In MovieSlate, all FPS rates are NDF (Non Drop Frame) unless marked as DF (Drop Frame). 29.97 DF, 30 DF, and 59.94 DF rates are used to keep timecode in sync with wall clock time. Note that choosing Custom (text only) does not actually change the rate at which the timecode is displayed; it merely changes the text that appears in the slate's FPS field. When Custom is chosen, a menu of snippets from the FPS Snippets Group is displayed (if it exists). Otherwise, the keyboard will appear after choosing Custom.
- TITLE - an optional title for the shot. If present, the TITLE appears in the History screen’s scrolling list of shots, and also in the Sound Report (in each shot’s yellow NOTES / FILES column).
- NOTES (mixer notes) - contains a single “Sound Mixer” note for a single take— that you can create/edit by tapping this NOTES field. Additional notes can be added from the MovieSlate or History screens. All a shot’s notes appear in the Sound Report (in each shot’s yellow NOTES / FILES column).
- RNOTE (sound roll notes) - contains a single “Sound Roll” note for a single SROLL field value— that you can create/edit by tapping this RNOTE field. A single sound roll note is used for any/all shots in a project which reference the sound roll note’s SROLL. All sound roll notes appear at the bottom of the Sound Report.
- UBITS (User Bits) - swipe the timecode display to the left to reveal the UBITS display. User Bits are static data sent/received along with timecode via WiFi and wired microphone input (when the optional Timecode Sync plugin is enabled). User Bits data traditionally consists of codes, dates, tape reel numbers, or other organizational information. Tap the User Bits display to edit each hexadecimal digit using the Keypad. Tap the Keypad’s MDY button to enter the current Date in Month-Day-Year format. Tap it again to enter Day-Month-Year. Tap it again to enter Year-Month-Day. Once User Bits have been set to Date, they will always reflect the current date.
Sound Dept: Sound Tracks
|
SOUND TRACKS
|
|
Each shot can contain up to 32 sound tracks. Sound Track data is saved with each shot in MovieSlate’s shot log History.
You enter track data using the Sound Tracks screen. On iPad, the Sound Tracks appear on the right side of the Sound Dept screen. On iPhone and iPod touch, tap the Tracks button at the top of the screen to view the Sound Tracks screen.
SOUND TRACK COMPONENTS
Each Sound Track consists of these components:
- Track Label/Color - vertical text such as T01. Track labels appear as colored column headers in Sound Reports. Tap the label to edit its text— or its color (see Setting Track Colors instructions below). You can set all the labels in one fell swoop from MovieSlate’s Settings > Text Fields > Sound > Track Labels button (in the upper right corner). From there, you can choose numbered labels (T01 - T24) or lettered labels (L/R and A-V).
- Microphone field - gold text that indicates which kind of microphone was used for the sound track. Tap on this field to edit its text. By default, the Snippets Chooser will appear with a list of “Mics” snippets to choose from. You can edit these snippets from MovieSlate’s Settings > Text Snippets. You can choose which snippet group will appear by default from MovieSlate’s Settings > Field Input Styles > Sound.
- Sound Track Name field - white text that indicates what source (often an actor) was being recorded for this sound track. Tap this field to edit its text. By default, the Snippets Chooser will appear with a list of “Actors” snippets to choose from. You can edit these snippets from MovieSlate’s Settings > Text Snippets. You can choose which snippet group will appear by default from MovieSlate’s Settings > Text Fields > Sound.

- Enable button - a large, round button on the right side of the sound track. Tap the button to enable or disable a track. All sound track data is saved with each shot to MovieSlate’s shot log History. However, only enabled sound tracks appear in Sound Reports. To use red Enable buttons, go to MovieSlate’s Settings > Appearance > Red Arm-Track Buttons (at the very bottom of that screen).
EDITING & SETTING THE NUMBER OF TRACKS
Tap the Edit button above the Sound Tracks, then use the slider to set up to 32 tracks. As you adjust the slider, the bottom soundtrack row indicates the current number of tracks.
REARRANGING SOUND TRACKS
While editing the Sound Tracks, the track Enable buttons are replaced by buttons you can drag up and down to rearrange the order of the tracks. After rearranging, the track labels retain their original positions, but the track contents move to new positions.
SETTING TRACK COLORS
While editing the Sound Tracks, the Track Label buttons are replaced by Track Color buttons.
- To Clear all Colors - tap the Color Clear button at the bottom of the screen (on the Sound Dept tab).
- To Use Rainbow Colors - tap the Color Rainbow button at the bottom of the screen (on the Sound Dept tab).
Sound Dept: Sound Reports
|
SOUND REPORTS
|
|
Typically, Sound Mixers generate Sound Reports at the end of each day’s shoot. MovieSlate makes this really easy for you.
SOUND REPORT HEADER DATA
On the first page of every Sound Report is a header block that contains information about you and the project. To populate this data:
- Enter your info. From MovieSlate’s Settings > History Reports, tap My Info. Tap the blue plus button in the upper right corner of the My Info screen. Choose your contact card from the iOS Address Book to paste its data into My Info. Edit the pasted text as needed. Make sure the Include in Reports button is ON. Typically, you only need to enter this data one time— not each time you run a Sound Report. You can also add your own logo to the report via MovieSlate’s Settings > History Reports > My Logo
- Enter project data. From the Sound Dept screen, tap the PROD field, and choose Edit Project. Populate all the fields in the Edit Project screen. Typically, you only need to enter this data one time for each new project— not each time you run a Sound Report.
- Choose a Production Graphic. From the MovieSlate screen, swipe left once to reveal a blank space for a production graphic— which is displayed on the slate (and appears at the top of HTML reports: Formattted HTML, and Sound Report). Tap the blank space to choose a graphic from your iOS Photo library. The graphic will then appear momentarily.
SENDING SOUND REPORTS
To run a report, select a particular shot from the History screen. Tap the share button. From the menu, choose Sound Report and tap one of these menu choices:
- This Project - includes all shots for the selected shot’s project. When the project has multiple sound rolls, you can choose a specific roll or all rolls.
- Shots on Date - includes all shots for the selected shot’s date.
- This Sound Roll - includes all shots in the selected shot’s sound roll and project.
Your Sound Report is then created, and emailed to recipients (that you choose when the report is sent and/or from MovieSlate’s Settings > History Reports > Email To).
VIEWING & PRINTING SOUND REPORTS
MovieSlate saves Sound Reports as HTML files that can be viewed using web browsers. For best results, we recommend viewing and printing Sound Reports from the Safari or Firefox browsers on a computer.
To view the Sound Report, run the browser, then choose Open from the browser’s File menu, and choose the Sound Report html file.
To print the Sound Report from the browser, click the Print this Report button that appears at the top left of the report. Follow the browser-specific instructions that appear. It is important to print Sound Reports in landscape format, or they will not paginate properly.
From the print options sheet that appears in Mac OS X, users can click the PDF button to save the paginated report as a PDF, or click the Print button to send it on to the printer.
Sound Dept: Importing CSV Files
|
IMPORTING SOUND RECORDER CSV FILES
|
|
Some people prefer to capture all meta-data on their sound recorders, and use MovieSlate to generate the final Sound Reports. MovieSlate can import CSV files that were generated by the Sound Devices 788T (firmware v2.15 or newer), Zaxcom Deva, and Cantar recorders. Here are the instructions for that workflow...
- Capture meta data on your sound recorder as you have traditionally done.
- Export/Send the CSV log file to your iOS device. At the end of your shooting day, export the CSV file from your sound recorder (refer to the recorder’s documentation for instructions). Create a new email message, and attach the CSV file to the email. Send the email to your iOS device.
- Create a Project in MovieSlate. Run the MovieSlate app, and create a new project into which the sound recorder’s shots will be imported.
- Open the Email on your iOS device. Run the iOS Mail app, and view the email message you sent. Tap on the CSV attachment icon that appears near the bottom of the email. A spreadsheet-like view of the attachment appears. Tap the action button (with the curvy arrow in the upper right corner). A menu appears. Tap the “Open with MovieSlate” option.
- Choose a Project. After choosing to open the CSV attachment with MovieSlate, the MovieSlate app will open and you’ll be prompted to choose a project into which the sound recorder’s shots will be imported.
- Run a Sound Report. Go to MovieSlate’s History screen, select one of the shots you just imported, and tap the share button. A menu appears with report types— choose “Sound Report”.
Sound Dept: Streamlining Your Workflow
|
STREAMLINING YOUR SOUND DEPT WORKFLOW
|
|
Here are some setup and usage tips to help streamline your MovieSlate Sound Dept workflow...
- Pre-configure “Mic” and “Actor” snippets. Start in MovieSlate’s Settings > Text Snippets screen. Populate the “Mic” and “Actor” groups with the names of all the microphones and actors/characters you’ll need for your shoot. You might even consider creating several different “Actor” groups for use with different productions.
- Assign “Snippets (Mics)” as the Input Style for a Sound Track’s Microphone field. From MovieSlate’s Settings > Text Fields > Sound, tap the Microphone field. Then choose Snippets (Mics).
- Assign “Snippets (Actor)” as the Input Style for a Sound Track Name field. From MovieSlate’s Settings > Text Fields > Sound, tap the Source field. Then choose Snippets (Actors) or one of the snippet groups you set for the current production.
- Pre-populate Sound Tracks. From the Sound Tracks screen, enter Microphone and Sound Track Name values for each track. With a single tap, you can disable tracks that aren’t being used for a particular shot. You can also Edit the Sound Tracks, and rearrange the active tracks to be at the top of the list. This technique may be faster for you than constantly editing the text of each individual Sound Track.
- Pre-configure “Sound Report” settings. Go to MovieSlate’s Settings > History Reports. Set Report to Sound Report. Tap the Email To item and choose an email address by tapping the blue plus button (repeat to add multiple email addresses). You can also type or paste email addresses into this recipient list. Set the Attach Files and Compress Files to suit your preference. Tap the My Info item and enter your contact information (which will appear at the top of the Sound Report).
- Choose Report Email Recipients & Contents. From MovieSlate’s Settings > History Reports > Email To and Email BCC and Email Contents, you can choose who will receive a report, and what the email message should contain. These settings can be optionally configured on a per-project basis.
Script Dept: PRO Features
|
ENABLING THE SCRIPT DEPARTMENT FEATURE
|
|
If you’re a Script Supervisor, then you might be interested in MovieSlate’s optional Script Dept feature— which provides an easy way to:
- Manage Script PDF pages: import, export, replace, delete
- Breakdown Script PDFs (iPad only): add acts, scenes, descriptions, elements, page counts, scene times, ruler lines
- Auto-Highlight Characters & Dialogue: on Script PDF pages
- Add Dialogue Numbers: for character dialogue lines on Script PDF pages
- Line/Mark Script PDFs using fingers or Apple Pencil
- Take Notes using text, audio, and pictures
- Log Data for scenes, takes, cameras, sound recorders
- Generate Reports quickly:
- Breakdown Reports
- Progress Report
- Facing Pages Report
- Editor’s Log Report
- Marked Script PDF pages
- MovieSlate XML, CSV, and HTML reports
Subscribe to Script Dept Features from MovieSlate’s Settings > MovieSlate Store.
Script Dept: Setup
After subscribing to the Script Dept Pro Features, a Script Dept tab appears at the bottom of the screen.
Tap the Script Dept tab to display the Script Setup screen. Items on this screen need only be set once; at the start of each day; when changing projects; or when a script PDF is revised.
SETUP PROJECT DATA
- Enter Logger Info which includes your Name, Department, Title, and Unit. Since this only needs to be done once, the Logger Info button in the upper left corner of the screen will immediately be replaced by the Share button (used for generating Script Reports at the end of the day). You can make additional Logger Info changes from MovieSlate Settings > Shot Log History > Logger Info.
- Choose a Project when you start working a new project or series episode. Tap the PROD (Production) field to create a new Project, or choose/edit/clone an existing Project. You must enter a Production name for each Project. All other Project fields are completely optional, although they appear in some of MovieSlate’s History Reports. “Networked Projects” from other MovieSlates on the WiFi network will also appear after tapping PROD > Choose a Project.
- Choose SingleCam or MultiCam to determine the type of coverage lines (aka tramlines) to create when lining a script PDF. Configure Tramline Tool options from MovieSlate Settings > Script Dept.
- Enter Director by tapping the DIR field. The director’s name appears at the top of each Script Report.
- Set Timecode by tapping the timecode display. Manually enter timecode digits from the timecode keypad. Or tap the keypad’s SYNC button to sync to external timecode sources.
- Choose the camera frame rate by tapping the FPS field. Note that choosing Custom (text only) does not actually change the rate at which the timecode is displayed; it merely changes the text that appears in the slate's FPS field.
SETUP SCRIPT INFO
- Place a Script PDF into MovieSlate’s Scripts folder using one of these solutions:
- AirDrop a PDF to your device, and choose to open the PDF with MovieSlate.
- Email a PDF as an attachment to your device. Open the email from the Mail app, long-tap the PDF attachment’s icon, and choose to open the PDF with MovieSlate.
- Use the Files app (on iOS/iPadOS) to place a PDF in the On my iPhone/iPad > MovieSlate8 > Scripts folder.
- Use the Finder (on macOS) to place a PDF in your Home folder > Documents > MovieSlate > Scripts folder.
- Choose a Script PDF - by tapping the Choose Script PDF button or the PDF field to display a list of PDFs that you’ve already placed into MovieSlate’s Scripts folder. Note that you can also delete unused PDFs from this list by tapping its Edit button.
- Enter a Revision Number from the REV field to identify which version of the script you’re currently using. Each time you modify the PDF by adding or deleting pages (more on that later), MovieSlate will ask you to set a new REV number.
- Enter Page and Scene Counts by tapping the PAGES and SCNES fields.
- Enter Estimated Running Time by tapping the RTIME field. In Progress Reports, the To Be Shot row displays Over/Under Running Time when RTIME contains a non-zero value.
SETUP DAY INFO
- Choose a Shoot Day - (starting with 1) by tapping the DAY field at the start of each day. Note that a single shoot day can actually span more than a single calendar date.
- Choose a Shoot Day’s Start Date - by tapping the DATE field. In the screen that appears, choose Today to have MovieSlate automatically update this field for you each day.
- Enter Call, Lunch, Dinner, and Wrap Times by tapping the CALL, LUNCH, DINNER fields which are used to create the Progress Report. Note that you can enter start and end times for LUNCH and DINNER.
- Enter a List of Scheduled Scenes by tapping that field. Enter scenes separated by commas (like 1,2,3,4). Do not enter scene setups in this field (such as 2B), but instead enter just the scene number (such as 2). From MovieSlate Settings > Fields > Scene , you can choose from various scene formatting styles, and the Script Dept supports these Keypad styles: 123-123, 123.123, 123/123, 123abc, 123ABC.
- Optionally enter Progress Report Counts of Pages, Scenes, Setups, Times, Wildlines for this DAY. These values are automatically calculated when Takes have been logged for the day (and appear in green at the bottom of each text field). Otherwise, manually enter Day Progress count totals reported by a Script Supervisor colleague who might have filled in for the day. Caution: in Progress Reports both sets of totals— manual (white) and logged (green)— are added together.
BREAKDOWN THE SCRIPT (ON iPAD)
- Breakdown the Script (iPad only) by tapping the Breakdown Script button. The Breakdown screen will appear (described in the next section). From the Breakdown screen, tap a Scan the PDF button to import: scenes, acts, cast of characters, story days, time of day, and (optionally) estimate page counts and scene running times.
LOG AND MARK THE SCRIPT
- Start Logging and Marking the Script by tapping the Log + Mark Script button. The Script will appear (described a few sections below).
Script Dept: Breakdown
Script Breakdown (on iPad)
Use the Breakdown Screen to:
- View the Script PDF.
- Scan the Script PDF to import: scenes, acts, characters, story days, time of day, and (optionally) estimate page counts and scene running times.
- Enter scene descriptions.
- Add breakdown elements: cast, extras, props, costumes, hair, makeup, FX, stunts, vehicles, animals, set/location info, and notes.
- Highlight breakdown elements in the Script PDF.
- Add ruler line annotations (above sluglines) to the Script PDF.
SCANNING THE PDF
The Breakdown screen displays the Script PDF on the right, and a gray panel on the left.
Scroll through the Script PDF to find the first page that contains actual dialogue. Enter that page’s number into the SCAN FROM FIRST PAGE OF DIALOG text field on the left panel. Then tap the SCAN PDF FOR ACTS, SCENES, CHARACTERS button on the left panel. After scanning, a list of the script’s Acts and Scenes will soon appear in the left panel, and information about the first scene will appear in the right panel.
Repeat the Scan at any time by either:
- Tapping the RESCAN PDF button in the left panel. This will scan the Script PDF for potential new scenes. For existing scenes, this will update: Act, Story Day, Slugline— and if enabled in Settings: Page Count, Estimated Running Time. All other existing scene data will be preserved.
- Tapping the Edit button in the left panel, tapping the Trashcan button, and choosing to Delete All. Caution: this will delete all breakdown information including any you have entered by hand— so use this proceedure only to restart the Breakdown from scratch.
THE ACTS AND SCENES LIST
The left panel shows a list of Scenes and Acts (if the Script PDF contained Acts). Scenes are automatically sorted. Acts are sorted in the order they appear in the Script PDF.
To Re-Sort Acts: tap the Edit button, then tap the SORT ACTS button. Hold a finger on the right edge of an Act’s row and drag the row to the desired order within the Acts list. Tap the DONE button to return to the Scenes list.
The ACT ? title appears for scenes which PDF scanning did not associate with a particular Act.
To rename ACT ? title: tap the Edit button, then tap the SORT ACTS button, then tap the RENAME “ACT ?” button, and enter a new name for the Act.
Scene Colors. Scenes with logged data appear in green. Scenes which have not been shot yet appear in blue.
To Delete Scenes: tap the Edit button, select scene(s), then tap the Trashcan button. Choose to delete just the selected scenes, or all the scenes. Scenes with logged data can only be deleted if deleting all scenes in order to restart the breakdown.
To View Scene Breakdown details: tap on a scene within the list.
SCENE BREAKDOWN DETAILS
Scene Breakdown Details appear in the right panel along with the Script PDF.
To view the Script PDF: tap the Pencil, Scene, Bookmark, Grid, or Magnifying Glass buttons (at the top of the right panel).
To view Scene Breakdown Details: tap on a scene from the list in the left panel, or the Scene button (at the top of the right panel).
Category buttons: On the left is a row colored buttons: SCENE, SYNOPSIS, CAST, EXTRAS, PROPS, COSTUMES, HAIR, MAKEUP, FX, STUNTS, VEHICLES, ANIMALS, LOCATION, NOTES. Tap a button to view/edit scene breakdown information for that category.
THE SCENE CATEGORY
Use this screen to edit this scene information— which appear in Script Breakdown Reports:
SSCEN field - the scene number/letter. This field cannot be changed if there’s already loggged data for the scene (the scene is green).
ACT field - enter a value into this field to associate the scene with a particular act.
To choose an existing Act from a list: tap the Ⓐ button.
PAGES field - the scene’s page count. This field can be used to auto-populate the PAGES field on the Script Dept Logging screen. Logged PAGES data (if any) appears in green below this field.
Manual Count. Tap the PAGES field and enter a count using the keypad.
Automatic Count. By default, Script PDF scanning populates this field with an estimate. This behavior can be disabled from MovieSlate’s Settings > Script Dept > Breakdown Reports section > Estimate Page Counts.
TIME field - the scene’s estimated running time. This field can be used to auto-populate the TIME field on the Script Dept Logging screen. Logged TIME data (if any) appears in green below this field.
Manual Timing. Tap the TIME field and enter a duration using the keypad.
Automatic Timing. By default, Script PDF scanning populates this field with an estimate based on the scene’s page count. This behavior can be disabled or adjusted for pacing from MovieSlate’s Settings > Script Dept > Breakdown Reports section > Estimate Running Time.
Stopwatch Timing. Tap the stopwatch icon (at top of screen) to start/stop a timer. Tap the stopwatch’s elapsed time text to display a menu. Tap the Paste into TIME field menu item to paste the elapsed stopwatch time into the TIME field.
STORY DAY field - which day in the story the action takes place. Script PDF scanning will import this information if it is contained in the Script PDF.
STORY DOW field - which day of the week in the story the action takes place.
STORY TOD field - which time of day in the story the action takes place. Script PDF scanning will attempt to import this information if it is contained in the Script PDF’s slugline.
SCHEDULED SHOOT DAYS field - on which shooting day(s) the scene is expected to be shot. Use the keypad’s comma button to add more than one day. This field can be used to auto-populate the Scheduled Scenes field on the Script Dept Setup screen and the PAGES / TIME fields on the Script Dept Logging screen (when enabled from MovieSlate’s Settings > Script Dept > Offer Breakdown Data). Logged DAY(S) data (if any) appears in green below this field.
SCHEDULED SHOOT DATES field - on which shooting date(s) the scene is expected to be shot. Each time this field is tapped, the chosen date is added to this field. Tap the field’s clear button to remove all the field’s dates. Logged DATE data (if any) appears in green below this field.
ADD NEW SCENE button (at bottom of screen) - tap to create a new blank scene which you can edit (useful when new scenes are added some time after originally scanning the Script PDF).
THE SYNOPSIS CATEGORY
SLUG field - the slugline (scene header) found when scanning the Script PDF.
DESC field - the scene description that will appear in Script Breakdown Reports.
SNIPPETS: ALL CAST list - a list of all the characters found in the Script PDF or entered into the CAST elements for all scenes. Tap on a snippet to paste it into the DESC text field.
RULER LINES ABOVE SLUGLINES buttons - tap the ADD button to add colored horizontal line annotations above each slugline in the Script PDF. Tap the REMOVE button to remove any existing ruler line annotations. Tap the color palette button to choose the ruler lines’ color.
THE ELEMENTS CATEGORIES
The Elements Categories are: CAST, EXTRAS, PROPS, COSTUMES, HAIR, MAKEUP, FX, STUNTS, VEHICLES, ANIMALS, LOCATION, NOTES.
Enter Elements one-per line for: CAST, EXTRAS, PROPS, COSTUMES, HAIR, MAKEUP, FX, STUNTS, VEHICLES, ANIMALS. That way, they can appear as Element Snippets which can be quickly added to other scenes.
Elements Snippets List: contains an alphabetized list of all a category’s elements from all scenes. Tap a snippet to add it as a scene element. Switch between ELEMENTS and CAST snippets lists by tapping the ELEMENTS and CAST buttons at the bottom of each list.
Choose which Elements should appear in Breakdown Reports from MovieSlate’s Settings > Script Dept > Breakdown Reports section > Include Element Lists.
Element Category Colors appear in Breakdown Reports and when adding elements from the Script PDF (see the next section below). To change a color tap the round swatch color button at the bottom of the screen.
PDF Highlights button - provides options to:
Add PDF Highlights for Elements that were previously added from the Script PDF (see the next section below). This can be useful if a new Script PDF has replaced the PDF to which highlights were originally added.
Remove PDF Highlights for Elements in the PDF.
Set Public/Private state for all Element highlights in the PDF.
ADDING ELEMENTS FROM THE SCRIPT PDF
To Add Elements from the Script PDF: Show the Script PDF. Select some text in the PDF, and an Edit menu appears. Select the + Breakdown menu item. A Breakdown Element screen appears with these features:
Element Text field contains the selected PDF text. Edit this text to be whatever you want to appear in the Breakdown Report.
The Aa button - with each tap of this button, Element Text is capitalized, lowercased, or uppercased. To revert to the original text: long-tap the Aa button.
Choose the Element’s Category by tapping one of the category buttons.
Add a Highlight Annotation to the Script PDF (when adding the element) by enabling the HIGHLIGHT TEXT IN PDF on/off switch. When an element is added, it respects the Public/Private annotation tool’s current state.
Add the Element to the current scene by tapping the ADD ELEMENT button.
BREAKDOWN REPORTS
Generate Breakdown Reports by tapping the up-arrow button in the top left of the Script Dept Setup screen.
There are two Breakdown Reports:
- Pre-Production Breakdown - reports only breakdown data, and does not include logged data.
- Progress Breakdown - is run as of a specific Shoot Day and can report both breakdown and logged data if enabled from MovieSlate’s Settings > Script Dept > Breakdown Reports section > Include Logged Data and Include Element Lists.
Script Dept: Markup
Script PDF Markup + Data Logging
Use the Script PDF Screen to markup (annotate) the script PDF, and to log data for reports.
Markup/Line the Script using annotation tools to create script coverage lines (aka tramlines), typed/handwritten/audio notes, pictures, and drawings that stick to the PDF itself. Most annotations can be selected, grouped, moved, stretched, erased, copied, and pasted. Tap on an annotation to select it, and inspect/change its properties including: color, opacity, line weight, typeface, and more.
Enter Data into Fields which MovieSlate saves (logs) for each take, and uses to later generate Script Reports. Most field data is persistent; you only need to alter the data when something changed on set. MovieSlate can automatically update some fields for you (such as the DATE), and auto-increment some data (such as TAKE). So even though MovieSlate saves a huge amount of data to its shot log History for each shot, you generally change a very small amount of data from take to take.
Script Pages
Tap on a script page (but not an annotation) to reveal the entire page by hiding the toolbar (at top) and the tabbar (at bottom). Tap the page again to show the toolbar and tabbar.
Swipe your finger or Apple Pencil left/right to move to to the next/previous script page.

Tap the page number’s grid icon (at page bottom) to show script page thumbnails. Tap a thumbnail to view its page.
Insert or Replace Pages
If inserting new script pages - create new email and attach a PDF containing the new pages. Send the email to your iOS device, open the email from the iOS Mail app, long-tap the PDF attachment’s icon, and choose to open the PDF from MovieSlate (which imports the PDF into MovieSlate), then...
To import or replace pages in the current script - go to MovieSlate’s Script Dept tab, and tap the Log + Mark Script button. Tap the grid button to view thumbnails of all the current script pages. Tap the Select button at the top of the screen. Select one or more existing pages— to indicate where the new pages will be inserted, and/or which existing pages to replace. Tap the Import button at the top of the screen, then choose whether to import or replace pages.
Add, Delete, Rotate, Move Pages
To edit the current script - go to MovieSlate’s Script Dept tab, and tap the Log + Mark Script button. Tap the grid button to view thumbnails of all the current script pages. Tap the Edit button at the top of the screen. Long-tap a page to drag it to a new position within the document. Normal-tap a page to select it, then tap the icons at the top of the screen to: add, delete, rotate, export, select, undo, redo. Tap the Done button (or checkmark icon at the top) to finish editing.
Script Toolbar (Screen Top)
Screen space permitting, the script toolbar contains some/all of these buttons (from right to left)...

- Search - tap to search for script dialogue, a scene description, or character name.
- Grid (in toolbar on iPad, and next to the script page number) - tap to view all the script pages from the Page Grid screen-- where you can quickly select a specific page, or add/delete/replace pages.

- Bookmark - tap to un/mark the current page. From the Page Grid screen, you can tap the Bookmarks button to view just your bookmarked pages.
- Take - tap to start/end takes. Read more about this in the Script Dept Data Logging chapter.
- Timecode/Stopwatch - tap to view either running Timecode or a Stopwatch-- and options to start/stop/reset the Stopwatch, and paste time into a script note that sticks to the PDF. Use the Stopwatch to log performance laps of continuous shots that don’t cut between takes, and save that info as a Take Note.
- Scene - tap to change data fields and type Scene/Take notes. Read more about this in the Script Dept Data Logging chapter.

- Video (iPad only) - tap to show/hide streaming camera video in a small window that floats above the script pages. Tap the video window to drag it around the screen. The video icon only appears in the toolbar after connecting to a Teradek Cube from the Video tab/screen.

- Annotation - shows/hides a toolbar of annotation tools used to markup the script (described immediately below).

- Back - returns to the Script Setup screen.
Document Buttons (Below Script Toolbar)
Screen space permitting, the script toolbar contains some/all of these buttons (from right to left)...
- Plus - tap to choose additional PDF documents to view. Open documents appear in a tabbar to the right of the plus button— or in a window pane to the right of the current PDF document (so you can view two PDFs side-by-side). This is useful for comparing new script pages with existing pages, before importing the new pages.
- Close box (in document tabbar) - tap to close a tab. Closing the single remaining tab hides the tabbar without closing the document.
- Save - saves the document's annotations immediately. The document is also auto-saved periodically when changing pages, document tabs, or screens.
Annotation Toolbar (Screen Left)
The Annotation Toolbar - contains tools used to draw coverage lines (aka tramlines), add notes, and other marks to the script (collectively known as Annotations). Most tools are arranged in groups (as denoted by a small triangle in each tool’s lower right corner). Long-tap a grouped tool to show/choose a different tool from its group. The tools/groups are:
- Note Tools Group

- Text Note - creates a typed note that sticks to the PDF page and is always visible.

- Sticky Callout Note - creates a typed note that collapses to an icon on the PDF page-- with a line and arrow that can be used to point to something on the page.

- Sticky Note - creates a typed note that collapses to an icon on the PDF page. Tap the note icon to view/edit its sticky note.

- Text Stamp - creates a custom text annotation with a border and optional date and time— and provides a list of stock stamp annotations to choose from.

- Clipboard - displays a list of saved annotations. To use: select any annotation on the current PDF page; tap this tool; then tap the Paste button in the Saved Annotations screen that appears. Later, tap the clipboard tool, then tap on any of the saved annotations to add them to the current PDF document page. Tap the Saved Annotations screen's Edit button to select saved annotations to remove from the list.

- Image Note - pastes an image from the Camera or Photos app onto the PDF page.

- Audio Note - records a voice note, displayed as a speaker icon on the PDF page. Tap the icon to listen to the audio recording.
- Line Tools Group

- Line - draws a single line segment on the page.

- Line Segment - draws multiple, connected line segments on the page.

- Rectangle - draws a rectangle on the page.

- Oval - draws an oval on the page.

- Polygon - works similarly to the Line Segment tool.
- Ink Tools Group

- Ink Pen - draws free-form lines and handwritten notes on the page that can be erased with the Eraser tool.

- Hilighter - like the Pen tool, but with translucent ink.
- Ungrouped Tools

- Eraser - erases portions of objects created by the Ink and Tramline tools. The Eraser tool does not work on annotations created by tools in the Note and Line groups. Double-tap the Eraser tool to set its size.

- Selection - used to select, group, inspect, and delete one or more annotations. With no tool selected, tap an annotation to select it. Double-tap the Selection tool to select or deselect all of a page's annotations.

- Tramline Header - tap to add a text annotation containing Scene, Take, Timecode, and/or Camera info optionally surrounded by a bubble shape (configurable from Settings > Script Dept). Tip: select any existing tramline (aka coverage line) headers, then tap this tool to add or remove bubbles.

- Tramline - tap to add a straight, vertical ink line annotation onto the page (called a coverage line or tramline). Tap the tool repeatedly to add more lines to the selected coverage line. Tip: select any existing coverage line or header, then tap this tool to add more lines.

- Eye (Public/Private). Private annotations can be easily excluded from exported Script PDF Reports. To mark an annotation as public or private: select it, then tap this tool. With no selected annotations, tapping this tool determines whether new annotations will be public or private.

- Highlight Characters. MovieSlate scans the PDF and automatically highlights character names and their dialogue blocks— and can also add sequential dialogue numbers next to each character’s lines.

- Color - tap to choose the ink, text, or line color.

- Undo - tap to Undo annotation actions.

- Redo - tap to Redo undone annotation actions.

- Drag - tap to move the Annotation Toolbar to the left, right, or top of the screen.

- Close - tap to hide the Annotation Toolbar (useful when the toolbar is positioned at the top of the screen; covering the toolbar).
Script Dept: Highlight Characters & Dialogue Numbering
Highlight Characters & Dialogue Numbering
MovieSlate can scan Script PDF documents and automatically highlight character names, dialog, and parentheticals— and add sequential dialogue numbers next to each character’s lines. MovieSlate can assign highlight colors, or you can choose your own. Toggle highlighting for each character to isolate and emphasize dialog appearance. This non-destructive highlighting can be edited, toggled, and excluded from your lined script reports.
To get started, tap the Characters button (theatre mask icon) in the Annotations Toolbar. The Highlight Characters screen appears.
To scan the PDF for Character Names and previously auto-highlighted text: enter the page number of the first page within the PDF document that contains actual dialogue; then tap the Scan PDF for Character Names button. After choosing a new PDF file or importing new PDF pages, tap the Trashcan button to clear the list of character names, then scan the new PDF. It can take a minute or so to process larger PDF documents.
For best results, use clean shooting-script PDFs that contain no extraneous pages. MovieSlate does its best to determine which PDF pages contain actual characters and dialogue, but can sometimes be fooled by pages which contain no dialogue or character names.
To delete inappropriate phrases from the character name list, tap the Edit button, select the phrases, then tap the Trashcan icon.
Highlighting Preferences
Set Highlighting Preferences by tapping the gear button (bottom of screen). These options appear:
- Parentheticals (below Character) - when enabled, new highlighting will include text in parenthesis (which is typically not dialogue).
- Dialogue (below Character) - when enabled, new highlighting will include a character's dialogue lines. New highlighting always includes character names (in ALL CAPS above each block of dialogue lines).
- Character’s Name Anywhere - when enabled, new highlighting will include a character's name throughout the PDF (except on MovieSlate report pages).
- Only when ALL CAPS - when enabled, a character's name will be highlighted only when it is ALL CAPS.
- All new Highlights are Private Annotations - when enabled, newly generated highlighting is private.
- DONE button - dismisses the Highlighting Preferences screen.
Sorting Characters
Characters / Most Lines - changes how the character names are sorted in the list. A count of dialogue line blocks appears to the right of each character's name.
Adding & Removing Highlights
To add or remove highlights for a character, tap the on/off switch next to a character’s name. MovieSlate auto-selects the next unused color in its palette. To generate highlights in a specific color, tap a character's name and choose a color from the palette.
Tap the √ ALL button to generate auto-highlights for all characters in the list.
Tap the √ NONE button to remove all auto-highlights.
The Highlight Characters feature will not disturb any manual highlighting.
Tap the Done button to dismiss the Highlight Characters screen.
Tap on a Highlight in the PDF to change the color of that single highlight from a menu that will appear.
Adding & Removing Dialogue Numbers
Dialogue #s - tap this button to show the Dialogue Numbering screen. Enter the page number of the first page within the PDF document that contains actual dialogue; then tap the Add Numbers button. Tap the Remove Numbers button to remove any existing dialogue number annotations.
Locking & Unlocking Dialogue Numbers
When locked, dialogue number annotations cannot be selected or moved (as though they were part of the PDF’s text). To manually edit or move annotation(s), unlock them all first.
Dialogue Numbers Preferences
Set Dialogue Numbers Preferences by tapping the gear button (bottom of screen). These options appear:
- Count from 1 at Scene Change - when enabled dialogue numbers start counting from 1 at scene changes. When disabled, sequential dialogue numbers start at 1 and never reset throughout the PDF.
- Locked (Not Selectable) - when enabled, new annotations are created and are automatically locked. You can use the Unlock Numbers button to unlock dialogue number annotations.
- Text Color - tap the rainbow button to choose a color to use for dialogue number annotations before creating them.
- Text Size - tap the pluse/minus button to choose a text size for dialogue number annotations before creating them.
- Text Font - tap this row to choose a font to use for dialogue number annotations before creating them.
- On Left, On Right, Right Column - choose where new dialogue number annotations will appear in the PDF. On Left and On Right will position the numbers before or after the character name. Right column will position the annotations near the right edge of the PDF page.
Script Dept: Tramlines (Coverage Lines)
Coverage Lines (aka Tramlines)
Marked scripts contain colored lines drawn down each page, known as coverage lines or tramlines. Each tramline corresponds to a particular shot, and provides a visual reference as to what the shot actually covers. Colors generally indicate the shot type. For instance: red is often used for masters and wide shots; blue for singles; black for multiples; and green for cutaways/inserts.
Coverage Lines can be straight and/or squiggly. The squiggly lines indicate that the dialogue and/or action is off-screen (not in the shot; not photographed).
A Tramline Header note usually appears above each coverage line. For SingleCam productions, the header usually contains the Scene/Setup. For MultiCam productions, the header usually contains timecode. You can configure the header's contents from MovieSlate's Settings > Script Dept > Coverage Lines (Tramlines).
Creating Tramlines
To create a coverage line header - tap the Tramline Header tool. A new header annotation then appears in the margin of the script page. Drag the selected header annotation into position.
To add or remove tramline header bubbles (bordered shapes which surround he header text) - select one or more tramline header annotations, then tap the Tramline Header tool. This is handy when continuing coverage lines to a subsequent page. Example: select bubbled tramline header annotations from the top of one page; copy them; go to the next page; paste them; and tap the Tramline Header tool to remove the bubbles from the pasted (still selected) header annotations.
To start a coverage line - tap the Tramline tool. A new straight inked tramline then appears in the margin of the script page. Tap the Tramline tool repeatedly to add more lines to the selected coverage line(s). Drag the selected coverage line(s) into position. Tip: with any existing coverage line or header selected, tap this tool to add more lines to the selection.
To resize a tramline - tap a coverage line to select it, then drag its bottom-right knob up or down— without making the selection box any wider.

To choose a tramline color - tap a coverage line to select it, then tap the color icon in the menu that floats above the selected tramline. To set the default tramline color - tap the color chooser’s Make Default button.
To draw tramline squiggles - select the Eraser tool, and use it to erase a portion of a straight coverage line(s). Then choose the Ink Pen tool and draw squiggles over the erased tramline section.
Tramline Defaults
Set Tramline Defaults - for bubble shapes, text, size, color, line thickness from MovieSlate's Settings > Script Dept > Coverage Lines (Tramlines).
Script Dept: Logging
Entering Data
Enter Data into Fields from the Script PDF Screen which MovieSlate saves (logs) for each take, and uses to later generate Progress Reports, Facing Pages, and Editor’s Logs. Most field data is persistent; you only need to alter the data when something changes on set. MovieSlate can automatically update some fields for you (such as the DATE), and auto-increment some data (such as TAKE). So even though MovieSlate saves a huge amount of data to its shot log History for each shot, you generally change a very small amount of data from take to take.
Tap the Scene button in the toolbar (at screen top) to show/hide the data fields:
- Slated Scene - is comprised of three fields: PREFX, SSCEN, SETUP. Choose various input styles for these fields from MovieSlate Settings > Fields > Script. Tap the ⊕ button to add more scenes to credit in the progress report (also useful for crediting scenes logged by second or third units).
- Scene Prefix (PREFX) - contains an optional scene prefix, such as: R for RESHOOT; or X for 2ND UNIT. Tap the CAM button (on the left of this field) to choose which camera letters should also reference the prefix in Editors Log and Facing Pages reports. Important: to ensure accurate Progress Reports, enter the scene’s prefix in the PREFX field rather than the SSCEN or SETUP fields.
- Script Scene (SSCEN) - tap to enter a script scene number (such as 1) using the keypad. Swipe up/down on the Script Scene to increment/decrement the scene without using the keypad or keyboard. Tap the plus button (on the left side of this field) to add more scenes shot simultaneously with the logged scene, for use in Progress Reports.
- Scene Setup (SETUP) - tap to enter a setup (such as A) using the keypad. Swipe up/down on the Scene Setup to increment/decrement the setup without using the keypad or keyboard. The left side of this field contains the Camera Setups Count for the Slated Scene; tap this button to manually set the count that’s used in Editors Log and Progress Reports.
- Time - displays the Scene’s duration and average take duration. Tap to enter a Scene duration using the keypad. Tap the keypad’s Takes button to set individual take durations. Tap the keypad's COMPLETE or PARTIAL buttons to indicate whether the current scene is completed.
- Pages - tap to enter a Scene’s page count (in eighths) using the keypad. Tap the keypad's CREDIT SCENE IN PROGRESS REPORTS on/off switch to determine whether the current scene will be included in Progress Reports.
- Page# - tap this field to enter a Script page number (which does not always match a PDF page number). Script page numbers are used when creating Facing Pages Reports. After tapping this field, tap its keypad's Build New Facing Page button to insert a new facing page before the currently visible PDF page.
- Scene Notes - tap to enter notes for the current Scene/Setup.
- Circle Takes (Ⓣ ICON) - tap to circle takes (and cameras) from a list of previous takes. Cameras without checkmarks appear as NO-PRINT on the History screen, and in Editors Log and Facing Pages reports
- Sound Roll (SROLL) - tap to enter the current Sound Roll using the keypad.
- Take - tap to enter the current Take number using the keypad. Swipe up/down to increment/decrement the Take number. You can choose to auto-increment the Take number when each take ends from: MovieSlate Settings > Behavior > Shot Behavior.
- Cameras: Roll, Frame, Subject grouped fields for up to 26 Cameras. Swipe left/right on any camera field to switch between cameras. Swipe left/right on the camera letter buttons to see more letters. Tap Cam to enable/disable cameras, or edit camera colors, letters, and names. Tap Roll to enter a Camera Roll using the keypad. Tap Frame to choose a framing abbreviation (such as XCU for Extreme Close Up). Tap Subj to choose an actor or character name.
- Camera Metadata (iPad only) - tap the More button to display metadata fields for the selected camera letter (such as FPS, Shutter Speed, Focal Length, and more). This field data appears in Editors Log and Facing Pages reports, and can be automatically added to Tramline Header text (configure from Settings > Script Dept > Coverage Lines > Contents).
- Setting/Clear Data for Multiple Cameras - tap a camera field’s label (on its left side) to edit the label, or copy field data to multiple cameras. Tap a camera field’s clear button (on its right side) to clear its data, or data for multiple cameras.
- Camera-Specific Notes - create/edit camera notes by double-tapping a camera’s letter button.
Logging Data
Tap the Take button in the toolbar (at screen top) to start or stop a take and log all field data to MovieSlate’s Shot Log History.
While a take is in progress, these fields are visible:
- Scene, Time, Pages, Page# - as described above.
- Take Notes - tap to enter notes for the current take.
- Circle Takes (Ⓣ ICON) - tap to un/circle takes (and cameras). Cameras without checkmarks appear as NO-PRINT on the History screen, and in Editors Log and Facing Pages reports.
While a take is in progress, these fields may be visible after tapping the ★ button (o the left of the NOTES field):
- False Take X - tap to mark a false take and start again.
- Sound Rating - tap/swipe to star-rate this take’s sound.
- Picture Rating - tap/swipe to star-rate this take’s picture.
- Issues - tap to choose this take’s quality issue (if any). Edit the items in this list from MovieSlate Settings > Text Snippets.
Script Dept: Reports
Script Reports
If viewing the Script PDF Screen, tap the Back button to return to the Script Dept Setup screen (the screen that displays the PROJ name).

From the Script Dept Setup screen, tap the Share button (at the top-left of that screen), then choose one or more of these reporting options:
- Script PDF - exports selected pages and their annotations to a new PDF.
- Pre-Production Breakdown - reports only breakdown data, and does not include logged data.
- Progress Breakdown - is run as of a specific Shoot Day and can report both breakdown and logged data if enabled from MovieSlate’s Settings > Script Dept > Breakdown Reports section > Include Logged Data and Include Element Lists.
- Progress Report - generates a report showing a shoot day’s progress. This report can be run at lunch or after you’ve wrapped the day.
- Facing Pages - generates a report that lists/details a shoot day’s takes in scene order. Facing Pages can also be inserted into the Script PDF itself by tapping the Log + Mark Data button, tapping the PAGE# field, then its keypad's Build New Facing Page button to insert a new facing page before the currently visible PDF page.
- Editors Log - generates a report that lists/details a shot day’s takes in shooting order.
Single/Multi Day Reports - Progress Reports are always generated for a single day. Editors Log and Facing Pages reports can be generated for multiple days— so long as a Progress Report is not being generated at the same time.
The selected script reports are generated and merged into a single PDF— shown in a preview window— where you can edit and annotate it further, if desired.
Tap the Share button to email, print, or share the report (via other installed iOS apps, such as Dropbox).
MovieSlate XML, CSV, and HTML reports can be generated from the History tab/screen’s sharing button.
Script Report Setup
Choose default email recipients from MovieSlate Settings > History Reports > Email To and Email BCC.
Choose report paper sizes from MovieSlate Settings > History Reports > PDF Options. Note that Script Reports are always generated in portrait orientation.
Your contact info can optionally be included in Script Reports. Enter your info from MovieSlate Settings > History Reports > My Info.
Your
production logo can optionally be included in Script Reports. From the
MovieSlate tab/screen, swipe left once to reveal a blank space for a production graphic— which is displayed on the slate. Tap the blank space to choose a graphic from your iOS Photo library. The graphic will then appear momentarily.
Reports can be emailed and/or archived. Set this option from MovieSlate Settings > History Reports > Email / Archive Reports. From there, tap the Archives button to view a list of existing archives. Tap an archive in the list to share it via AirDrop, Dropbox, or Email.
Script Dept: Settings
See the Settings > Script Dept chapter of this User Guide.
History screens
|
THE HISTORY SCREEN
|
|
Each time you “start a shot”, all the fields on the MovieSlate, Camera, and Sound Dept screens are saved to MovieSlate’s shot log History.
Use the “History” screen to view, search, edit, duplicate, MovieSlate’s shot log History and Notes. From this screen, you can also export/email various History Reports.
MovieSlate’s shot log History is organized as a collection of Projects (one per production or television episode). Each Project is a collection of Shots. Each Shot contains data fields, and can optionally contain a collection of Notes.
Internally, MovieSlate stores its shot log History data in a SQLite database file called userdata.sql— which you can backup or import from iTunes using iOS File Sharing. You can also export a “MovieSlate XML” History Report, then archive the shot log data to an external database such as Pomfort’s Silverstack SET desktop appliation.
NAVIGATING THE HISTORY SCREENS
On iPhone and iPod touch, History is presented as a stack of screens: Projects > Shots > Shot Details > Shot Notes.
On the iPad (in landscape orientation), the Projects > Shots stack of screens is presented on the left, and the Shot Details and Notes are shown on the right. To view the Projects > Shots stack of screens while in portrait orientation, tap the Shot x of x button at the top of the Shot Details screen.
History screens: Projects
|
HISTORY PROJECTS SCREEN
|
|
All the Projects you’ve created will appear on this screen.

Tap the blue ">" button to edit a Project’s information— which includes Production name, Episode, Producer, Client info, Camera format, and Sound fields (when the Sound Department plugin is installed).

To delete projects, and all their shots & notes, swipe your finger across a project’s name. Or tap the Edit button then the Trashcan button. Warning: all deletes are final. It’s a good idea to email the history log to yourself before deleting any information, or use iOS File Sharing to save a backup of your MovieSlate userdata.sql file.
Tap on a Project’s name to view a list of all its Shots.
History screens: Shots
|
HISTORY SHOTS SCREEN
|
|
This screen is divided into sections. Each section represents a project, and contains a row for each of its shots.
Tap a section header to quickly scroll:
- to the first shot — when viewing a Single Project
- to the previous project — when viewing All Projects
Tap a section footer to quickly scroll:
- to the last shot — when viewing a Single Project
- to the next project — when viewing All Projects
SHOT ROWS
Tap on a shot row to view its details.
On iPad, double-tap a shot to un/circle its take. While editing the list of Shots, tap the Ⓣ button to select/circle/uncircle shots in the list.

A colored badge displays the number Shot Notes (if any) attached to the shot. Tap the badge (on iPhone or iPod touch) to view a list of the Shot Notes.
A red badge appears next to the shot that is currently “in progress” (if any).
To Delete a shot and all its Notes, tap the Edit button, select some shots, then tap the Trash can button.
Warning: all deletes are final. Before deleting anything, it’s a good idea to backup your data using our free MovieSlate Cloud service, or email the history log to yourself, or use iOS File Sharing to save a backup of your MovieSlate data.
SEARCHING
You can search the list by SLATE, camera/sound ROLL, SCENE, or TAKE. To do so, tap on the search box at the top of this screen. A keypad appears. Example: to search for scene 2: tap the keypad’s SCENE button, then tap the keypad’s “2” button.
You can also combine search terms. Example: to search for scene 2, take 5: tap the keypad’s SCENE button, tap the keypad’s “2” button, tap the keypad’s TAKE button, then tap the keypad’s “5” button.

To clear the search, tap the round “x” button on the right side of the search text at the top of the screen.

To close the keypad, tap the keypad’s blue “close” button.
SORTING
To change the list’s sort order, tap the Edit button at the top of the screen, then tap the up/down triangles to sort the list in ascending or descending order.
While editing, tap the Sort button (to the left of the up/down arrows) to sort on a different field (such as Date/Time, Rank, Rank, Title, Slate, Camera/Sound Roll).
History screens: Shot Details
|
HISTORY SHOT DETAILS SCREEN
|
|
This screen displays all the data for a particular shot in the MovieSlate shot log History.
Edit on any of this screen’s fields by tapping on them— that includes the date, time, timecode, and geographical location.
Tap the white arrow buttons to show the previous and next shot.
Tap the slate button (at the top-right of this screen) to:
- Clone the Shot - create a duplicate of the selected shot.
- Copy to Slate - load all the shot's data to the Slate, Camera, and Sound Dept screens.
- Copy to Slate, then Delete - use this option to essentially "reslate" a shot. Important! After tapping this button, you should immediately tap the clapper sticks to start a new shot in order to save the data back to History (along with new timecode, note, and GPS location data).
Tap the Un/Circle button to circle or uncircle this take (shot). A circle is then drawn around the shot’s TAKE field.
Tap the pencil button to create a new Note for this shot.

Tap the key button - to create a note containing custom, shot-specific Keywords for inclusion in Final Cut Pro X XML reports.
Tap the camera button to create a new Image Note for this shot by taking a new photo (from iOS devices with cameras), or choosing an existing picture from the iOS Camera Roll or Photo Library (useful for importing sketches created by iOS drawing apps).
Tap the microphone button to create a new Voice Note for this shot.

Tap the speaker button to toggle the speaker on/off when listening to voice notes.
ON iPHONE AND iPOD TOUCH
Tap the Sound Tracks row (if visible) to display the Sound Tracks screen where you can edit any of the track data.
Tap the “Shot Notes” row to display a list of Notes (if any) for this shot.
Tap the buttons below the Notes list screen to create new text, voice, or image notes.
ON iPAD
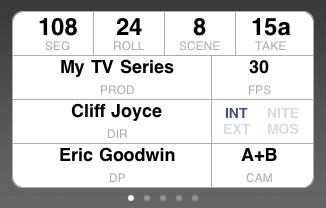
This screen comprises most of the History screen.
The top of this screen displays the Shot’s Details, arranged in blocks within a white, rounded box. Scroll through the detail blocks by swiping your finger to the left/right over the white, rounded box.
The bottom of this screen contains a list of Shot Notes for the selected shot. Tap the buttons above the Shot Notes list to create new text, voice, or image notes. Tap the Search field at the top-right of the screen to search all Notes in all Shots.

Tap the zoom button (with 4 arrows) to zoom the Shot Notes list to full screen height. Tqp the zoom button again to return to normal.
Tap the Tracks & Notes title to hide/show the Sound Tracks (when the Sound Department plugin is installed).
SHOT NOTES
|
Tap to edit date, time, timecode.
|
To edit a note’s text, tap on the right side of a note row’s red divider lines.
|
View an note’s image, or hear a note’s audio by tapping the blue button on the right side of the note.
History screens: History Reports
|
HISTORY REPORTS
|
|
To create/send History Reports, go to the History screen, tap the share button (far-right on iPad; in various places on iPhone and iPod touch). After you choose the report’s format and scope, the report file(s) are optionally zipped along with note images and audio files, and attached to an email. An email screen appears where you can add recipients, edit the email’s message, then click the Send button.
REPORT FORMAT
MovieSlate supports a number of different report formats, described below. You can pre-select multiple formats from MovieSlate’s Settings > History Reports. MovieSlate can build/send multiple reports at once (for most report types).
Otherwise, after tapping the share button, a menu appears with the following choices:
- Sound Report - for details, please refer to the “Exporting & Sending Sound Reports” in the “The Sound Dept Screen and Plugin” section of this User Guide.
- Camera Report - generates an HTML report of all shots grouped by Project, Day, and Camera. Can be used for both SingleCam and MultiCam workflows.
- MultiCam Report - for details, please refer to the “Exporting & Sending MultiCam Reports” in the “The MultiCam Screen and Plugin” section of this User Guide.
- Formatted HTML - an easy-to-read report that can be viewed in any computer web browser. To view the report, drag the HTML file to your web browser application’s icon on your computer.
- MovieSlate XML - the recommended format for importing MovieSlate shot log History into sophisticated external databases, and application programs such as Pomfort’s Silverstack SET
- Final Cut Pro 7 XML - contains Shot and Notes data for import into Final Cut Pro 7 and older. After receiving the XML file on your Mac, run Final Cut Pro 7, select the menu: File > Import > XML, then choose the exported MovieSlate Shot Log for FCP 7.xml file. You can choose whether to export “Clip Bins” and/or “Sequences” from MovieSlate’s Settings > History Reports > Final Cut Reports > FCP7 XML Export. You can also choose whether to export Notes as FCP Markers in shots and/or sequences from MovieSlate’s Settings > History Reports > Final Cut Reports > FCP7 XML Markers.
Relinking Offline FCP7 Media - after import, FCP7 shows each shot as “Media Offline”. To relink the shot to the offline media (movie) files, right-click the clip and choose “Reconnect Media”. Final Cut Pro uses filenames to link logged meta data with media, so it is important to enter accurate data into the Filename field on MovieSlate's Camera tab/screen.
- Final Cut Pro X XML - sends MovieSlate log data to our free KeyClips app for macOS (download from movie-slate.com). For complete instructions: see the KeyClips app > Help > KeyClips Help. This type of report must be run by itself (not with other reports).
- Avid ALE (and Locators) - exports two files for import into Avid Media Composer:
- MovieSlate Clips.ale - contains shot and ASC CDL color look data (one row per clip)
- MovieSlate Locators.txt files - contains shot Notes (one file per clip)
After receiving the exported files on your computer, run Media Composer, select a Bin window, select the menu: File > Import, and choose the exported MovieSlate Clips.ale file. Select the menu: Tools > Locators, then select the menu: File > Import Locators, and choose a MovieSlate Locators.txt file.
- Prelude Marker Notes - exports a MovieSlate Prelude Markers.xmp file containing shot notes. After receiving the exported file on your computer: run Adobe Prelude; open a clip’s timeline; open the Unassociated Metadata window (from Prelude’s Window menu); click the Import button; and choose the XMP file that you exported from MovieSlate. Select the markers you want to assign to the selected clip, then click the Apply Markers button.
- Premiere Batch - exports a MovieSlate Premiere Batch.csv file containing shot data and notes. After receiving the exported file on your computer, run Adobe Premiere, select the menu: Project > Import Batch List, and choose the MovieSlate Premiere Batch.csv file.
A better Premiere workflow might be to export your data in Final Cut Pro 7 XML format, then import the FCP7 XML into Premiere. The FCP7 XML supports a much larger set of MovieSlate meta-data than is supported by the Premiere Batch format.
- Notes CSV - each row of this report is a shot note along with its parent shot’s fields, separated by commas. This format is suitable for importing notes into computer spreadsheets or databases. This format differs from the CSV Data format (below) because it only includes data in which shot notes were logged, and it is a single table.
- CSV Data - each of this text file’s rows contains a shot, and the shot’s fields are separated by commas. This format is suitable for importing shot log History into computer spreadsheets or databases.
- Plain Text - each of this text file’s lines contains a shot, and the shot’s fields are separated by tab characters. This format is suitable for importing shot log History into computer spreadsheets or databases.
REPORT SCOPE
After choosing a report format, MovieSlate will often prompt you to choose which records will appear in the report— the “scope”. Scope may be limited based upon which History screen (Projects, Shots, Details) you’re viewing when you tap the share button to send a report.
Several report formats (Formatted HTML, CSV, Plain Text) can contain a subset of shot data. You can choose which shot data fields will appear in these reports, and the order in which they will appear— from MovieSlate’s Settings > History Reports > Report Contents.
REPORT OPTIONS
Attachments. If your MovieSlate shot log History contains image or voice notes, then you can choose to send them along with your reports— from MovieSlate’s Settings > History Reports > Attach Files. When sending a large number of files, MovieSlate may attach the files to multiple emails, and send them in batches.
Zip Compression. To reduce the amount of time it takes to email a report and related files, you can choose to compress the email attachments into a zip file and optionally protect it with a password— from MovieSlate’s Settings > History Reports > Compress Files. This is highly recommended for XML report formats which compress significantly. To decompress password-protected zip files on a computer, you may need to install Stuffit Expander on your computer.
Emails and Archives. Send your reports via email and/or ZIP archive them inside MovieSlate. MovieSlate’s Settings > History Reports > Email + Archive. You can manage your archives by tapping the Archives button and you can download them to your computer using iOS File Sharing when you don't have an internet connection to send email.
To download the archives directly to your computer connect your device to your computer and open the iTunes application. Click on your device, then click on the Apps tab. Scroll the window down to the iOS File Sharing section and click on the MovieSlate icon. The list on the left will display all the reports you have archived. You can drag the files to your desktop or select the archives and click the Save button. All report archive file names begin with "archive".
Email Recipient List. You can create a list of email addresses to whom your reports will be sent. Tap on MovieSlate’s Settings > History Reports > Email To or Email BCC, and choose to configure a default or per-project setting. Then tap choose an email address by tapping the blue plus button (repeat to add multiple email addresses). You can also type or paste email addresses into this recipient list. When this list is empty, you’ll be able to choose email recipients after the history report has been build.
MY INFO & MY LOGO & PRODUCTION GRAPHIC
Your contact information, logo, and/or a production graphic can appear at the top of two of MovieSlate’s report formats:
Formatted HTML, and
Sound Report.
- My Info - go to MovieSlate’s Settings > History Reports > My Info. Tap the blue plus button in the upper right corner of the My Info screen. Choose your contact card from the iOS Address Book to paste its data into My Info. Edit the pasted text as needed. Make sure the Include in Reports button is ON. Typically, you only need to enter this data one time— not each time you run a report.
- My Logo - go to MovieSlate’s Settings > History Reports > My Logo. Tap the Choose Image, then choose a graphic from your iOS Photo library. Typically, you only need to enter this data one time— not each time you run a report.
- Production Graphic - from the MovieSlate screen, swipe left once to reveal a blank space for a production graphic— which is displayed on the slate (and appears at the top of HTML and Sound reports). Tap the blank space to choose a graphic from your iOS Photo library. The graphic will then appear momentarily.
Settings > Movie★Slate Cloud

|
MovieSlate Cloud is a free service you can use to backup and restore your MovieSlate data and settings, and share MovieSlate Workspaces.
|
|
To Register: go to the MovieSlate Cloud section of the Settings screen, and tap the "Register" button. Enter your name, email address, and a new strong password. Check your email, and tap its Activate Account link.
To Sign in: go to the MovieSlate Cloud section of the Settings screen. Enable the Remember Password option to save your password in the iOS Keychain so you won’t have to enter it again. Then tap the Sign In button. When prompted, enter your username and password.
To Backup: tap the Backup button to archive all your MovieSlate data on the Cloud. If you belong to any MSCloud Groups (see below), then you can choose to share your new Backup with any/all/none of them.
To Restore: tap the Restore button. A list will appear that contains your Backups and those shared with MSCloud Groups (see below) you belong to. Tap a Backup to replace all your data with a backup from the Cloud. Tap a Backup row’s round info button (if visible) to set its Group sharing permissions.
Store Multiple Backups with a PRO Features subscription (an optional in-app purchase). This is a great way to archive and restore old projects.
Share Backups with Groups with a PRO Features subscription (an optional in-app purchase), you can share individual Backups with other PRO subscribers. From movieslatecloud.com you can create a group and invite colleagues to join it. You can then choose to share Backups with your Groups by tapping MovieSlate’s MSCloud Backup or Restore buttons (see above).
Share Projects with Colleagues with a PRO Features subscription (an optional in-app purchase). To retrieve the shared project, your colleague does not need to be a PRO Features subscriber. Tap the Send Shared Data button; choose one or more projects. Then send the projects via either:
- AirDrop - tap on the name of your colleagues’ nearby iOS device which is also running MovieSlate 8.
- MovieSlate Cloud - enter a MovieSlate user colleagues’s email address.
Optional Backup Contents - to reliably send them, backups are limited to a compressed size of 600 MB. To reduce backup sizes, exclude some optional backup contents by disabling these items:
- Image & Sound Files - associated with logged image/sound notes.
- Report Archives - reports that have been saved to to a local archive (as per Settings > History Reports > Email and/or Archive).
- Non-Project PDFs (Script Dept subscribers) - temporary “non-project” PDFs are documents that are not tied to a particular logged project (such as partial scripts, call sheets, and non-scripts).
More to Come! Over time, we’ll be adding more free and paid services to MovieSlate Cloud— making it easy to collaborate with colleagues via the web. Production and Post-Production teams will be able to share data, search for data, generate reports, and more.
Settings > Movie★Slate Store

|
SETTINGS > Movie★Slate Store
|
|
Use this screen to learn about and purchase a subscription to MovieSlate PRO features. Subscriptions are purchased directly within the MovieSlate app using your iTunes account information, and are enabled immediately upon purchase.
Your iTunes Account will be charged upon purchase confirmation. The subscription automatically renews on a monthly basis unless you set auto-renew to be turned off in your iTunes Account at least 24 hours before the end of the current subscription period. Your iTunes Account is charged for a renewal within 24-hours prior to the end of the current period.
You can manage your subscription by signing into iTunes and navigating to the Account Settings section after purchase. There are no cancellations for the current subscription period during the active subscription period. (Meaning there are no refunds— if you cancel your subscription, the service benefits will be available to you until the end of your current subscription period.)
Once you’ve purchased a subscription, you can use it on any compatible iOS device that’s associated with your iTunes account. Just install MovieSlate on that iOS device, go to MovieSlate’s Settings > MovieSlate Store, and tap the RESTORE button at the top of the screen. You will be prompted to enter your iTunes account name and password.
Settings > Workspaces + Defaults

|
Workspaces are collections of MovieSlate Settings— configured for a particular workflow. You can load Settings from a Workspace, create new Workspaces that contain your current Settings, and share Workspaces with other MovieSlate users. For instance, Production companies might create custom Workspaces and share them with new crew members. Or one crew member might build and send a Workspace to a crew member who is filling in for the day.
|
|
WORKSPACE ICONS
There are three types of Workspaces:
- Default - are built into the MovieSlate app and cannot be deleted.
- Local - were created by you.
- Downloaded - were downloaded from MovieSlate Cloud.
USING WORKSPACES
- Creating a Workspace - Go to MovieSlate’s Settings > Workspaces. Tap the + button. Provide a name for the new Workspace.
- Sharing a Workspace - Then go to MovieSlate’s Settings > MovieSlate Cloud, and log in. Go to MovieSlate’s Settings > Workspaces. Tap the share button (to the right of a Workspace name).
- Loading a Workspace - Go to MovieSlate’s Settings > Workspaces. Tap on a Workspace. Choose to replace or merge check-marked Settings Categories with those from the Workspace.
- Replace - erases existing Settings data, then imports Workspace data.
- Merge - preserves existing Settings data, then imports only new Workspace data. Merge applies only to Themes, Snippets, and Filename Input Styles.
Settings > Appearance

|
From this screen, you can customize the appearance of clappersticks, hinges, colors, fonts, and more.
|
|
THEMES
- Choose a Theme to quickly apply multiple appearance options at once.
- Create a New Theme by tapping the Save as New Theme button after changing one or more Theme Elements (described below).
THEME ELEMENTS
- Clapper Hinge - the hinge’s appearance can be customized, and the hinge can appear on the left or right side of the clapper sticks. The hinge is visual decoration, and can also be configured as a button (from MovieSlate Settings > Behavior > Clapper Hinge).
- Clapper Top - a design to use for the top clapper stick.
- Clapper Bottom - a design to use for the bottom clapper stick (or choose Match Top to match whatever design is used for the top clapper stick).
- Clapper Text - text to appear on the right side of the top clapper stick. To choose the text color, tap the rainbow button to the right of the text field.
- Background - tap this row to choose a slate’s background color or graphic. To choose a custom color, tap the rainbow button to the right of the text field.
- Timecode Color - tap this row to choose the color of the timecode and userbits digits from a list of color swatches. To choose a custom color, tap the rainbow button to the right of the text field.
- Timecode Font - the font of the timecode and userbits digits. The digits may be more legible with the Draw Digits with Ghosted elements disabled.
- Slate Font - the font for all other text fields on the slate screen. Tap one of the five A buttons at the top of this screen to view: San Serif, Serif, Typewriter, Handwriting, or Script fonts.
SLATE OPTIONS
- Show Zoom Button ON SLATE TIMECODE - tap the zoom button to zoom the timecode display full screen. Tap again to zoom back to normal.
- Show Mirror Button AT BOTTOM TO FLIP SLATE - tap the mirror button to flip the display backwards— useful for filming images reflected in a mirror.
FLASH/CHART GRAPHICS
MUSIC VIDEO
- Show 'Start Playback' Button ON TOP CLAPPERSTICK - to make it obvious that tapping that button (or the clappersticks) will start music playback and a new shot.
- Show Current Marker Cue ON BOTTOM CLAPPERSTICK - to display the name of the last tapped Start-point Marker (which is easier to read at a distance than the marker show above the timecode display).
- Marker Cue Text Color - to set the color used to display the marker cue text on the bottom clapperstick.
HISTORY
- Circled Take Color - choose the color used to draw circles around take numbers on the History screen.
SOUND DEPT
- Track Style - choose how tall each Sound Track should be, and which fields each should include.
- Track Arm Color - sets the color of each track’s enabled arm button. Tap this settings row to choose from a menu of choices, or to have the arm button color match the track label color. Tap the rainbow button (on the right side of the row) to choose a custom color.
- Start Shot Button Color - sets the color of the Start Shot button at the top of the Sound Dept screen.
Settings > Behavior > Triggers

|
From this screen, you can fine-tune the app’s behavior to best fit your particular workflow.
|
|
CLAPPER HINGE
Choose what happens when the hinge button is tapped:
- Does Nothing - the hinge is not a button.
- Starts Shot - immediately starts the shot. However, when a MultiCam shot is in progress: instead of starting a shot, a time-stamped “clapperstick” note is added to the MultiCam master shot.
- Tap Anywhere - a tap on the hinge “arms” the slate. Then tap the slate anywhere else to actually start the shot.
- Simulates Denecke Sticks - a tap on the hinge toggles the sticks open/close, displaying the MovieSlate’s Settings > Behavior > Sticks Open credits animation (if any) beneath the MovieSlate screen’s timecode digits.
- Locks Things - displays a list of items which can be simultaneously locked:
- Locks Nothing - clears all hinge lock options, and returns to the main Clapper Hinge Behavior menu.
- Locks Rotation - prevents the screen from automatically rotating when your iOS device is rotated. This MovieSlate feature is not available for iPad (in order to support iPadOS Split-Screen Multi-Tasking). You can also lock and unlock screen rotation by swiping down from the top-right corner of your screen to open Control Center, then tapping the orientation lock button (with the circle-arrow icon). The system-wide rotation lock supecedes MovieSlate’s rotation lock.
- Locks Timecode Scrolling - locks the Slate tab's timecode sliding panel.
- Locks Clapper Scrolling - locks the Slate tab's clappersticks sliding panel.
- Locks Clapper Clapping - locks the Slate tab's clappersticks so when accidentally tapped, a new shot is not triggered.
- Locks Data Scrolling - locks the Slate tab's other sliding data panels.
- Locks Data Editing - prevents data from being entered into slate fields. On busy sets, this can prevent accidental changes to your slate data by unauthorized personnel. Of course, setting an iOS password might do this better (from the Settings app > General > Passcode Lock).
SHOT TRIGGERS
Choose how to start shots:
- Tap Clapper - starts a shot. When a MultiCam shot is in progress: instead of starting a shot, a time-stamped “clapperstick” note is added to the MultiCam master shot.
- Tap Clapper, then tap Anywhere - a tap on the hinge “arms” the slate. Then tap the slate anywhere else to actually start the shot.
- Tap Clapper or Shake to Clap - tap the clapper (as in Tap Clapper above), or vigorously shake your iOS device to start the shot.
- Tap Clapper or Change Volume - tap the clapper (as in Tap Clapper above), or change the system audio volume (convenient when using a Bluetooth selfie remote control).
- Tap “Start Shot” button - when chosen, the clapper sticks are replaced with a Start the Shot button.
- Clapper or WTS sticks - when synced with a physical Wireless Timecode Slate (WTS) such as the Denecke TS-TCB or Betso WTCS-1, shots will started by closing the WTS’s sticks, or by tapping MovieSlate’s closed sticks.
- Clap External Clappersticks - for use with an external clapper stick case such as ikan’s T-Slate. Shortly after the external sticks clap, MovieSlate’s clap detection software triggers the shot, saving it to History. In this mode, a Detect External Claps button appears over the onscreen clapper sticks. Tap the button to enable external clap detection prior to each shot. After enabling detection, two additional buttons appear: Detect Motion and Detect Sound. You can tap those buttons to enable/disable that form of clap detection. When motion and sound are both enabled, detection is quite good. However, you may experience false positives in some locations as the clap detection software is experimental and will be improved in later MovieSlate releases. To help prevent false-positives, clap detection is auto-disabled when the shot starts. During a shot, MovieSlate’s In-Progress screen contains a False Take button to quickly undo any false positives. Note that this feature is not compatible with Music Video mode and is not available on macOS.
When Using External Clappersticks, these additional settings come into play:
- Arm Before Each Shot - helps reduce false positives by showing a Detect External Claps button on MovieSlate’s clappersticks— which must be tapped to arm external clapperstick detection before each shot.
- Sound Sensitivity - can improve the reliability of external clapperstick sound detection.
Settings > Behavior > Shot Behavior
|
|
Choose what happens when each shot starts and stops...
|
|
WHEN SHOTS START
- 4 Second Timecode Freeze - freeze the starting timecode in the display for 4 seconds so it can be photographed.
- Reset Timecode on Clap - reset the timecode to the most recent value you entered using the Keypad.
- Show Timecode on Clap - shows the timecode if it was not already visible.
- Zoom Timecode on Clap - zooms the timecode full screen for a moment.
- Flash User Bits on Clap - briefly show the User Bits instead of the timecode display.
WHEN SHOTS END
- Confirm “End the Shot” - you’ll be asked if you really want to end the shot after tapping the End the Shot button in the MovieSlate screen.
- Pause Timecode when Shot Ends - pause (and jam) the timecode display (when not synced).
- Show Slate when Shot Ends - immediately return to the slate screen. Otherwise, the shot ends, but the Shot In Progress screen is not automatically closed— so you can continue to rate and make notes about the shot that just ended.
- Show Tail Sticks - display the Slate screen upside down with the shot’s ending timecode. Tap anywhere on the Tail Sticks screen to dismiss it. This feature is sometimes used when the camera has not filmed the clapperboard at the start of the take for some reason. So a “Tail Sticks” order is given, and a “tail slate” (or “end slate”) is filmed at the end of a take— during which the clapperboard is held upside-down (as an indication to post-production that this is a tail slate).
- Increment Slate number - automatically increase the SLATE field’s numeric value.
- Increment Take number - automatically increase the TAKE field’s number/letter.
- Increment Filenames - automatically increase the numeric portion of a camera’s Filename (on the Camera and MultiCam screens), and the sound Filenames (on the Sound Dept screen).
ON FALSE TAKES
On false takes, Sound Mixers are sometimes instructed to “hold the roll” and so stop their recorders. Since new sound files were created on the recorders, MovieSlate’s SLATE (SEG) number and filenames should logically increment. Things may be different for the Camera Department. Set these options to choose which items MovieSlate should auto-increment on false takes:
- Save to History - determines if the False Take should be saved to History, or automatically deleted.
- Prefix Take with “FT” - when saving a False Take to History, you can choose to have its TAKE field prefixed with “FT” (in History and Reports only— this setting does not affect the TAKE field shown on the MovieSlate and Sound Dept screens).
- Increment Take number - automatically increase the TAKE field’s number/letter.
- Increment Slate number - automatically increase the SLATE field’s numeric value.
- Increment Filenames - automatically increase the numeric portion of the camera’s Filename (on the Camera screen), and the sound Filenames (on the Sound Dept screen).
ON MOS SHOTS
- Clapperstick Label for MOS - when the slate’s MOS indicator is on, draw a large “MOS” label on the clappersticks.
- Clapperstick Vertical for MOS - when the slate’s MOS indicator is on, draw the top clapper stick fully open (straight up).
- Save Sound Filenames on MOS - when the slate’s MOS indicator is on, continue to save sound filenames.
ALWAYS
- Prevent Sleep - keeps the iOS device awake while the MovieSlate app is visible.
RELATED OPTIONS
- Reset TAKE to 1 - set the TAKE field to “1” whenever the SCENE changes.
- Reset TAKE to 1 - set the TAKE field to “1” whenever the SLATE changes.
- Reset SLATE to 1 - set the SLATE field to “1” whenever the SOUND ROLL changes.
SLATE SOUNDS
- Play Sound Effects - play the Clapper Sound and Pre-Roll Beeps (set separately in MovieSlate’s Settings > Slate Behavior).
- Clapper Sounds on MOS - when the slate’s MOS indicator is on, play (or suppress) the Clapper Sound.
- Clapper Sound - the sound that will play when the clapper sticks close— when enabled from MovieSlate’s Settings > Behavior > Play Sound Effects.
Settings > Behavior > Pre-Roll + Credits
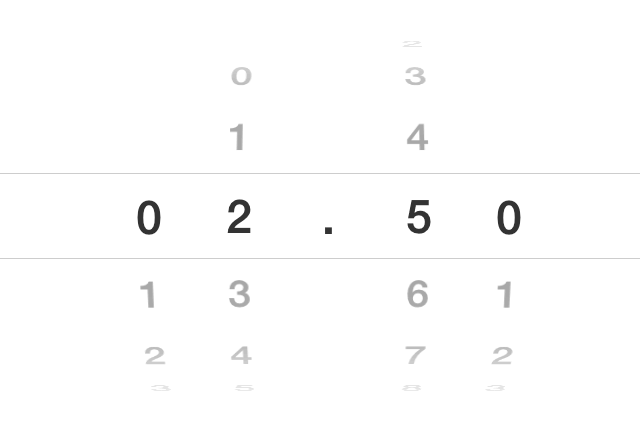
After tapping one of the options below, a screen with one or more odometer-style wheels of numbers appears. Drag the wheels until the digits representing the number of seconds (or frames) you want line up in the center (highlighted) row. Example: enter two and a half seconds as “02.50”.
PRE-ROLL (AT SHOT START)
- Pre-Roll Beeps - the number of “pre-roll” beeps played during the Delay/Pre-Roll duration (time permitting) as an audio on-set warning that the shot is about to start.
- Delay/Pre-Roll - after closing the clapper, the number of seconds (or frames) before a take actually starts. Timecode is “pre-rolled” by this amount when synced to a Music Video song.
- Song Delay - following the pre-roll duration, extra seconds (or frames) of silence before a Music Video song actually starts playback.
- Beep Interval - the number of seconds (or frames) between pre-roll beep sounds. The beeps stop playing once the pre-roll ends, and the shot begins. So setting a large Beep Interval may result in fewer than the Pre-Roll Beeps you specified.
SPEAK CREDITS
SHOW CREDITS (AT SHOT START/END)
A “Credits” animation can appear on the MovieSlate screen. Each animation rapidly displays individual slate and production field values full-screen for an instant so they can be photographed by the motion picture camera. This visual data can be useful when viewed frame-by-frame in a post-production editing suite.
Credits can also appear on a synced Wireless Timecode Slate (WTS) when MovieSlate’s Settings > Behavior > Shot Triggers > Clapper or WTS sticks is enabled, and Show Credits (below) is set appropriately. Credits appear on the Denecke TS-TCB slate’s bottom display, and the Betso WTCS-1 slate’s main display.
- Show Credits - a “master switch” to quickly enable/disable credits animations on the MovieSlate and WTS (Wireless Timecode Slate) screens.
- Sticks Open - shown when the MovieSlate sticks are tapped, or in a loop while a synced WTS sticks are open.
- Sticks Clap - shown when the MovieSlate sticks close, or a synced WTS sticks close.
- Shot Ends - shown when the End Shot button is tapped on the MovieSlate or Sound Dept tabs.
Each of the three “Sticks Open”, “Sticks Clap”, “Shot Ends” rows determine:
- Duration of each credit (in seconds or frames) - tap each row’s number button.
- When/If Credits Appear - tap each row’s ON/OFF switch (visible when Show Credits is not none).
- Credit Fields to Display - tap each row itself to choose the fields.
WIRELESS TIMECODE SLATES (WTS)
- Send Betso WTS Credits and become the 'Credits Master' when synced with a Betso WTS. A single MovieSlate app is responsible for sending credits to the WTS and other MovieSlate apps. When this option is enabled, it is simultaneously disabled on the current Credits Master (if any). The Credits Master’s Settings > Behavior > Show Credits options must also be appropriately configured in order to send any credits.
- Prefix All Fields with Labels - when enabled, a WTS displays each credit prefixed with its text field label.
- Invert TS-TCB Field Prefix - a few fields (Slate, Roll, Scene, Take, Duration, CAM) are always prefixed with a single character label and a colon. Enable this option to invert the label to sharply contrast with the field data on a synced Denecke TS-TCB.
- Default TS-TCB text - display a single field; or none (to blank the TS-TCB’s bottom display) to display when credit animations are not running.
Settings > Text Snippets

There are several ways to enter data into a text field, including the Snippet Chooser.
The Snippet Chooser is a scrolling list of frequently-used phrases called “Snippets” which you can manage from MovieSlate’s Settings > Text Snippets screen.
EDITING A TEXT FIELD WITH THE SNIPPET CHOOSER
- To add a snippet to the text field, tap the snippet, then tap the Insert button.
- To add a comma and space to the text field, tap the comma (,) button.
- To clear the text field, tap the Clear button.
- To switch between Snippet Groups, tap the Snippets: button (at the top of the Snippet Chooser) .
MANAGING SNIPPETS GROUPS
You can manage your Snippet Groups from MovieSlate’s Settings > Text Snippets screen:
- Add/Paste Snippet Group(s) - create new Group(s).
- “Edit” button (at the top of the screen) to alphabetize Groups, rearrange them, load the default Snippets and Groups, and delete individual Groups and the Snippets they contain.
- Group Name Rows - tap on a row to manage its Snippets.
SNIPPET ABBREVIATIONS
Each Snippet consists of two fields:
- a text phrase
- an optional abbreviation
You can choose how abbreviations are used from MovieSlate’s Settings > Text Snippets > Abbreviations:
- Off - when you tap the Snippet Chooser’s Insert button, the Snippet’s text phrase is inserted into the text field.
- Insert Abbreviations - when you tap the Snippet Chooser’s Insert button, the Snippet’s abbreviation phrase is inserted into the text field.
- Expand Abbreviations - when using the keyboard to type a Snippet’s abbreviation followed by a space, the abbreviation will be automatically replaced by the Snippet’s text phrase.
MANAGING SNIPPETS
Tap on a Snippet Group to edit its Snippets from MovieSlate’s Settings > Text Snippets. A list of Snippets appears.
- Add Snippet + Abbreviation to add a single new Snippet. Enter the Snippet’s text phrase in the top field, then its optional abbreviation in the bottom field.
- Add/Paste Snippets to quickly add an entire list of snippets to the group. From a computer, you could type batches of snippets into an email (one snippet per line); send the email to your iOS device; copy a batch of snippets to the pasteboard; then tap the “Paste Snippets” button.
- Tap on a Snippet to edit its text phrase and/or abbreviation.
- Tap the “Edit” button to alphabetize Snippets, rearrange their order, or delete them.
Settings > Text Fields

|
SETTINGS > TEXT FIELDS
Set a Text Field’s label and input style.
|
|
The list of Text Fields is organized by category. To choose a category, tap on one of the buttons at the top of this screen: Slate, Camera, MultiCam, Project, Sound.
To edit a Field’s Label, tap a row’s blue “i” button.
To edit a Field Input Style, tap a row.
FIELD LABELS
Next to many MovieSlate’s text fields is some vertical text that we call a Field Label. Labels appear as column headings in many (but not all) of MovieSlate’s History Reports.
Edit a Label by tapping on it in the MovieSlate, MultiCam, and Sound Dept screens, you can edit a field’s label .
Edit a Label from MovieSlate’s Settings > Text Fields screen by tap a row’s blue “i” button.
If you have the optional Sound Dept feature enabled, you can set all 32 sound track labels in one fell swoop by tapping the Sound button at the top of the list of fields, then the Track Labels button (in the upper right corner). From there, you can choose numbered labels (T01 - T24) or lettered labels (L/R and A-V).
FIELD INPUT STYLES
A Field Input Style determines the tool used to enter text into a field, and sometimes the format of the text itself. When you tap on a MovieSlate text field, one of these entry tools will appear:
- Keyboard - the standard iOS keyboard.
- Keypad - a keyboard containing number buttons. Other buttons appear based upon the particular field being edited.
- Date Chooser - a scrolling list of months/days/years used for editing the DATE and/or other fields.
- Buttons - a grid of buttons, each containing a frequently-used phrase called a Snippet. The Button field input style is only available for the Notes field on an iPad.
- List - a menu of available options (available when synced with selected cameras).
- Menus - a menu of frequently-used phrases called Snippets. It is faster to choose a single snippet from a menu than the Snippet Chooser.
- Snippet Chooser - a scrolling list of frequently-used phrases called Snippets. It is faster to choose multiple snippets from a Snippet Chooser than a menu.
- Filename Editor - the Camera, MultiCam, and Sound Dept screens all contain filename fields. MovieSlate supports many automated filenaming schemes (called filename input styles). When a filename field is tapped, a Filename Editor may, or may not appear. Many filename input styles automatically build filenames using static text, auto-incrementing numbers, and data from other fields— and so often require little or no user input because they are automatically updated each time a shot ends.
You can choose which entry tool (keyboard, keypad, date, buttons, list, menu, snippets, filename) should appear for a particular field from MovieSlate’s Settings > Text Fields.
You can also configure a particular data format style (such as “123ABC”) when choosing the Keypad input style for certain fields (such as SCENE). This format style tells MovieSlate how to format the next/previous SCENE number in the keypad and elsewhere.
You can also configure a specific Snippet Group to appear by default for a field, when choosing the Button, Menu, or Snippet input styles. The plain “Buttons”, “Menu”, or “Snippets” input styles defaults to the most recently used Snippet Group.
FILENAME INPUT STYLES
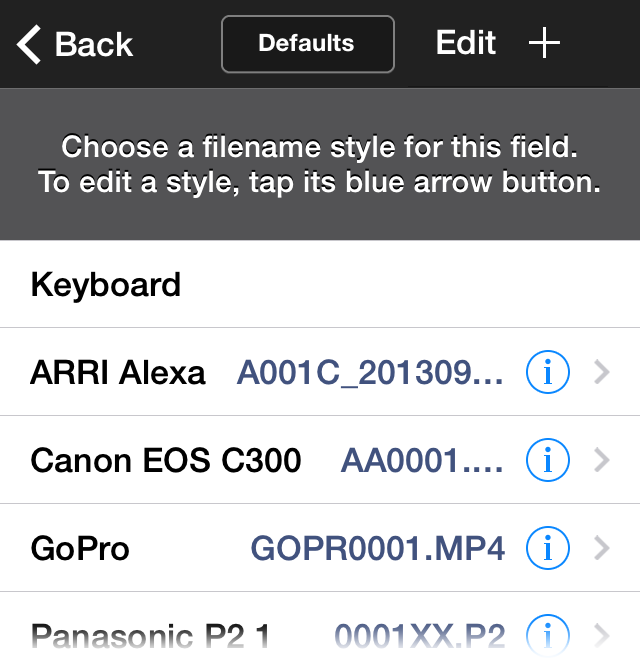
The Camera, MultiCam, and Sound Dept screens all contain filename fields. MovieSlate supports automated filenaming schemes (called filename input styles) which automatically build filenames using static text, auto-incrementing numbers, and data from other fields— and so often require little or no user input.
To select, edit, or create filename input styles from MovieSlate’s Settings > Text Fields. Then tap on a Filename, and a list of filename input styles appears.
- Reload Styles by tapping on the red Load Default Filename Styles button. This will replace all existing Filename input styles with the default styles.
- Choose a Style by tapping on the style’s name. The selected style will be used to build the Filename field’s text.
- Create a Custom Style by tapping the plus button at the top-right of the screen, then name your new style, and edit its elements (using the instructions in the section below).
- Edit a Style’s Name - by tapping the Edit button at the top of the screen, then tapping on a style’s name.
- Edit a Style by tapping its blue chevron button.
EDITING FILENAME INPUT STYLES
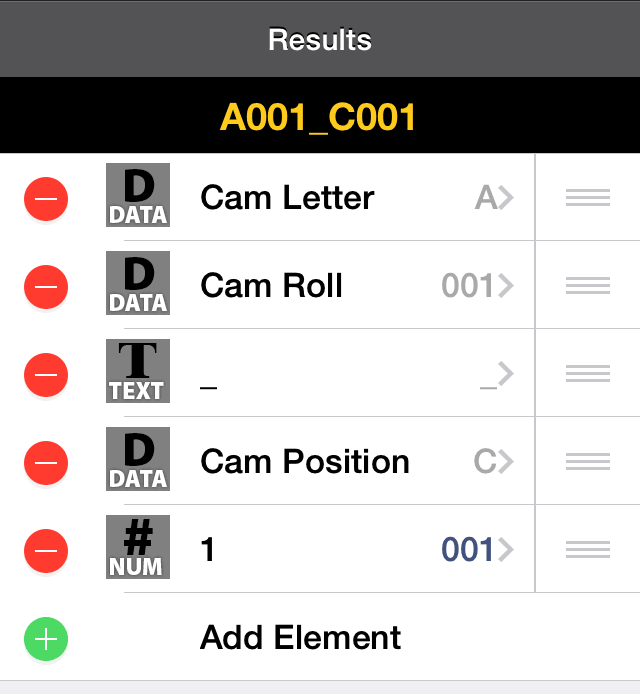
Filename input styles are built as sequences of elements. Each element describes a piece of data that MovieSlate uses to automatically build a filename.
- Move an Element by tapping on the three lines to the right of the element, then dragging the element up or down. This changes the element’s order within the sequence.
- Remove an Element by tapping the round, red minus sign button to the left of the element.
- Add an Element by tapping the round, green plus sign button; or by tapping the Add Element item at the bottom of the elements list. The element editor will appear (described below).
- Edit an Element by on its icon or name. The element editor will appear (described below).
THE ELEMENT EDITOR: EDITING FILENAME INPUT STYLE ELEMENTS
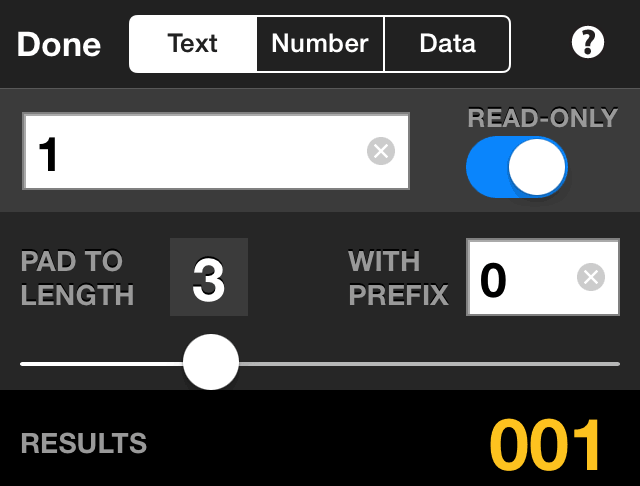
Filename input styles are sequences of these Element types:
- Text - free-form text elements can can be read-only (hidden), or editible (visible) when editing filenames from the Camera, MultiCam, and Sound Dept screens.
- Numbers - numeric data elements which automatically increment with each new shot, and can set when editing filenames from the Camera, MultiCam, and Sound Dept screens.
- Data - text from other data fields (such as Roll, Scene, Take, Date) used to automatically populate a portion of the filename. Data elements are always hidden when editing filenames from the Camera, MultiCam, and Sound Dept screens.
Any filename element can be optionally padded with prefix characters to a minimum length. So for instance, an element with a value of "1" padded to a length of "3" with a "0" prefix would appear in the filename as "001". Note that data elements can exceed the minimum length set in the element editor.
Settings > Shot Log History

|
Use this screen to set your MovieSlate shot log History preferences.
|
|
SHOT HISTORY
- Logger Info - enter the unit, name, department, and title of the person logging the shot log history.
- Save History - when ON, shot data is saved to MovieSlate’s shot log History when the clapper sticks close and a shot starts.
- Data-Only Mode - when ON, you can log shots with a single button tap. Shots won’t include timecode start/stop data. You can also enable/disable this mode by tapping the timecode display, then the “NO Timecode” keypad button (shown at right).
(GPS) LOCATIONS FOR HISTORY
- Find & Save Locations - when ON, MovieSlate will use the iOS device’s GPS radio (and/or WiFi and cellular towers) to locate the device’s current geographical location, look up the nearest address, and save all that Location information in MovieSlate’s shot log History. It can take up to a minute to obtain new map coordinates (latitude/longitude). An internet connection is required to lookup street address nearest to the map coordinates. To use this option, you must run the Settings app and enable “Location Services” for MovieSlate.
- Refresh when App Opens - when ON, MovieSlate will automatically refresh GPS map coordinates each time the app is opened— under these Conditions: both Find & Save Locations is ON, and you have run the Settings app and enabled Location Services for MovieSlate. Note that frequent map coordinate refreshing can quickly drain your iOS device’s battery.
- Refresh on Each Shot - when ON, GPS is refreshed each time a shot is started (under the same Conditions as above).
- Refresh at Interval - when ON, GPS is refreshed after a number of minutes (under the same Conditions as above).
HISTORY NOTES
- Default Note Color - the default background color used when creating new notes. This color can be changed when editing a Note.
- Save Clapper Notes - you can create shot Notes even when there is no shot in progress. Use this section to choose whether the new Notes should stick to the “Last Shot” (the most recent shot), or the “Next Shot” (the next shot you create).
- After Creating Images - choose what should happen next: edit the image, add some text to the note, or nothing.
- Save to Photos - when ON, Image Note photos are emailed as thumbnails, and optionally saved at full size in the Photos app.
- Auto-Correct Notes - optionally spell check while typing text into a Note.
- Auto-Show Keyword - when the Notes Editor appears.
- Show Ⓣ Circle Take Button in Note Editor - Some directors don’t cut between takes. When logging in these cases, use the Ⓣ button to save timecode-stamped “Circle Take” notes.
- Clear Sound Notes - when ON, the Sound Dept’s Sound Notes field will be cleared each time a shot ends.
HISTORY DATA IMPORT
- CSV Templates - MovieSlate can import projects and history from CSV files. Tap Send to email CSV template files to your computer, import them into a spreadsheet program, type data, then email them back to MovieSlate. For more info, see the last section of the MovieSlate screen: Workflow chapter of this User Guide.
- Copy-to-Slate, and then - determine what should happen after a tap on the History > Shot Details > Slate button, and the Copy this Shot to Slate option is selected.
Settings > History Reports

|
Use this screen to set your MovieSlate shot log History preferences.
|
|
HISTORY REPORTS
- Report Type - From the “History” screen, you can tap the share button to create/email History Reports of various formats. Use this screen to choose which History Report will be created. MovieSlate can build/send multiple reports at once (for most report types).
- Sound Report - for details, please refer to the “Exporting & Sending Sound Reports” in the “The Sound Dept Screen and Plugin” section of this User Guide.
- MultiCam Report - for details, please refer to the “Exporting & Sending MultiCam Reports” in the “The MultiCam Screen and Plugin” section of this User Guide.
- Formatted HTML - an easy-to-read report that can be viewed in any computer web browser. To view the report, drag the HTML file to your web browser application’s icon on your computer.
- MovieSlate XML - the recommended format for importing MovieSlate shot log History into sophisticated external databases, and application programs such as Pomfort’s Silverstack SET
- Final Cut Pro 7 XML - contains Shot and Notes data for import into Final Cut Pro 7 and older. After receiving the XML file on your Mac, run Final Cut Pro 7, select the menu: File > Import > XML, then choose the exported MovieSlate Shot Log for FCP 7.xml file. You can choose whether to export “Clip Bins” and/or “Sequences” from MovieSlate’s Settings > Shot Log History > Final Cut Reports > FCP7 XML Export. You can also choose whether to export Notes as FCP Markers in shots and/or sequences from MovieSlate’s Settings > Shot Log History > Final Cut Reports > FCP7 XML Markers. This type of report must be run by itself (not with other reports).
Relinking Offline FCP7 Media - after import, FCP7 shows each shot as “Media Offline”. To relink the shot to the offline media (movie) files, right-click the clip and choose “Reconnect Media”. Final Cut Pro uses filenames to link logged meta data with media, so it is important to enter accurate data into the Filename field on MovieSlate's Camera tab/screen.
- Final Cut Pro X XML - sends MovieSlate log data to our free KeyClips app for macOS (download from movie-slate.com). For complete instructions: see the KeyClips app > Help > KeyClips Help.
- Avid ALE (and Locators) - exports two files for import into Avid Media Composer:
- MovieSlate Clips.ale - contains shot and ASC CDL color look data (one row per clip)
- MovieSlate Locators.txt - contains shot Notes (one file per clip)
After receiving the exported files on your computer, run Media Composer, select a Bin window, select the menu: File > Import, and choose the exported MovieSlate Clips.ale file. Select the menu: Tools > Locators, then select the menu: File > Import Locators, and choose a MovieSlate Locators.txt file.
- Prelude Marker Notes - exports a MovieSlate Prelude Markers.xmp file containing shot notes. After receiving the exported file on your computer: run Adobe Prelude; open a clip’s timeline; open the Unassociated Metadata window (from Prelude’s Window menu); click the Import button; and choose the XMP file that you exported from MovieSlate. Select the markers you want to assign to the selected clip, then click the Apply Markers button.
- Premiere Batch - exports a MovieSlate Premiere Batch.csv file containing shot data and notes. After receiving the exported file on your computer, run Adobe Premiere, select the menu: Project > Import Batch List, and choose the MovieSlate Premiere Batch.csv file.
A better Premiere workflow might be to export your data in Final Cut Pro 7 XML format, then import the FCP7 XML into Premiere. The FCP7 XML supports a much larger set of MovieSlate meta-data than is supported by the Premiere Batch format.
- Notes CSV - each row of this report is a shot note along with its parent shot’s fields, separated by commas. This format is suitable for importing notes into computer spreadsheets or databases. This format differs from the CSV Data format (below) because it only includes data in which shot notes were logged, and it is a single table.
- CSV Data - each of this text file’s rows contains a shot, and the shot’s fields are separated by commas. This format is suitable for importing shot log History into computer spreadsheets or databases.
- Plain Text - each of this text file’s lines contains a shot, and the shot’s fields are separated by tab characters. This format is suitable for importing shot log History into computer spreadsheets or databases.
- Report Contents - choose which data fields are included in Plain Text, CSV Data, and Formatted HTML Reports (all other History Reports are fixed formats). There are two choices for including Notes in reports:
- Notes as a Column glues all a shot’s Notes together and puts them into a column in that shot’s row.
- Notes in Rows creates a separate set of rows, with one note per row.
- Report Date Format - specify how dates should be formatted for Plain Text, CSV Data, and Formatted HTML Reports.
- Preserve Note Line Breaks - in Plain Text, CSV Data, and Formatted HTML Reports. Disable this setting to strip all note line breaks in those Reports.
- Strip Image & Sound Filenames - from notes in Plain Text, CSV Data, and Formatted HTML Reports. Disable this setting to retain filenames in the notes.
EMAIL / ARCHIVE REPORTS
- Email From - enter the email address from which reports are emailed. This email address will only be used if configured from the iOS Settings app, otherwise your default email address is used.
- Email To and Email BCC - create a list of email addresses to whom History Reports will be sent by default, or to a group (tap the plus button), or on a per-project basis. When entering the addresses, type/paste email addresses into this recipient list, or tap the blue plus button to choose an email address from the contacts list (repeat to add multiple email addresses). When these lists are empty, you’ll be able to choose email recipients after the History Report has been built.
- Email Contents - create an email message to accompany the History Report, by default or on a per-project basis.
- Email + Archives. Send your reports via email and/or ZIP archive them inside MovieSlate. You can manage your archives by tapping the Archives button and you can download them to your computer using iOS File Sharing when you don't have an internet connection to send email.
To download the archives directly to your computer connect your device to your computer and open the iTunes application. Click on your device, then click on the Apps tab. Scroll the window down to the File Sharing section and click on the MovieSlate icon. The list on the left will display all the reports you have archived. You can drag the files to your desktop or select the archives and click the Save button. All report archive file names begin with "archive".
IMAGE + SOUND FILES (FROM NOTES)
- Attach Files to Reports - choose whether images and audio (from your shot Notes) should be included with your History Reports.
- Zip Compress Files - choose to compress History Report email attachments into a zip file and optionally protect it with a password. This option is highly recommended for XML report formats which compress significantly. To decompress password-protected zip files on a computer, you may need to install Stuffit Expander on your computer.
- Use Short Filenames - report filenames are shortened to work better with how some email programs treat file attachments.
PDF REPORTS
- HTML as PDF - enable this option to have MovieSlate convert HTML reports into PDF documents.
- PDF Options - choose a page size and orientation for the resulting PDF Report.
- My Info - your contact info can be optionally included in Sound Reports. Tap the blue plus button in the upper right corner of the My Info screen. Choose your contact card from the iOS Address Book to paste its data into My Info. Edit the pasted text as needed. Make sure the Include in Reports button is ON. Typically, you only need to enter this data one time— not each time you run a Sound Report.
- My Logo - your logo can appear at the top of HTML and Sound Reports. Tap the Choose Image, then choose a graphic from your iOS Photo library. Typically, you only need to enter this data one time— not each time you run a report.
FINAL CUT PRO REPORT OPTIONS
- FCP7 XML Export - choose whether to export “Clip Bins” and/or “Sequences” as part of MovieSlate’s Final Cut Pro 7 XML History Reports.
- FCP7 XML Markers - when exporting MovieSlate’s Final Cut Pro 7 XML History Reports, choose whether your Notes can should imported as “Markers” in Final Cut Pro 7’s shots and/or sequences.
SOUND REPORT
- Report Contents - choose which field columns should appear in the Sound Report.
- Sort By - Choose how Sound Reports should be sorted. Drag the fields into the sort order you desire.
- Column Arrows - have the report draw “fill down” arrows in certain columns to indicate repeating data. This can make the Sound Report much more readable by reducing clutter, and identifying exactly where data changed from shot to shot.
Settings > Timecode + Sync

|
SETTINGS > TIMECODE + SYNC
|
|
From these screens, you can set options for WiFi syncing— and when the Timecode Sync plugin is enabled, for WiFi/Wired timecode/data syncing, and app-to-app chat over WiFi.
LTC (LINEAR TIME CODE)
- Test Wired Microphone Input - test your audio cables for receiving timecode from an external source via a wired microphone input (On older devices: a headphone jack. On newer devices: a headphone to lightning adapter, or headphone to USB-C adapter). Using this option, you can “Try before you Buy” the Timecode Sync Plugin
- Required Cables and More - tap to view a webpage with information about the cables required for receiving timecode via wired microphone input.
- Send Timecode Audio - choose whether to send timecode audio over the left, right, or both channels. This can be useful for Music Video shoots, where you might want to play song(s) back on the other stereo channel. In such situations, we recommend mixing your songs to monaural, and silencing one of the stereo channels on each song.
- Calibrate LTC Lag - timecode received via LTC audio (wired microphone input) can lag behind the source’s timecode (generally between 2 and 4 frames). If you are experiencing a lag, then you can have MovieSlate compensate by using the values specified here (enter either frames or seconds). Start by zeroing out the frames and seconds in this screen. Then go to the main MovieSlate screen, and SYNC your camera. Make sure the timecode is not paused. Record video of both the MovieSlate and Camera timecode displays running side-by-side. Import that video into an editor (like Avid, Final Cut Pro, Premiere). Scrub through the video and pause on a single frame. Note the difference (in frames) between the two timecode displays. Go back to the MovieSlate’s Settings > Timecode Syncing > Calibrate LTC Lag screen and enter that difference into the frames field.
- Auto-Jam LTC - when a wired microphone input cable gets removed while receiving LTC, jam sync the timecode.
- Auto-Receive LTC - when a wired microphone input cable gets inserted, try to receive LTC (if not already receiving timecode from another external source).
- Auto-Receive WiFi - when a MovieSlate or Wireless Timecode Slate WiFi timecode host is detected, then auto-receive timecode (if not already receiving timecode from another external source).
TENTACLES & TCS HUBS
These settings apply when synced with a Tentacle Sync E , or (TCS) Timecode Systems WiFi Hub (:pulse, :wave:, :buddy master):
- Calibrate Timecode Lag - Tentacle and TCS/Atomos devices already compensate for any lag due to latency. If you need to create an offset in MovieSlate’s timecode display for some other reason, then use this screen to enter a positive or negative offset value.
- Status Lights - blinking, colored status light indicators can optionally appear on the bottom clapper, the MultiCam screen, and Sound Dept screens.
- TCS Hub Status Colors
- Green - Hub WiFi is off
- Blue - Hub WiFi is on
- Red - Hub warnings
- Tentacle Sync Status Colors
- Green - Tentacle is generating timecode
- Red - Tentacle waiting for external timecode
- Amber - Tentacle is out of range
- UltraSync Blue Status Colors
- Green - normal operation
- Amber - negotiating a new connection, or low quality timecode sync
- Red - lost live timecode sync
- Name & Battery - show the TCS Hub’s name and battery level on the bottom clapper stick.
- B:LINK Networking (for TCS Hubs) - enable or disable B:LINK networking (see TCS documentation for details).
- TCS Bluetooth Pairing Name - the (up to 11 character) name of your iOS device as it will appear in the TCS Device’s Bluetooth Pairing menu (TCS Bluetooth devices include the UltraSync Blue and AtomX SYNC Ninja V). The pairing name can be the name of your iOS device, your own name, or even “MovieSlate”.
RECRUN (LOG SHOTS AS EXTERNAL TIMECODE STARTS/STOPS)
- Auto-Start Shots - automatically start shots when MovieSlate detects that the wired microphone input timecode has started.
- Auto-End Shots - automatically end shots when MovieSlate detects that the wired microphone input timecode has stopped.
- False Positive Duration - in order to reduce RecRun false positives, MovieSlate can ignore stop/start changes in wired microphone input timecode for a number of seconds after a shot auto-starts or auto-stops.
Settings > Camera Control
SETTINGS > CAMERA CONTROL
With optional Pro Features, MovieSlate can remotely control specific camera models. Use this Settings screen to configure camera control preferences.
- Camera Connect Demo - when enabled, the Camera and MultiCam screens include a Sync to Camera button to simulate connecting to a camera.
- Accept Slate Data from Cameras (when available) - Slate data includes: Production, Scene, Take, Director, DP, Data 1-6, Copyright, and Location.
- Control Synced Cameras - disable for read-only access to the synced camera.
- Start a MultiCam Shot - when any synced camera starts recording a shot. This setting has no effect if there’s already a MultiCam master shot in progress (you are already MultiCam logging).
- Send XML to QuineBox IoT - QuineBox™IoT is a hardware solution for connecting RED cameras over great distances (via IP addresses). Enable this setting to have MovieSlate send MovieSlate XML to QuineBox IoT each time a shot ends.
Settings > Sound Recorder Control
SETTINGS > SOUND RECORDER CONTROL
With optional Pro Features, MovieSlate can remotely control specific sound recorders. Use this Settings screen to configure sound recorder control preferences.
- Upon Connect - choose which direction scene/take/track data should sync upon connection to a sound recorder.
- Fetch Shots for History - upon connection to a sound recorder, request a number of most recent takes to import as shots in MovieSlate’s History (duplicates are never imported). Note that when a Shot is changed from MovieSlate’s History tab, it’s metadata does not sync back to the recorder (and vice versa).
- Tracks Order - choose the order in which the recorder’s sound tracks should be displayed. Please note: when synced with a recorder, track labels are set automatically and cannot be changed from Settings > Text Fields > Sound > Sound Tracks.
Settings > Slate Data Sync
SETTINGS > SLATE DATA SYNC
With optional Pro Features, you can sync data between MovieSlates.
- Send WiFi Data - tap the ON/OFF switch to have your MovieSlate automatically send its data (as it changes in real time) to other MovieSlates on the same WiFi Network.
- Receive WiFi Data - tap the ON/OFF switch to automatically accept incoming data (as it changes in real time) from other MovieSlates on the same WiFi network.
- Fields to Receive - choose which specific data fields you’d like to receive. This feature can be used to ensure that all departments use the same Production, Scene, and Take information, for instance. Enable Shot Start Notification and Shot End Notification to display a notification at the top of your screen when another department starts/stops a shot (the notification includes Scene and Take information).
Settings > On-Set Chat
SETTINGS > ON-SET CHAT
With optional Pro Features, you can WiFi chat with other MovieSlate users (no internet connection required).
- Receive Chat Messages - determines whether your MovieSlate app will receive messages from other MovieSlates on the same WiFi network.
- Show Chat Notifications - determines whether your MovieSlate will display a banner across the top of its screen when a new chat message arrives from another MovieSlate.
- Chat Message Text Size - choose how large message text should appear on MovieSlate’s Chat screen.
Settings > Script Dept
SETTINGS > SCRIPT DEPT
With optional Script Dept Features, these preferences are available:
SCRIPT REPORTS
- Flatten Report PDFs - generates much smaller PDFs, however their annotations cannot be edited.
BREAKDOWN REPORTS (iPAD)
- Add Page Breaks to report when Act changes - when enabled a page break is inserted at the bottom of each Act's totals.
- Include Logged Data - when enabled: logged shoot days, page counts, and scene counts are included in Progress Breakdown reports.
- Include Element Lists - choose which element lists to include in Breakdown Reports.
- Cast in ALL CAPS - choose whether cast character names should appear in ALL CAPS (or just Capitalized) in Breakdown Report element lists.
- Underline Cast - choose whether cast character names should be underlined in Breakdown Report element lists.
- Estimate Page Counts (1/8ths) - when enabled: Script PDF scanning will populate each scene’s PAGES field with an estimated page count.
- Estimate Running Time - Script PDF scanning can populate each scene’s TIME field based on each scene’s page count (PAGES field). Choose No to disable this feature, or choose scene pacing to help estimate the running time.
- Offer Breakdown Data - when enabled, MovieSlate offers to populate some blank text fields with Breakdown data. On the Script Dept Setup screen, the Scheduled Scenes field can be populated when the DAY field changes. On the Script Dept Logging screen, the PAGES / TIME fields can be populated when the SSCEN field changes.
PROGRESS REPORT
- Include 'SCENE' Notes in Progress Reports - Scene notes are generally created for use in Editors Log reports, and can be optionally included in Progress Reports as well.
- Count Wildline Setups in Progress Reports - when enabled: wildlines will count as setups in Progress Reports.
FACING PAGES & EDITORS LOG
- Organize Cameras - For Editors Log & Facing Pages - choose whether Camera Info (Framing, Subject, Motion, Filters) and/or Camera Rolls should be organized in Columns or in Rows (automatically selected for reports containing more than 8 cameras).
- Sort Order for Facing Pages - Day + Scene will sort each Facing Page’s scenes by Day, then by Scene. Scene will sort each Facing Page’s scenes by Scene only.
- Page Breaks at Scenes for Facing Pages - when enabled, each Facing Page will contain only the setups for a single scene root (such as 1, 1A, 1B, VB). Additonal scenes logged for that Facing Page will appear on subsequent pages.
- Bookmark Facing Pages - when enabled, Facing Pages are bookmarked when you insert into the Script PDF (by tapping the PAGE# field, then the keypad's BUILD NEW FACING PAGE button).
- Include 'TAKE' Notes in Editors Log Reports - choose whether to include whether Editors Log Reports will include Take notes.
- Preserve Note Line Breaks in Editors Log & Facing Pages - when enabled: line breaks within notes will be preserved.
- Show Day/Date/Time - when enabled: all Scenes (not just the first Scene of the day) in Editors Log and/or Facing Pages reports will include Day/Date/Time text above the Scripted Scene text.
Data Logging
- SCENE Note Color - choose the default background color for SCENE notes.
- TAKE Note Color - choose the default background color for TAKE notes.
- Edit Notes in field - when enabled, notes can be directly edited in the Notes field. When disabled, a tap on the Notes field will display the Notes Editor.
- Clear SETUP field when SSCEN field changes - when enabled, the Script Dept's SETUP field text will be cleared when you change text in the SSCEN field.
- Reset TAKE to 1 - when the SSCEN and/or SETUP text changes. Settings > Behavior > Reset TAKE to 1 when SCENE changes is automatically disabled when either of these options are enabled.
- Show ★ Ratings & Issues - when enabled, the star ratings and ISSUES field will automatically appear. You can also manually show/hide them by tapping the ★ button on the left side of the NOTES field.
- Script Owns New Shots. Shots started from the Script Dept tab are “owned” by Script, and so appear in Script Reports (such as Facing Pages), and are displayed differently in an iPad’s History tab. Enable this option to have the Script also own new shots started from other tabs (such as Slate, Camera, Sound). This option will appear when Settings > Shot Log History > Logger Info > Department is set to Script.
Script PDFs
- Show Scroll Buttons - choose when to show buttons at the bottom of the screen to go to the previous and next script pages (very helpful when using Apple Pencil or when a drawing tool is selected).
- Scroll Direction - choose whether to scroll left/right (horizontal) or up/down (vertical).
- Page Scroll Style - choose whether scrolling should: Jump to Page (faster) to view a single page at a time; or Continuous scroll (slower) to simultaneously view portions of two pages. Since PDF annotations cannot actually span pages, the Continuous setting is useful when creating new coverage line (aka tramline) annotations that appear to be extensions of tramlines from a previous page.
- Page Mode - choose to view: a Single Page; Double Pages (side by side); or Automatic (single in portrait; double in landscape orientation). Double Pages are only available when Page Scroll Style is set to Jump To Page.
- Thumbnail Bar - choose to view a Scrubber Bar (tiny page thumbnails) or Scrollable Thumbnails (larger thumbnails with bookmarks) at the bottom of the PDF markup screen.
- Apple Pencil (2nd Gen) Double-Tap Action - can quickly change annotation tools or undo/redo the last annotation. Choose a MovieSlate action, or use the System Default (configurable from the Settings app > Apple Pencil).
Coverage Lines (Tramlines)
- Settings for SingleCam / MultiCam - tap these buttons to change default settings for SingleCam and MultiCam workflows.
- Font - choose the typeface and font weight used when creating a new Tramline Header.
- Font Size - choose the font size used when creating a new Tramline Header.
- Line Thickness - choose the line thickness used when creating a new Tramline or Header Bubble.
- Line Spacing - choose the spacing between lines used when adding a new Tramline to a group of Tramlines.
- Line Color - choose line color used when creating new Tramlines.
- Bubble Color - choose border color used when creating new Header Bubbles.
- Text Color - choose color used when creating new Header Text.
- Contents for Header Text - choose which field data should be included when creating a new Tramline Header. Drag the right edge of each field to change the order in which fields will be positioned within the Tramline Header.
- Prompt for Recent - disable to prevent MovieSlate from prompting for recent Scene and Take information.
- Bubble - choose a shape (none, circle, square, oval, rectangle) to surround Tramline Header contents when creating a Tramline Headers. Tip: with Tramline Header annotation(s) selected, tapping the Tramline Header tool adds/removes bubble(s) to/from the selected annotation(s).
- Header Tool adds Lines - choose whether a tap on the Tramline Header tool should automatically add tramlines as well. Tip: with tramline and/or header annotation(s) selected, tapping the Tramline tool adds additional tramlines the selected annotation(s).
- Auto-Enable Public Annotations - when enabled, a tap on either the Tramline or Tramline Header tools will automatically switch back to creating PUBLIC annotations (if the Public/Private tool was in PRIVATE mode).
Timecode + Stopwatch Annotations
Tap the timecode or stopwatch display at the top of the Script Markup screen. A menu appears with an option to "Paste Time" as an annotation into the Script PDF— using the default settings below.
- Settings for Timecode / Stopwatch - tap these buttons to change default settings for Timecode and Stopwatch modes.
- Font - choose the typeface and font weight used for a new time annotation.
- Font Size - choose the font size used for a new time annotation.
- Color - choose color used for a new time annotation.
Stopwatch Options
Use these options to synchronize stopwatch events with shot starts and stops.
- Auto-Start Stopwatch when Shot Starts - resumes the stopwatch running (from the current stopwatch time).
- Auto-Stop Stopwatch when Shot Ends - pauses the stopwatch running, and does not clear the time to zero.
- Auto-Clear Stopwatch when Shot Ends - clears the stopwatch time to zero.
- Auto-Reset Stopwatch when Shot Starts - resets the stopwatch time to zero.
Help screen
|
USER GUIDE
The document you are reading now. Tap the magifying glass button (at the top-right of the screen) to search the User Guide for specific information.
|
|
FAQs
A great troubleshooting resource that displays MovieSlate FAQs from our website. If you’re having problems with the app, chances are you’ll find a solution here. We update the FAQs often.
HOW-TO VIDEOS
We’re working on a series of short “How-To” videos that will demonstrate the use of MovieSlate in various workflows. The videos will be streamed to the app from the internet, and we plan to produce new videos every so often.
CONTACT US
If you’re having a problem with MovieSlate and cannot find the solution in our FAQs, then please use this button to send us an email.
You can also use this button to send us feature requests, or tell us who you are and what production(s) you’re using MovieSlate with (we love to brag about our customer’s projects).
WHAT’S NEW
The first time you run a MovieSlate update (installed from the App Store), this screen will appear to let you know about all the changes we’ve made to the app. We thought you might want to review that information later, so we also included here on the Help screen.
INFO
On the iPad, this information appears on the right side of the Help screen (before you tap any buttons). On the iPhone and iPod touch, tap the Info button to see which version of MovieSlate you are running, and gratuitous statistics about your MovieSlate shot log History.
Timecode Basics
WALL CLOCK TIME
When you run MovieSlate for the first time, Timecode is displayed using wall clock time (as set from the Settings app > General > Date & Time).
You can enable wall clock time by tapping MovieSlate’s timecode display, then tapping the Keypad’s clock button.
Wall clock time is not always the same as timecode! In fact, wall clock time is inappropriate for use with 23.976, 29.97, and 59.98 FPS because timecode at those NDF (Non Drop Frame) rates run 0.1% slower than wall clock time; drifting away from clock time by 3.59 seconds every hour. When you attempt to use those incompatible rates with clock time, MovieSlate will warn you (but not prevent you from doing so). You can, however, avoid drift by using DF (Drop Frame) rates which are designed to keep timecode and wall clock time in sync.
Tap the FPS field (on the Slate or Sound Dept screens) to choose the timecode's frames-per-second. Note that choosing Custom (text only) does not actually change the rate at which the timecode is displayed; it merely changes the text that appears in the slate's FPS field.
SETTING THE TIMECODE MANUALLY
To manually “jam” (set) your own timecode, tap the timecode display. Using the keypad, enter HH:MM:SS:FF digits, from left to right. You don’t have to enter colons or even enter all the digits.
SYNCING THE TIMECODE MANUALLY
To manually sync your camera and slate, tap the timecode display. Enter your motion picture camera’s timecode plus about 10 seconds. Begin recording on your camera, and when your camera’s timecode matches the display, tap the Keypad’s Done button.
Timecode Sync Feature
TIMECODE SYNC FEATURE
The optional (Pro Feature) Timecode Sync feature sends timecode to, and receives timecode from compatible cameras, sound recorders, and timecode generators via wired microphone input (On older devices: a headphone jack. On newer devices: a headphone to lightning adapter, or headphone to USB-C adapter). Timecode Sync also provides real-time, continuous timecode syncing between multiple MovieSlates via wired microphone input/output— and timecode/data between multiple MovieSlates on the same WiFi network.
Tentacle Sync E portable timecode generators (with 2.0 or newer firmware) can wirelessly transmit timecode to MovieSlate via Bluetooth low energy (and do not receive timecode from MovieSlate). All Tentacle Sync models can also send timecode via their headphone jack connector using a four connection mini jack (set the Tentacle's audio output volume to Mic instead of Line level). Use the Tentacle Setup app (available in the App Store) to configure Tentacles and jam their timecode to an external source.
TCS UltraSync Blue and AtomX SYNC Ninja V portable timecode generators can wirelessly transmit timecode and userbits to MovieSlate via Bluetooth low energy (and do not receive timecode from MovieSlate). To start syncing, tap MovieSlate’s timecode display. From the TCS Bluetooth Device’s own menu, choose the Bluetooth Pair menu, then wait about 5 seconds for the TCS Bluetooth Device to discover your iOS device. Select your iOS device’s name when it appears in the TCS Bluetooth Device’s menu; which pairs the two (normally you only need to pair the devices one time). You can configure a custom pairing name for your iOS device from MovieSlate’s Settings > Timecode + Sync > TCS Bluetooth Device Pairing Name. To stop receiving timecode from the TCS Bluetooth Device, tap MovieSlate’s timecode display and choose Stop TCS Bluetooth Sync, or choose Unpair TCS Bluetooth Device to unpair the two devices.
TCS Hubs can sync timecode over an Ad Hoc WiFi network provided by the Timecode Buddy:master, :wave, and :pulse portable WiFi timecode base stations, and Denecke TS-TCB hardware slate.
WiFi Sync between multiple MovieSlate apps and BETSO WTS hardware slates. MovieSlate itself does not create a WiFi network (use a hub or switch for the network). WiFi syncing only happens between devices that are on the same WiFi network. An internet connection is not needed.
Pro Feature. The Timecode Sync feature is part of a MovieSlate PRO subscription, which you can purchase from our “In-App Store” in MovieSlate’s Settings > MovieSlate Store.
SYNCING TIMECODE BETWEEN MOVIESLATES
Using a WiFi connection, you can sync timecode (and slate data) between multiple MovieSlates on different iOS Devices (iPads, iPhones, or iPod touches).
Internal clock time often varies from iOS Device to iOS Device. So MovieSlate provides a means of synchronizing its (clock or jammed) timecode across multiple iOS Devices. WiFi continuously transmits timecode signals from one MovieSlate to one or more other MovieSlates. When the sender’s timecode starts or stops, so does the timecode on receiving MovieSlates. Only one MovieSlate can send timecode over a WiFi network; all other MovieSlates will receive timecode. For best results using WiFi timecode sync, we recommend you turn Bluetooth OFF from the Settings app on all iOS Devices involved. From each MovieSlate you want to WiFi sync: tap the MovieSlate tab, tap the timecode display, tap the keypad's Sync button, then tap the appropriate Send and Receive buttons.
ONE-TIME SYNCING A COMPLETE SET OF PRODUCTION DATA FROM ANOTHER MOVIESLATE
Your MovieSlate can request a complete set of production data from another MovieSlate on the same WiFi* network. From the MovieSlate, MultiCam, or Sound Dept screens: tap the PROD field; then tap the Choose a Project button; then choose one of the “Networked Projects” to import.
REMOTE CONTROLLING A MOVIESLATE FROM ANOTHER MOVIESLATE
You can use one MovieSlate (master) to remotely control other MovieSlate(s) on the same WiFi network.
To Enable Remote Control
- Tap the timecode display on a MovieSlate to be remotely controlled.
- Tap the SYNC button.
- Tap the Choose Remote Control button.
- Choose a MovieSlate that will act as the remote control (master).
Use Synced Timecode
Sync timecode between the MovieSlates to ensure properly synced History data. As the master’s shot starts and stops, its slate/shot data (and many of its settings) are sent to the MovieSlate(s) being remote controlled.
LTC TIMECODE SYNC WITH EXTERNAL DEVICES
Sync timecode with cameras, sound recorders, and other external timecode devices. Timecode data is sent as LTC audio signals over a cable that runs between the devices.
Supported Devices and Frame Rates
You’ll need a camera, sound recorder, or timecode generator that’s capable of sending and/or receiving LTC (Longitudinal Time Code) over an audio cable. Not all cameras have LTC-IN or LTC-OUT ports, but many professional-level cameras do (check your camera’s instruction manual if you’re not certain). MovieSlate can send and receive frame rates of 23.976, 24, 25, 29.97, 29.97 DF, 30, and 30 DF.
Timecode Sync Cables
You’ll need cables running from your external timecode device to the iOS device’s wired microphone input (On older devices: a headphone jack. On newer devices: a headphone to lightning adapter, or headphone to USB-C adapter):
- When sending timecode from MovieSlate, use a standard, unattenuated cable.
 When receiving timecode in MovieSlate, use a custom, “attenuated” cable. The iPad/iPhone/iPod end of the cable must be a 'TRRS' four connection mini jack (four visible bands; just like the jack used on Apple's iPhone headphones). The audio signal needs to be at MIC level— not LINE level which would overpower an iPad/iPhone/iPod wired microphone input. If your camera's LTC audio output is at LINE level or is too loud, you will have to attenuate (lower the volume of) the audio signal. Our support website has a page with links to sources of the proper cables.
Receiving Camera Timecode
Connect a cable from the timecode source (camera, sound recorder, timecode generator) to the wired microphone input on your iOS Device (On older devices: a headphone jack. On newer devices: a headphone to lightning adapter, or headphone to USB-C adapter).
From the MovieSlate or Sound Dept screens, tap the timecode display, then the SYNC keypad button. Tap the Receive button, then the Wired Microphone Input button.
When viewing footage that contains MovieSlate’s timecode display, you may notice that some frame digits may appear to be missing (particularly when receiving synced timecode via the wired microphone input). Durations are accurate, however.
MovieSlate’s timecode pauses/resumes as you stop and start the camera.
Timecode received via the wired microphone input inherently lags behind the source’s timecode by a few frames. To compensate for this lag, go to MovieSlate’s Settings > Timecode Sync > Calibrate LTC Lag, and zero out the frames and seconds. Go to the main MovieSlate screen, and SYNC your camera. Make sure the timecode is not paused. Record video of both the MovieSlate and Camera timecode displays running side-by-side. Import that video into an editor (like Avid, Final Cut Pro, Premiere). Scrub through the video and pause on a single frame. Note the difference (in frames) between the two timecode displays. Go back to MovieSlate’s Settings > Timecode Sync > Calibrate LTC Lag screen and enter that difference into the frames field.
Camera Frame Rates
When receiving timecode from a camera, MovieSlate supports frame rates: 23.976, 24, 25, 29.97, 29.97 DF, 30, and 30 DF.
Jamming Camera Timecode
When you disconnect the cable from the wired microphone input, the timecode is “jammed” and continues running using MovieSlate’s internal clock. You can also jam sync by tapping the timecode display, then the Jam Sync button.
Sending MovieSlate Timecode
Connect a cable from the wired microphone output on your iOS Device’s to a camera, or sound recorder.
From the MovieSlate or Sound Dept screens, tap the timecode display, then the SYNC keypad button. Tap the Send button, then the Wired Microphone Input button. If the camera does not recognize the timecode, or if the timecode appears to skip, you may need to adjust the iOS Device’s physical volume up/down buttons (generally, louder is better).
Stop Camera Syncing
Tap the timecode display, then tap the Stop Syncing button.
TCS Hub Syncing
|
If you have a TCS (Timecode Systems) portable WiFi Hub such as a :pulse, :wave, or ::buddy master, then MovieSlate’s optional Timecode Sync feature can receive a steady stream of extremely accurate timecode over WiFi. TCBuddy can create its own internal (Ad Hoc) WiFi network. Learn More
|

|
USING THE TCS HUB’S CONTROL KNOB
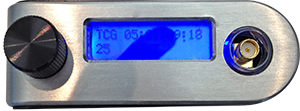
The black control knob is on the top of the TCS Hub (shown on the left in this picture).
Power up the TCS Hub by pushing the control knob down for one second.
Power off the TCS Hub by pushing the control knob down for five seconds.
Access the TCS Hub menu system by pushing the control knob down— while the TCS Hub is powered up. Scroll through menu selections by rotating the knob clockwise or counter-clockwise. Select a menu item by briefly pushing the control knob down.
CONNECTING MOVIESLATE TO A TCS HUB INTERNAL AD HOC WIFI NETWORK
- Enable the TCS Hub Ad Hoc Network. If a WiFi Connected message does not appear on the TCS Hub screen within a few seconds, choose TCS Hub menu > WiFi > Turn On/Off > Re-Start. Then choose TCS Hub menu > WiFi > Network Type > Ad Hoc (default).
- Run the Settings app on your iOS device. Tap the Wi-Fi item. From the Choose a Network list, tap the TCS Hub network. Wait for the WiFi icon to appear at the top of the screen before attempting the next step.
- Run the MovieSlate app. From the MovieSlate or Sound Dept screens, tap the timecode display, then the SYNC keypad button. Tap the Sync With TCS Hub button. It only takes a few seconds to sync.
WHILE SYNCED WITH TCS HUB
TCS Hubs continuously stream timecode, framerate, and userbits data to MovieSlate. A sync icon appears in the upper left corner of MovieSlate’s timecode display.
TCS Hub’s name, battery status, and blinking sync status lights appear on the bottom clapper stick. These items can be disabled from MovieSlate’s Settings > Timecode Syncing > Timecode Buddy.
CHANGING TCS HUB SETTINGS
A four-digit password is required to change TCS Hub settings from MovieSlate. To view or set the password, select TCS Hub menu > System Settings > Set Passcode.
To change the TCS Hub timecode, userbits, or framerate: tap on those MovieSlate fields while synced with a TCS Hub, then enter the TCS Hub password.
To change TCS Hub Settings, tap the timecode display from the MovieSlate or Sound Dept screens while synced with a TCS Hub. Tap the Edit TCS Hub Settings button, then enter the TCS Hub password. From the TCS Hub Settings screen, tap an item to view an explanation of that setting, or consult the TCS Hub user guide.
WTS Syncing (Wireless Timecode Slates)
 If you have a Wireless Timecode Slate (WTS) such as the Denecke TS-TCB or Betso WTCS-1, then MovieSlate (with a Pro Features subscription) can receive a steady stream of extremely accurate timecode from the WTS over WiFi, and display MovieSlate “Show Credits” animations on the WTS’s display. Each credit is shown for a brief time— perhaps just a few frames— long enough for the camera to photograph loads of metadata that can be more legible than data handwritten on the WTS slate, and much easier to read in bright light than the iPad screen. Learn More
QUICK START: CONNECTION + SYNC
A WTS can create its own internal (Ad Hoc) WiFi network, or join an external WiFi network. Please refer to WTS manufacturer’s documentation its networking instructions. Meanwhile, here are the quick start instructions:
- Run the iOS Settings app > WiFi - and join the network used or supplied by the WTS.
- Run MovieSlate.
- Make sure MovieSlate’s Pro Features are enabled.
- Go to the MovieSlate tab.
- Tap the timecode display.
- Tap the SYNC button in the keypad.
- For Denecke TS-TCB: tap Connect to TCS Hub.
- For Betso WTCS-1: tap Receive, then tap WiFi (or enable Settings > Timecode + Sync > Auto-Receive WiFi).
- Upon connection, MovieSlate will indicate that it has synced with the WTS, and start displaying its synced timecode.
QUICK START: CONFIGURE SETTINGS
- Go to MovieSlate > Settings > Behavior.
- Tap the Shot Triggers item and choose Clapper or WTS sticks. When enabled, MovieSlate starts shots when the WTS sticks clap.
- Tap the < (back) button.
- Scroll down to the SHOW CREDITS section.
- Show Credits should be set to Always or Only with synced WTS in order to display credits on the WTS.
- The next three rows (Sticks Open, Sticks Clap, Shot Ends) determine:
- the duration of each credit (tap each row’s number button);
- if credits will appear (tap each row’s ON/OFF switch),
- and which fields to display (tap each row itself to choose the fields).
- Sticks Open credits are shown (in a loop) while synced Denecke TS-TCB sticks are open, or when MovieSlate slate hinge is tapped.
- Sticks Open credits are shown (one time only) when the Betso WTCS-1 or MovieSlate sticks are tapped.
- Sticks Clap credits are shown (one time only) when either the WTS or MovieSlate sticks close.
- Shot Ends credits are shown (one time only) when the MovieSlate user taps the "End Shot" button. When synced with Betso WTCS-1 slates, these credits are sent by the MovieSlate Credits Master (see MovieSlate Settings > Behavior > Send Betso WTS Credits).
- Turn the Prefix All Fields with Labels switch ON or OFF (your preference). With this switch enabled, MovieSlate prepends credits data with field labels. Example: "Alan Smithee" becomes "DIR: Alan Smithee".
- Tap Default TS-TCB text and choose a field to display on the TS-TCB, which will be displayed when credit animations are not running.
- Tip: try enabling the SLATE + ROLL and SCENE + TAKE credits. During animations, those credits are prefixed with a #, R, S, or T character. Note that this is regardless of the Prefix All Fields with Labels switch setting.
QUICK START: ACTION!
- Go to the MovieSlate tab/screen, and sync to the WTS by tapping the timecode display, SYNC button, then:
- For Denecke TS-TCB: tap Connect to TCS Hub.
- For Betso WTCS-1: tap Receive, then tap WiFi (or enable Settings > Timecode + Sync > Auto-Receive WiFi).
- Open the WTS clappersticks.
- Credits may appear on MovieSlate and/or WTS displays, depending upon the Settings configurations. On a Denecke TS-TCB, a credit that’s 80 pixels or less will be centered on the display. Longer credits will be shown flush-left and truncated.
- Close the WTS sticks, and the Sticks Clap animations may appear on the WTS and/or the MovieSlate displays. MovieSlate will start a shot— when MovieSlate’s Settings > Behavior > Shot Triggers is set to Clapper or WTS sticks.
- Long animations (due to long durations and/or a large number of credits fields) can be cancelled by tapping MovieSlate’s full-screen credits animation screen. For Betso WTCS-1: credits can only be cancelled from the MovieSlate app designated as the Credits Master from Settings > Behavior > Send Betso WTS Credits.
- Finally, tap MovieSlate’s End Shot button, and the Shot Ends animations may appear on the WTS and/or the iPad.
- Sticks Open credits can be tested without starting shots by tapping the hinge to the left of MovieSlate’s clapper sticks— when MovieSlate’s Settings > Behavior > Clapper Hinge is set to Simulates Denecke Sticks. To stop the animation, tap the hinge again.
Troubleshooting Basics
If the MovieSlate app starts behaving strangely, then here are some things that will likely fix the problem:
- Restart the MovieSlate app. Return to the Springboard by tapping the Home button once. From the Springboard, tap the Home button twice more to show the running apps. Hold your finger on the MovieSlate icon until the icons all jiggle. Tap the red circle in the MovieSlate app to completely quit the app. Tap the Home button to return to the Springboard, then launch MovieSlate again.
- Reboot your iOS device. Hold down the iOS device’s Power button and Home button at the same time. Slide the red arrow button to the right. When the device is completely shut off, press the Power button again, then launch the MovieSlate app.
- Reinstall the MovieSlate app. First connect backup your MovieSlate data from iTunes using iOS File Sharing. Then from your iOS device, hold your finger on the MovieSlate icon until the icons all jiggle. Tap the black X in the corner of the MovieSlate icon, which will delete the app. Sync the MovieSlate app to your iOS device using iTunes. Then restore your MovieSlate data using iOS File Sharing.
- Contact Us. If all else fails, then please contact us for help. The easiest way is from MovieSlate’s Help > Contact Us screen.
Troubleshooting: Sync over WiFi
WiFi Sync is part of the optional Timecode Sync feature— available for purchase from MovieSlate’s Settings > MovieSlate Store > PRO Features.
- Base Station? Make sure you have a WiFi base station within range of all the iOS Devices you’ll be syncing.
- Bonjour Ports Open? MovieSlate uses Apple's Bonjour networking protocols, which require these open network ports: 5297, 5298, 5353.
- All iOS Devices are on the same Network? To connect an iOS Device, run the Settings app, tap WiFi, then choose the Network (base station). Please note that MovieSlate does not create WiFi networks— it joins existing WiFi networks.
- Is Bluetooth also ON? On some iOS Devices, received timecode can appear to skip if Bluetooth is enabled on that Device. You can disable Bluetooth from the General section of the Settings app.
- Restart the MovieSlate app if other iOS Devices cannot connect to it properly. Return to the Springboard by tapping the Home button once. From the Springboard, tap the Home button twice more to show the running apps. Hold your finger on the MovieSlate icon until the icons all jiggle. Tap the red circle in the MovieSlate app to completely quit the app. Tap the Home button to return to the Springboard, then launch MovieSlate again.
- If all else fails reboot the devices you’re syncing and start over.
Troubleshooting: Camera Timecode Sync
Camera Timecode Sync feature is part of a PRO Features subscription— available for purchase from MovieSlate’s Settings > MovieSlate Store > PRO Features.
TROUBLESHOOTING CABLES
Here’s a way to test your camera’s audio output and cabling:
- Connect the cables from the camera to your iPad/iPhone/iPod wired microphone input (On older devices: a headphone jack. On newer devices: a headphone to lightning adapter, or headphone to USB-C adapter).
- Go to MovieSlate’s Settings > Timecode Sync > Test Wired Microphone Input.
- The levels at the bottom of this screen should be in the green range. When they are, timecode should be displaying at the top of the screen. If the levels are not in the green range, there is too much attenuation on the cables (the audio is not loud enough).
CAMERA FRAME RATES
When receiving timecode from a camera, MovieSlate supports frame rates: 23.976, 24, 25, 29.97, 29.97 DF, 30, and 30 DF.
TIMECODE LAG
Timecode received via the wired microphone input inherently lags behind the source’s timecode by a few frames. MovieSlate can compensate for this lag.
Go to MovieSlate’s Settings > Timecode Sync > Calibrate LTC Lag.
Zero out the frames and seconds. Go to the main MovieSlate screen, and SYNC your camera. Make sure the timecode is not paused. Record video of both the MovieSlate and Camera timecode displays running side-by-side. Import that video into an editor (like Avid, Final Cut Pro, Premiere). Scrub through the video and pause on a single frame. Note the difference (in frames) between the two timecode displays. Go back to the MovieSlate’s Settings > Timecode Sync > Calibrate LTC Lag screen and enter that difference into the frames field.
Troubleshooting: iOS Privacy Controls
MovieSlate may not function properly until iOS Privacy Controls have been properly configured. iOS 8 introduced enhanced privacy controls for apps running on your iPhone, iPad, and iPod Touch. Sometimes iOS privacy settings can cause MovieSlate to not function properly and you may not even be aware of it.
MovieSlate has features that require access to Contacts, Location, Photos, and the Microphone. If you're upgrading from iOS 6, you may never see an iOS Privacy Permissions confirmation when MovieSlate attempts to access one of those protected resources. In that case you can open your device's Settings app, tap on the Privacy item, then tap each of the Contacts, Location, Photos, and the Microphone items. In the list of apps that appears, ensure that MovieSlate has access to these items:
- Location - MovieSlate saves GPS location data for your shots. You can turn this feature off in MovieSlate Settings > Shot Log History > Find & Save Locations.
- Contacts - MovieSlate accesses your Contacts when you tap the Blue "+" button for sending reports via email, configuring a standard address to send reports, and choosing a Director and DP.
- Photos - MovieSlate can use the built-in camera to create an Image Note. If you have the enabled the Save to Photos setting in MovieSlate’s Settings > Shot Log History then MovieSlate will save a full size version of the Photo Note to the Photos app.
- Microphone and wired microphone input - are used by MovieSlate to record Audio Notes. MovieSlate's optional Timecode Sync feature uses wired microphone input to sync timecode from cameras, sound recorders, and other external LTC timecode sources. The microphone is used to detect the sound of external clapper sticks closing from iPad cases like the ikan T-Slate.
Privacy Policy
The personal information you enter into MovieSlate is used only to create your History Reports, and is not sent to any servers, except as part of the email you send to others. Your personal information is stored locally on your iOS device, and on your computer (when you sync your iOS device with iTunes), and no place else.
When you enable MovieSlate’s Settings > Shot Log History > Find & Save Locations, the MovieSlate app uses your iOS device’s radios to obtain the current location coordinates (latitude and longitude). In order to obtain the nearest street address, those geographical coordinates are then sent to our internet servers— along with your iOS device’s model number, iOS system version, and a unique ID (that we make up) to send the location coordinates and address data back to your device. No personal information or iOS device “UDID” codes are collected or sent to our servers. We use this information to understand which iOS system versions and devices our software is being used with. This also helps us diagnose and narrow down any bugs you are reporting.
When you send us an email, we keep the contents of the email and your email address confidential. In fact, all collected data is confidential. The support information we receive is used to improve the quality of our software— and is not shared with other organizations for commercial or other purposes.
Credits, Thanks, Disclaimers
ROLL CREDITS...

MovieSlate was written by Cliff Joyce, with contributions from Eric Goodwin. MovieSlate is © Copyright 2009-2020 PureBlend Corporation. All rights reserved. MovieSlate® and MovieSlate® are registered trademarks of PureBlend Corporation. MovieSlate Cloud is a trademark of PureBlend Corporation.
THANKS!
Thanks to Eric Goodwin for his many contributions, dedicated testing, and friendship.
Thanks to Joe Foglia for all his help, advice, and encouragement.
Thanks to our incredible team of beta testers who took time from their busy production schedules to provide us with valuable testing and feedback!
Thanks to Timecode Systems for helping us access their TCS Hubs.
Thanks to Denecke for collaborating on our timecode syncing engines and the Denecke TS-TCB.
Thanks to ARRI for their help with the Alexa Camera Control feature.
Thanks to Adobe for use of their Creative Cloud image editor.
Thanks to Pomfort for use of their external clapper detection software.
Thanks to Karl Stenerud for ObjectAL.
Thanks to Mugunth Kumar for MKStoreKit.
Thanks to Ryota Hayashi for HRColorPicker.
Thanks to Jason Berube and Ron Dexter for their focus charts.
Thanks to Clément Wehrung for NDHTMLtoPDF.
Thanks to Font Squirrel for the CartoGothicStd font.
THE FINE PRINT
Denecke® and the Father Time logo are trademarks of Denecke, Inc.
Timecode Buddy™, TCBuddy™, :buddy master™, :pulse™, :wave™ are trademarks of Timecode Systems Ltd.
Final Cut Pro® is a registered trademark of Apple, Inc.
Media Composer® is a registered trademark of Avid.
Creative Cloud®, Prelude™, Premiere®, and Adobe® are trademarks of Adobe.
Teradek, Teradek Cube, and Teradek Clip are trademarks of Teradek, LLC.
Alexa® is a registered trademark of ARRI, Inc.
REDLink® Scarlet®, Epic®, and RedCineX® are registered trademarks of RED Digital Cinema.
Portions of the external clap detection software are Copyright © 2011 Pomfort GmbH.
S7RatingView is © Copyright 2009 7touch Group, Inc. All rights reserved.
ObjectAL is © Copyright 2010 Karl Stenerud. Licensed under the Apache License, Version 2.0 (the "License"); you may not use this file except in compliance with the License. You may obtain a copy of the License at this
URL. Unless required by applicable law or agreed to in writing, software distributed under the License is distributed on an "AS IS" BASIS, WITHOUT WARRANTIES OR CONDITIONS OF ANY KIND, either express or implied. See the License for the specific language governing permissions and limitations under the License.
DISCLAIMER OF WARRANTY. THE MOVIESLATE APP IS LICENSED “AS-IS”, WITH NO WARRANTIES, AND YOU ACKNOWLEDGE THAT YOUR USE OF THE APP IS AT YOUR SOLE RISK. YOU BEAR ALL RISK OF USING IT. WE GIVE NO EXPRESS WARRANTIES OR GUARANTEES REGARDING THE APP OR ANY RELATED PRODUCTS, SERVICES, OR TECHNOLOGIES. WE DISCLAIM ALL WARRANTIES OF ANY KIND, INCLUDING BUT NOT LIMITED TO ALL IMPLIED WARRANTIES OF MERCHANTABILITY, FITNESS FOR A PARTICULAR PURPOSE, AND NON-INFRINGEMENT.
LIMITATION OF REMEDIES AND DAMAGES. THE MAXIMUM YOU MAY RECOVER FROM US AND OUR SUPPLIERS FOR DIRECT DAMAGES IS U.S. $0.01. YOU CANNOT RECOVER ANY OTHER DAMAGES, INCLUDING CONSEQUENTIAL, LOST PROFITS, SPECIAL, INDIRECT, PUNITIVE, OR INCIDENTAL DAMAGES. YOU ALSO CANNOT RECOVER FOR ANY LOSS OF DATA, PRIVACY, CONFIDENTIALITY, OR PROFITS; OR ANY INABILITY TO USE THE APP. THIS LIMITATION APPLIES TO: (A) ANYTHING RELATED TO THE APP, SERVICES, CONTENT (INCLUDING CODE) ON THIRD PARTY INTERNET SITES, OR THIRD PARTY PROGRAMS; AND (B) CLAIMS FOR BREACH OF CONTRACT; BREACH OF WARRANTY, GUARANTEE, OR CONDITION; STRICT LIABILITY, NEGLIGENCE, OR OTHER TORT, TO THE EXTENT PERMITTED BY APPLICABLE LAW. IT APPLIES EVEN IF WE KNEW OR SHOULD HAVE KNOWN ABOUT THE POSSIBILITY OF THE DAMAGES.